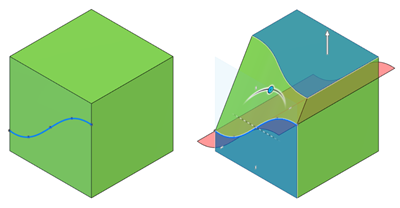
Create a draft
Learn how to use the Draft tool to apply a fixed or parting line draft angle to rotate faces on a solid body in Fusion.

In the Design workspace, Solid tab, select Modify > Draft.
The Draft dialog displays.
In the dialog, select the draft Type:
- Fixed Plane: Creates draft from a fixed plane.
- Parting Line: Creates draft along a parting line.
Select a plane or face to define the Pull Direction.
To flip the pull direction, click the pull direction manipulator in the canvas.
Select the faces to draft.
For the Fixed Plane draft type, select Draft Sides:
- One Side: Apply draft to one side.
- Two Side: Apply draft to two sides at different angles.
- Symmetric: Apply draft to two sides at the same angle.
For the Parting Line draft type, select a plane, face, edge, or sketch curve on the solid body to use as the Parting Tool.
For the Parting Line draft type, select the Parting Line Type, and adjust the associated settings:
- Fix Parting Line: Fixes the parting line in place.
- Select Draft Sides:
- One Side: Apply draft to one side.
- Two Side: Apply draft to two sides at different angles.
- Symmetric: Apply draft to two sides at the same angle.
- Select Draft Sides:
- Move Parting Line: Moves the parting line to apply draft.
- Select Direction:
- Angle Above: Maintain angle above parting line.
- Angle Below: Maintain angle below parting line.
- Both: Maintain angle on both sides of parting line.
- Fixed Edges: Select edges to prevent deformation when parting line moves.
- Select Direction:
- Fix Parting Line: Fixes the parting line in place.
Adjust the Angle of the draft:
Use the angle manipulator handle in the canvas, or enter an exact value.
Click OK.
The draft angle displays on the solid body in the canvas.
Tips
- Hold
Ctrl(Windows) orCommand(MacOS) to modify the selection set once the chamfer tool preview displays on the body in the canvas. - You can uncheck Tangent Chain if you do not want to include tangentially connected geometry when you select faces.