Insert a fastener

Learn how to use the Insert Fastener tool to insert a desired fastener to your design in Parametric Modeling mode in Fusion.

Important:

There is a difference in how fasteners are stored and handled based on when any hub member inserted a fastener to any design in the hub using the Insert Fastener tool for the first time.

Before May 14, 2024

If you are a part of a hub where fasteners were inserted to any design in the hub before May 14, 2024, they are stored in the Fasteners project. Only the project owner or a Fusion hub Administrator can grant you access to it. Contact them if you need access. See the How to use the fastener library with multi-user Fusion hub help topic for more information. If you are using a legacy single-user storage account, transfer it to a Fusion hub to access this feature.

You can upgrade the Fasteners project to the Standard Components project which is accessible to anyone in the hub. Learn more on how to upgrade projects.

After May 14, 2024

If you are a part of a hub where fasteners were inserted to any design in the hub for the first time after May 14, 2024, they are stored in the Fasteners folder in the Standard Components project in the Libraries section of the Data Panel. There is only one Standard Components project in a hub and it is automatically created when any user inserts a fastener to any design in the hub using the Insert Fastener tool. The Standard Components project is accessible to anyone in the hub.

Insert a fastener

  1. On the Design workspace toolbar, click Solid > Insert > Insert Fastener insert fastener icon.

    The Insert Fastener dialog displays.

  2. In the dialog, search, filter and browse to find your desired fastener.

  3. Click the fastener you want to insert to select it.

  4. In the canvas, select existing geometry (a circular edge, a cylindrical face, a sketch point, for countersunk fasteners select the circular edge of the conical face), or an existing fastener to position a fastener. If you select a cylindrical face, the Secondary Geometry option enables you to select a planar face.

    Example of selecting multiple geometry when placing a fastener:

    select fastener

  5. The size of the fastener is automatically selected based on the selected geometry. You can select a specific size from the dropdown list or drag the manipulator in the canvas to adjust.

  6. In the canvas, use the manipulators or select the Nominal Length value from the drop-down list.

  7. Optional: Specify Material and Finish of the fastener.

  8. Optional: Specify Part Number and Description.

  9. Click OK.

A fastener is inserted to your design. It is stored in the newly created Fasteners folder in the Browser. Fasteners and their joints are displayed in the Timeline. Note that when you insert multiple fasteners at once, only one fastener group is added to the Timeline. Deleting that group deletes all fasteners from that group. To delete individual fasteners, expand the group in the Timeline and delete from there, or locate them in the Browser and delete from the Browser.

Insert multiple fasteners in one session

Learn how to insert multiple fasteners of various types (bolts, nuts, washers) without closing the Insert Fastener panel.

  1. On the Design workspace toolbar, click Solid > Insert > Insert Fastener insert fastener icon.

    The Insert Fastener dialog displays.

  2. Use steps 2 - 9 from the workflow above to find, position and specify the fastener.

  3. In the dialog, click Create and continue button, or in the canvas click the green check mark.
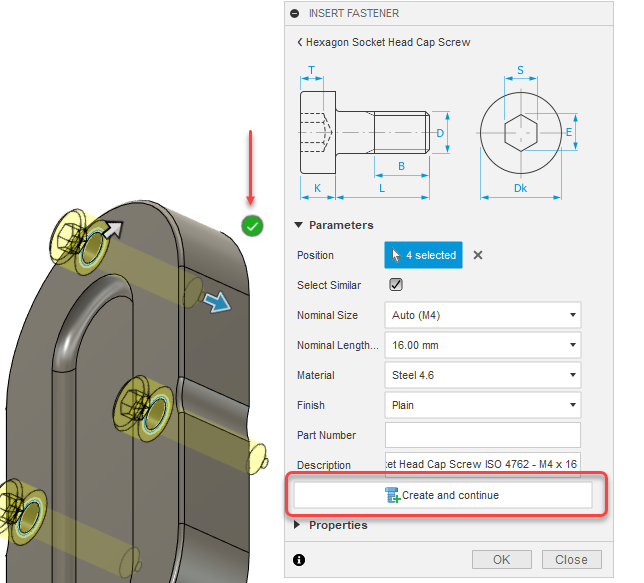
    select fastener

  4. Use the Back button to locate additional fasteners or edit the existing fastener.
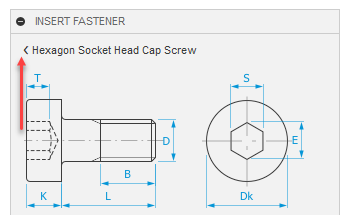
    select fastener

  5. Continue placing the desired fasteners. Once you are done placing all fasteners, click OK to close the dialog.

Selected fasteners are inserted to your design. Note that when you insert multiple fasteners at once, only one fastener group is added to the Timeline. Deleting that group deletes all fasteners from that group. To delete individual fasteners, expand the group in the Timeline and delete from there, or locate them in the Browser and delete from the Browser.

Insert similar fastener

Learn how to insert similar fastener to your design in Fusion. For example, you want to use the same bolt in the design but select other geometry.

  1. In the Fasteners Browser folder, locate the desired fastener, right-click, and select Insert Similar Fastener.

    The Insert Similar Fastener dialog displays.

  2. Adjust the parameters such as size, length, material, or surface finish.

  3. Or, use the Back button to locate another fastener, and adjust its parameters.

  4. In the canvas, select existing geometry (a circular edge, a cylindrical face, a sketch point), or an existing fastener to position a fastener.

  5. Click OK.

A fastener is inserted to your design.

Edit a fastener

Learn how to edit a fastener in your design in Fusion.

Note: If you want to edit multiple fasteners at once they need to be identical.
  1. In the Fasteners Browser folder, locate the desired fastener, right-click, and select Edit Fastener.

    The Edit Fastener dialog displays.

  2. Adjust the parameters such as size, length, material, or surface finish.

  3. Click OK.

The fastener is updated in the design.

Replace a fastener

Learn how to replace a fastener in your design in Fusion.

  1. Activate the Replace Fastener tool in one of the three following ways:

    • in the Fasteners Browser folder, locate the desired fastener, right-click, and select Replace Fastener.
    • in the Timeline, locate the desired fastener, right-click, and select Replace Fastener.
    • in the canvas double-click the fastener, right-click, and select Replace Fastener.

    The Replace Fastener dialog displays.

  2. In the dialog, search, filter and browse to find your new desired fastener.

  3. Click the new fastener to select it.

  4. Optionally, adjust the parameters such as size, length, material, or surface finish.

  5. Click OK.

The fastener is replaced in the design.

Remove a fastener

Learn how to remove a fastener from your design in Fusion.

  1. In the Fasteners Browser folder, locate the desired fastener, right-click, and select Remove Fastener.

    • in the canvas double-click the fastener, right-click, and select Delete.
    • locate the fastener in the Fasteners Browser folder, right-click, and select Delete
    • in the Timeline, right-click the fastener or expand a fastener group to locate the fastener, and click Delete

The fastener is removed from the design.

Tips