Create a lip and groove
Learn how to use the Lip tool to create a lip, groove, or combined feature on one or two solid bodies in Fusion.
This feature is part of an extension. Extensions are a flexible way to access additional capabilities in Fusion. Learn more.
On the Design toolbar, select Plastic > Create >
 Lip.
Lip.The Lip dialog displays.
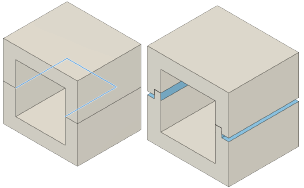
In the canvas, select one or more tangent edges on a solid body to define the path for the lip or groove.
Select a Type:
 Lip: Creates a raised lip feature on a solid body.
 Groove: Creates a recessed groove feature on a solid body.
- Lip And Groove: Creates a lip feature with a lip and groove on a pair of solid bodies.
Optional: Adjust the Visibility of the bodies you are working with.
 Side 1 Transparency: Reduces the opacity of the side 1 body while you edit the feature.
 Side 2 Transparency: Reduces the opacity of the side 2 body while you edit the feature.
Choose a Guide Type then select it's corresponding guide geometry.
 Face Guide: Select a face on either side of the selected edge to locate the feature.
 Pull Direction: Select a plane or face to define the pull direction.
A preview of the lip, groove, or lip and groove feature displays in the canvas.
Optional:
 Flip the feature to the other body.
Optional: Define one or two Extents and choose a result:
- Select one or two points, vertexes, faces, or planes to extend to.
- Then choose an Extent Result from the possible outcomes based on the extents that you select.
Optional: On the
 Advanced tab, adjust the feature dimensions.
Click OK.
The lip, groove, or lip and groove feature displays on the solid body in the canvas.
Tips
- Assign a Plastic Rule before creating a Lip feature.
- Select the inside edge to place your lip feature to place the reveal on the outside of your design.
- To create a lip and groove together, ensure the two bodies are touching so the edges line up and the faces are normal to each other. For example, a box that you Shell and then Split Body.
- For Lip And Groove type, the groove dimensions are automatically determined by the lip dimensions and clearance.
- For Pull Direction, ensure the edges are tangent continuous.