Loft a solid body
Learn how to use the Loft tool to create a solid body in Fusion.
On the toolbar, click Solid > Create > Loft
 .
.The Loft dialog displays.
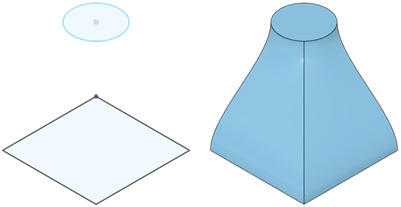
In the canvas, select two or more Profiles to loft.
In the dialog, select an end condition or continuity for the first and last profiles:
- Connected
- Direction
- Connected (G0)
- Tangent (G1)
- Curvature (G2)
If the first or last profile shares a connected face, and continuity is set to Tangent (G1) or Curvature (G2), adjust its edge alignment:
- Free Edges
- Align Edges
- Align To Surface
Select a Guide Type:
- Rails
- Centerline
In the canvas, select the rails or centerline.
Select an option for Tangent Edges:
- Merge: Merges edges of tangent faces into a single face.
- Keep: Maintains edges between adjacent tangent faces.
Select an Operation, and adjust its associated settings:
 Join: Combines the new body with an existing body.
 Cut: Removes an area from an existing body.
- Objects to Cut: Check or uncheck objects to cut.
 Intersect: Creates a body at the intersection of an existing body and the new body.
- Objects to Cut: Check or uncheck objects to cut.
 New Body: Creates a new body in the active component.
 New Component: Creates a new body in a new component. (Hybrid Design type only)
Optional: On the Analysis tab, select an Analysis Type to analyze the previewed result in context:
- None: Displays no analysis.
- Zebra: Displays alternating black and white stripes on a body to help you analyze surface curvature.
- Curvature Map: Displays a color gradient on a body to help you analyze areas of high and low surface curvature.
- Isocurve Analysis: Applies UV mapping and curvature combs to help you analyze the quality of the surface curvature.
Click OK.
The lofted solid body displays in the canvas.
Tips
Use Tangent Chain to dynamically control selection sets.
To create a closed loop Loft, check Closed to connect the first and last profiles to each other.
Add rails to gain additional control over the shape of the lofted body.
Select labels in the canvas to change settings for individual profiles, rails, or centerlines.