Create a 3D section view
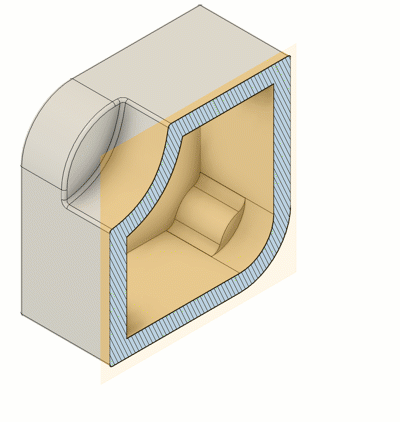
Learn how to use Section Analysis to create a view that cuts through all visible objects in a design to reveal interior details and obscured features in a Fusion design.
Create a section analysis
On the toolbar, select Inspect > Section Analysis
 .
.The Section Analysis dialog displays.
In the canvas, select a planar object to define the Cut Plane.
Adjust the Distance and Angle manipulator handles to orient the cutting plane, or enter specific values.
Optional: Click
 Flip to switch which side to reveal.
Optional: Adjust the Section Color:
- From Component: Uses the color of each component to shade the cutting plane.
- Custom: Uses a color that you select to shade the cutting plane.
- Custom Color: Click the color swatch, then select a color or enter a specific RGB value.
Optional: Uncheck Show Hatch to hide the diagonal hatch pattern that displays on the faces where the cut plane creates the section analysis.
Click OK.
In the Browser, the Section Analysis result displays in the Analysis folder. The section analysis affects all of the components it cuts through while it is visible.
Show or hide a section analysis
- In the Browser, expand the Analysis folder.
- Click the visibility icon next to the section analysis you want to show or hide.
 Visibility is on.
 Visibility is off.
The section analysis is shown or hidden in the canvas.
Edit a section analysis
- In the Browser, expand the Analysis folder.
- Right-click the section analysis, then click Edit.
- In the dialog, adjust the selection set and settings.
- Click OK.
Delete a section analysis
- In the Browser, expand the Analysis folder.
- Right-click the section analysis, then click Delete.
The section analysis is deleted from the Browser and no longer affects the components in the canvas.
Tips
Use a section analysis to reveal the interior details of a design.
Create multiple section analyses, then adjust their visibility in the Browser to switch between them.
The Section Color option is set to From Component by default and displays the section view color coded by component. Set it to Custom to switch the entire section view to a single color that you specify.
Use Flip to flip the section view over the cut plane.