Create a snap fit
Learn how to use the Snap Fit tool to create a cantilever snap fit feature to fasten two solid bodies together in a design in Fusion.
This feature is part of an extension. Extensions are a flexible way to access additional capabilities in Fusion. Learn more.
Create a snap fit with a parallel hook and groove
Create a snap fit feature with a hook and a groove, parallel to a face, to connect a pair of solid bodies.
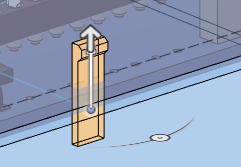
On the toolbar, select Plastic > Create > Snap Fit
 .
.The Snap Fit dialog displays.
In the dialog, select the Visibility:
- Side 1 Transparency: Reduces the opacity of the Side 1 body.
- Side 2 Transparency: Reduces the opacity of the Side 2 body.
- Section Analysis: Cuts a section through the center of the snap fit feature while you edit.
In the dialog, select the Parallel Hook And Groove snap fit Type.
In the canvas, select Sketch Points to position the hook side of each snap fit feature.
A preview of each snap fit feature you place displays in the canvas.
Optional: Flip the snap fit feature over the selected sketch point.
Select a Rotation Type and adjust its associated settings:
- Uniform: Rotates all snap fits to the same angle around their sketch points.
- Rotation Angle: Drag the manipulator handle to rotate the snap fit around the sketch point, or specify an exact value.
- Independent: Rotates each snap fit independently around its own sketch point.
- Rotation Angle: Drag each manipulator handle in the canvas, or specify an exact value.
- Aligned: Align all snap fits to planar, linear, or point geometry that you select.
- Alignment Object: Select a plane, line, or point to align snap fits.
- Flip: Click to flip the alignment of snap fits 180 degrees relative to the alignment object.
- Uniform: Rotates all snap fits to the same angle around their sketch points.
Select an Extent Type and adjust its associated settings:
- To Next: Extrudes the bottom of the hook from the sketch plane to the nearest faces on a solid body.
- Base Fillet Radius: Specify the radius value for the fillet at the base of the hook.
- Distance: Extrudes the bottom of the hook from the sketch plane to a specified depth.
- Depth: Specify the distance to extrude.
- To Next: Extrudes the bottom of the hook from the sketch plane to the nearest faces on a solid body.
In the Hook section, select a Body for the hook.
Specify values to adjust the dimensions of the hook.
In the Groove section, check Groove to create the groove side of the snap fit feature.
Specify values to adjust the dimensions of the groove.
Click OK.
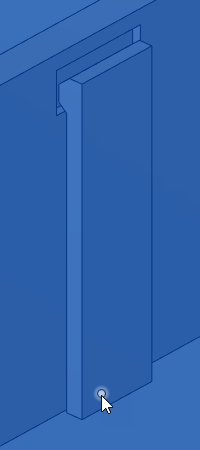
The snap fit feature is created and displays on the solid body in the canvas.
Create a snap fit with a perpendicular hook and groove
Create a snap fit feature with a hook and a groove, perpendicular to a face, to connect a pair of solid bodies.
- In the dialog, select the Perpendicular Hook And Groove snap fit Type.
- In the canvas, select Sketch Points to position the hook side of each snap fit feature.
- Optional: Flip the snap fit feature over the selected sketch point.
- Select a Rotation Type and adjust its associated settings:
- Uniform
- Rotation Angle
- Independent
- Rotation Angle
- Aligned
- Alignment Object
- Flip
- Uniform
- Specify the Base Fillet Radius value for the fillet at the base of the hook.
- In the Hook section, select a Body for the hook.
- Specify values to adjust the dimensions of the hook.
- In the Hook Undercut section, check Groove to create the groove side of the snap fit feature.
- Select a Body for the groove.
- Specify values to adjust the dimensions of the groove.
- Click OK.
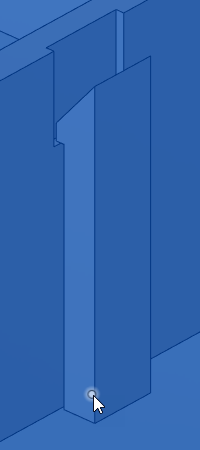
The snap fit feature is created and displays on the solid body in the canvas.
Create a snap fit with a hook and loop
Create a snap fit feature with a hook and a loop to connect a pair of solid bodies.
- In the dialog, select the Hook And Loop snap fit Type.
- In the canvas, select Sketch Points to position the loop side of each snap fit feature.
- Optional: Flip the snap fit feature over the selected sketch point.
- Select a Rotation Type and adjust its associated settings:
- Uniform
- Rotation Angle
- Independent
- Rotation Angle
- Aligned
- Alignment Object
- Flip
- Uniform
- Select an Extent Type and adjust its associated settings:
- To Next
- Base Fillet Radius
- Distance
- Depth
- To Next
- In the Loop section, select a Body for the loop.
- Specify values to adjust the dimensions of the loop.
- In the Hook section, check Hook to create the hook side of the snap fit feature.
- Select a Body for the hook.
- Specify values to adjust the dimensions of the hook.
- Click OK.
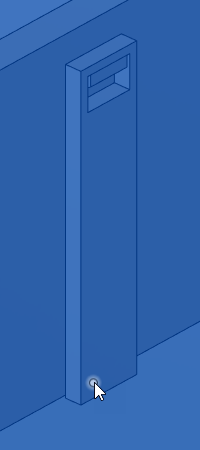
The snap fit feature is created and displays on the solid body in the canvas.
Tips
- Assign a plastic rule to the components that contain the bodies if you want the snap fit feature to inherit some of its dimensions from the plastic rule.
- Create a sketch on a parting plane between two bodies and place a point to locate each snap fit feature.
- You can leave the sketch points unconstrained and drag them on the sketch plane to adjust the position of each snap fit, or constrain or dimension them in the sketch to define precise locations.
- Clear the selection set to adjust the Selection Mode:
- Select Automatic to automatically select all visible sketch points.
- Select Manual to manually select each sketch point.