Basics of T-splines
Tutorial: Create a T-spline shape
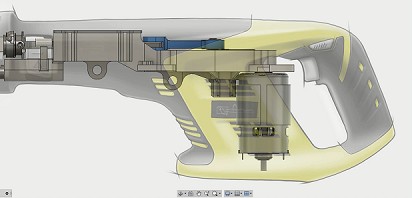
T-splines allow you to sculpt shapes for conceptual designs. In this tutorial, you use T-splines to create the housing for a reciprocating saw. You begin with a concept sketch of the saw, and create T-spline primitives for the basic structure.
Attach a concept sketch
To create the reciprocating saw, use a concept sketch as a guide for positioning and shaping the T-spline.
The Attached Canvas command inserts the sketch. The concept sketch is small when you first attach it, so you need to scale and move it to a useful size and position.
Open the project
If the Data Panel is not open, click Show Data Panel
 .
.In the Data Panel, open 1_Sculpting Basics Start from Samples > Workshops & Events > Adoption Path > Conceptual Design > 1_Sculpt Basics.
Insert the concept sketch
Choose Insert > Attached Canvas.
Click the XY workplane.
The image will attach to this workplane.
Click Select Image, and then select the file to use as the concept sketch (the attached canvas).
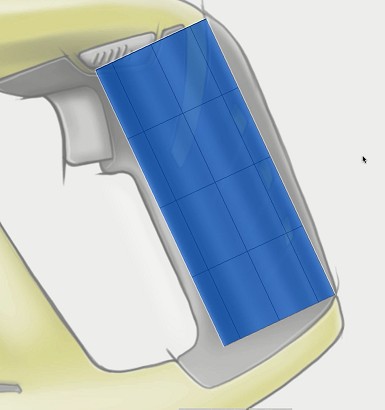
Note: You must upload an external image. The Attached Canvas command cannot use images already in the Data Panel. You can find the concept sketch for this video in the downloads.To scale and move the concept sketch, drag the manipulators. When you are done, the sketch position and size should resemble this image:

To allow the model to show behind the concept sketch, set Canvas Opacity to 50, making the image semitransparent.
To allow the concept sketch to show through 3D objects in front of the image, select Display Through. The following image shows the concept sketch with opacity set to 50 and Display Through on.
Click OK.
Fusion places the concept sketch in the Canvases folder. If no Canvases folder exists, Fusion creates one.
Calibrate the concept sketch dimensions
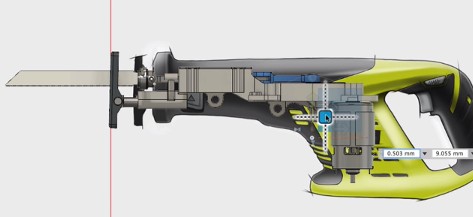
To ensure that the sketch dimensions change proportionally when the model changes, right-click the sketch in the Canvases folder and choose Calibrate.
Click the dimension that you want to calibrate to.
Next, you add a T-spline cylinder that you use as the beginning of the reciprocating saw handle.
Create a T-spline primitive
Insert a primitive T-spline that approximates the handle of the reciprocating saw. To shape the handle of the reciprocating saw, you can use one of two approaches:
Insert a primitive T-spline cylinder and sculpt it.
Start with a 2D sketch profile that you extrude, revolve, sweep, or loft. Then you adjust the shape and add or subtract faces to match the concept sketch.
In this tutorial, you use the first approach: inserting and shaping a T-spline cylinder.
To enter the Sculpt workspace, choose Create > Create Form. You must be in the Sculpt workspace to create and edit T-splines.
Choose Create > Cylinder.
Click a workplane to create the geometry on, and click to set the origin point of the cylinder.
In the Cylinder dialog, do the following:
Set Diameter to 40 mm and Height to 100 mm.
Set Diameter Faces to 8 and Height Faces to 4.
When you are done, the cylinder should resemble this image:
Align the T-spline to the handle
After you create the T-spline cylinder, use the Edit Form tool to align the cylinder with the handle in the concept sketch.
The Edit Form tool can translate, rotate, and scale faces, edges, or vertices in the Sculpt workspace. You can manipulate single elements or groups of elements. For example, here are some ways that you can manipulate a primitive cylinder. (You won't use them all in this tutorial.)
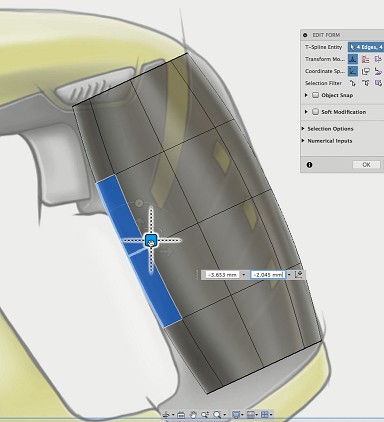
Choose Modify > Edit Form.
Drag the manipulators to move the cylinder to the location of the handle and rotate it. When you are done, the cylinder aligns with the handle in the concept sketch.
Select faces, edges, and vertices, and drag the manipulators to match the T-spline shape to the concept sketch.
In the Sculpt workspace, double-clicking an edge selects the entire loop. The final cylinder position and shape should resemble this image:
You just added a T-spline cylinder and gave it an approximate position and shape for the handle. In the next tutorial, you refine the handle.