Add internal circular symmetry to a T-Spline body
Learn how to use the Circular - Internal tool to add internal circular symmetry within a T-Spline body in Fusion.
- In the Design workspace, Form contextual environment, select Symmetry > Mirror - Internal
 .
. - Select two faces on the T-Spline body.
- Select one of the Possible symmetries from the dropdown list.
- Click OK.
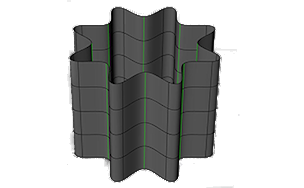
Green symmetry lines display on the T-Spline body in the canvas. When you modify geometry in one radial section of the T-Spline body, the geometry in the other radial sections update to match.

Tip: If symmetry could not be detected from the selected faces, continue to pick symmetrical edges and points on either side of the desired symmetry plane.
Note: You can also add symmetry in the dialog as you create a T-Spline primitive (box, sphere, quadball, etc.).
Remove symmetry from a T-Spline body
Select a body and select Symmetry > Clear Symmetry.
Tips
- A single body can have multiple mirror symmetries applied.
- Use circular symmetry to create designs with uniformly spaced features such as a showerhead.