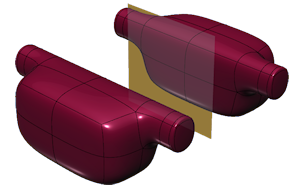
Duplicate a T-Spline body across a plane
Learn how to use the Mirror - Duplicate tool to create a duplicate T-Spline body mirrored across a plane in Fusion.

Add mirror symmetry between two T-Spline surfaces
In the Design workspace, Form contextual environment, select Symmetry > Mirror - Duplicate
 .
.The Mirror - Duplicate dialog displays.
Select a T-Spline body.
Select a symmetry plane.
Click OK.
A duplicate body displays in the canvas, symmetrical to the original, mirrored across the symmetry plane. Any changes you make to one copy are reflected in the other copy.
Add mirror symmetry to a T-Spline body by duplicating one half
- Use the ViewCube to display a side view of the body.
- Select the portion of the model that you wish to replace with a mirrored copy. Delete it, and click Home on the ViewCube.
- Select Construct > Plane Through Three Points.
- Select three T-Spline points at the new opening to create the plane.
- Select Symmetry > Mirror - Duplicate.
- Select the body and the plane, then select OK.
Tip: In the dialog, make sure Weld is selected to weld the two halves into a single body.
Remove symmetry from a T-Spline body
Select a body and select Symmetry > Clear Symmetry.
Tips
- Faces are welded together if they are within the weld tolerance.
- Use Clear Symmetry to remove the link between surfaces.