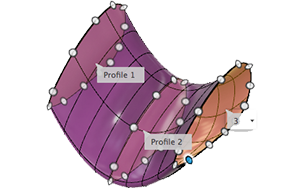
Loft a T-Spline body through multiple profiles
Learn how to use the Loft tool to create a smooth T-Spline body that transitions between two or more sketch profiles or faces in Fusion.

In the Design workspace, Form contextual environment, select Create > Loft
 .
.The Loft dialog displays.
In the canvas, select two or more Profiles to loft.
In the Loft dialog, select an end condition or continuity for the first and last profiles:
- Connected
- Direction
Select a Guide Type:
- Rails
- Centerline
In the canvas, select the rails or centerline.
Select an option for Tangent Edges:
- Merge: Merges edges of tangent faces into a single face.
- Keep: Maintains edges between adjacent tangent faces.
To adjust how Fusion positions the faces, in the Length Spacing and Width Spacing drop-downs, select one of the following:
- Uniform. Sets the spacing evenly along the curve.
- Curvature. Creates more faces where the curve is tightest.
Select an Operation, and adjust its associated settings:
 New Body: Creates a new body in the active component.
Click OK.
The lofted T-Spline body displays in the canvas.
Tips
- By default the loft will always create straight transitional surfaces between profiles. To control the direction of the surface between the profiles you can add a sketch curve to use as a centerline.
- If the T-Spline surface is not matching well to the profiles, you can increase the number of faces to improve the match.