Use flat pattern in sheet metal
You can create a flat pattern from a sheet metal model and display the correct flat pattern.
Create a flat pattern from a sheet metal model
With a single body sheet metal body open, on the Sheet Metal tab, select Create > Create Flat Pattern
 .
.Select the stationary face from which all flanges are unfolded.
Click OK. The flat pattern is created, and displays.
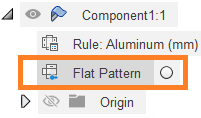
A Flat Pattern node is created in the Browser.

To return to the folded model, click Finish Flat Pattern
 .
.
Switch between folded pattern and flat pattern
In the Browser, click the Activate Flat Pattern radio button.

Update an out-of-date flat pattern
If a flat pattern is out-of-date with the current sheet metal geometry, it displays as Out-Of-Date ![]() in the Browser.
in the Browser.
To update the flat pattern, simply activate it using the Activate Flat Pattern radio button in the Browser. Or, right-click and select Update Flat Pattern ![]() .
.
To return to the folded model, click Exit Flat in the toolbar.
Delete a flat pattern
In the Browser, hover over the flat pattern node, right-click and select Delete.
Tips
- A folded model must have at least one flat surface for a flat pattern to be generated.