Activity 3: Constrain the pusher block
In this activity you specify the motion of the pusher block. You want the pusher block to push the steel slab into the roller, but you don’t want the pusher block, itself, to hit the roller. Instead, you want the pusher block to push the steel slab far enough into the roller that friction between the slab and the roller can pull the slab completely through.
To ensure the pusher block does not impact the roller, it must stop moving before it reaches the roller. Remember, in Activity 2, that you set the Event Duration to 0.002 s. To ensure the pusher block does not impact the roller, you specify a constant velocity for .0005 s and then ramp the velocity down to zero over the next .0005 s. With this velocity specification the block will come to a stop halfway through the simulation.
In this activity, then, you set fixed structural constraints on 5 degrees of freedom on the pusher block, so it can move only in the X direction. You then prescribe the velocity of the pusher block so that it pushes the steel slab into the roller, but does not touch the roller itself.
To specify the motion of the pusher block you
- Apply a fixed structural constraint to the pusher block in all but the X direction
- Determine the velocity needed on the pusher block
- Apply the prescribed velocity to the pusher block so it moves in the +X direction
- Define the multiplier curve that controls the prescribed translational velocity of the pusher block, so that the pusher block stops before it hits the roller.
Prerequisites
- Activity 2 is complete.
Steps
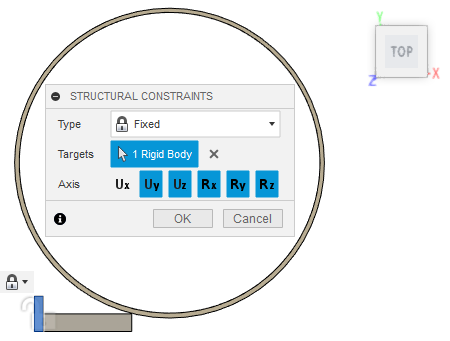
Set structural constraints to fix the pusher block on five degrees of freedom; Uy, Uz, Rx, Ry, and Rz, to prevent it from moving in all but the X direction.
Click
 (Simulation workspace > Setup tab > Constraints panel > Structural Constraints), to open the Structural Constraints dialog.
Confirm the constraint Type is set to Fixed.
Click the pusher block to select it as the Target.
Note: Since it is a rigid body, the entire body is selected when you click any edge or face.Notice that three rotational degrees of freedom (DOF) appear in the Structural Constraints dialog in addition to the usual translational DOF. Elements belonging to rigid bodies support six DOF.
Confirm that the Ux, Uy, Uz, Rx, Ry, and Rz Axis options are all activated, as indicated by blue highlighting, then click on Ux to deselect it.

Click OK to set the constraints and close the dialog.
Determine the velocity you need to apply to the pusher block, given that the tangential speed of the roller is 55000 mm/s and the thickness of the steel block is reduced by 25% as it exits the roller.
- The tangential velocity exiting from under the roller is higher than the velocity of the material entering the process zone because the cross section is reduced by 25%.
- Conservation of mass requires an initial velocity on the pusher block that is 75% of the exit velocity. If you push the slab faster than this, you would be forcing it into the roller faster than the material can be rolled out the far side.
- (75/100) * 55000mm/s = ~ 41000 mm/s
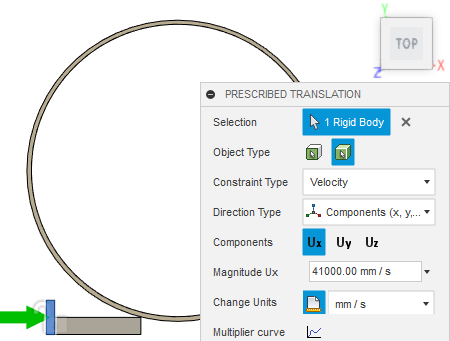
Prescribe a velocity of 41000 mm/s on the pusher block in the +X direction.
Click
 (Simulation workspace > Setup tab > Constraints panel > Prescribed Translation) to open the Prescribed Translation dialog.
Click the pusher block in the canvas to identify it as the Selection.
Note: Because you identified the pusher block as a rigid body, the entire body is selected automatically.Change the Constraint Type to Velocity.
Select the Ux Component to define the direction.
Click
 Change Units and switch the units to mm/s.
Set the Magnitude to 41000 mm/s.
Note: A green arrow appears to indicate the direction of the prescribed velocity.
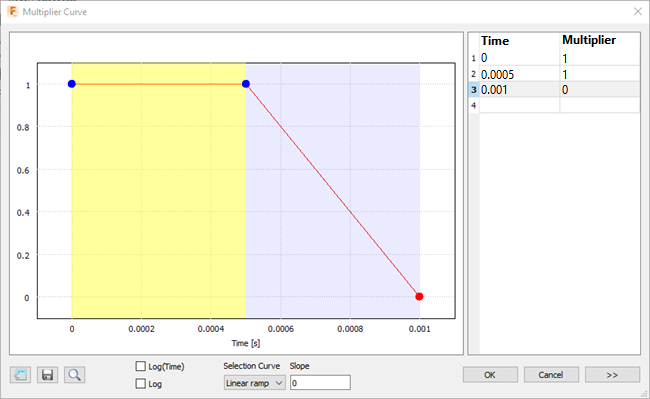
Define the motion of the pusher block, such that it moves at 41000 mm/s for the first 0.0005 s and then ramps down to 0 mm/s over the next 0.0005 s.
In the Prescribed Translation dialog, click
 Multiplier curve to open the Multiplier Curve dialog.
On the right side of the dialog, type 1 as the Multiplier at Time 0 so that the pusher body moves at 41000 mm/s at the start.
On row 2, in the Time column, type 0.0005 and set the Multiplier to 1 again so that the pusher body moves at 41000 mm/s for the first 0.0005 s.
On row 3, in the Time column, type 0.001 and set the Multiplier to 0 so that the pusher body slows down and stops over the next 0.0005 s.

Click OK to accept the curve.
Click OK to apply the prescribed translation and close the dialog.
Activity 3 summary
In this activity, you
- Applied a fixed structural constraint to the pusher block in all but the X direction
- Determined the velocity needed on the pusher block
- Applied a prescribed velocity to the pusher block so it moves in the +X direction
- Defined the multiplier curve that controls the prescribed translational velocity of the pusher block, such that the block stops before hitting the roller.