Activity 2: Specify the rigid bodies and select materials
In this activity, you specify that the roller and the pusher block are Rigid Bodies and select appropriate materials for the analysis. Rigid parts can translate or rotate, but they cannot deform, and no strains or stresses are calculated for them. In this analysis we are only concerned with the strain experienced by the steel metal slab.
Assigning rigid body status to the roller and pusher block reduces their response to 6 degrees of freedom at the center of gravity of each body: 3 spatial translations and 3 rotations. These parts are still meshed with their complete geometry and still participate in contact interactions.
In this activity you
- Select the Fusion Nonlinear Material Library and identify each of the model components in the Study Materials dialog.
- Override the default materials and assign appropriate nonlinear metal plasticity model materials to the steel parts of the model
- Specify that the roller and pusher block are Rigid Bodies to reduce the solution time of the simulation.
Prerequisites
- Activity 1 is complete.
Steps
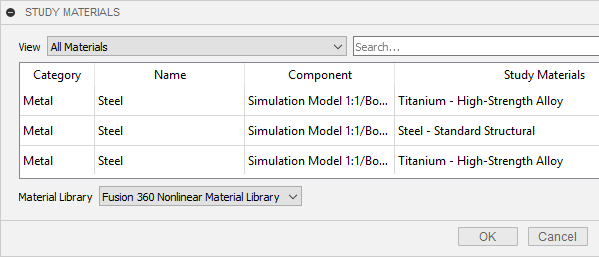
Check which dialog entry represents which model component in the Fusion Nonlinear Material Library, then select Steel - Standard Structural as the material for the steel slab.
Click
 (Simulation workspace > Setup tab > Materials panel > Study Materials) to open the Study Materials dialog.Note: Each body has a default material assigned to it that is linear. Once you have selected the nonlinear material library, you can override these materials and assign appropriate nonlinear materials.
At the bottom of the Study Materials dialog, select Fusion Nonlinear Material Library from the Material Library drop-down menu.
Click in the first row of the Study Materials dialog and confirm that it represents the roller. Repeat the process with the other two rows, and confirm that the second row represents the steel slab, and the third row represents the pusher block.
In the Study Materials column, hover over row two, and click
 Edit to activate the drop-down menu.
Click the down arrow to open the drop-down menu and select Steel - Standard Structural.
Select Titanium - High Strength Alloy for the roller and pusher block.
Note: You are going to make the roller and the pusher block rigid so it really doesn’t matter what material you assign to them, but it is best practice to assign a material whose density similar to the actual material.Click in the first row to select the roller.
Holding down the Ctrl key, click in the third row to select pusher block, too.
Hover over either entry in the Study Materials column and click
 Edit to activate the drop-down menu.
Click the down arrow to open the drop-down menu and select Titanium - High Strength Alloy. Notice that the material in the other row does not change. All selected rows update only when you click OK
Click OK to accept the selection and apply it to both selected rows.

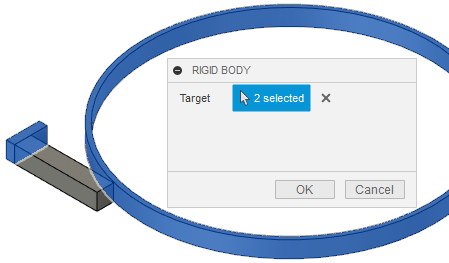
Specify that the roller and pusher block are Rigid Bodies.
Click
 (Simulation workspace > Setup tab > Rigid Bodies panel > Rigid Bodies) to open the Rigid Bodies dialog..
Select both the roller and the pusher block bodies as the Target.

Click OK to accept the selection and close the Rigid Body dialog.
Activity 2 summary
In this activity, you
- Selected the Fusion Nonlinear Material Library and identified each of the model components in the Study Materials dialog.
- Overrode the default materials and assigned Steel - Standard Structural to the steel slab and Titanium - High Strength Alloy to the roller and pusher block
- Specified that the roller and pusher block are Rigid Bodies to reduce the solution time of the simulation.