Activity 2: Review the study setup and run the injection molding simulation
When you create an injection molding simulation study, the study is setup automatically with default settings, and the setup is detailed for you in the Setup Summary dialog that opens. The Setup Summary dialog provides an opportunity to review the settings and change them if you need to. In this activity, you
- Confirm that the mold and melt temperatures are appropriate for the material selected.
- Identify the number and position of the default injection locations, and edit them if necessary.
- Select aesthetic faces that should be free from blemishes
- Check the study is setup properly, then solve the study.

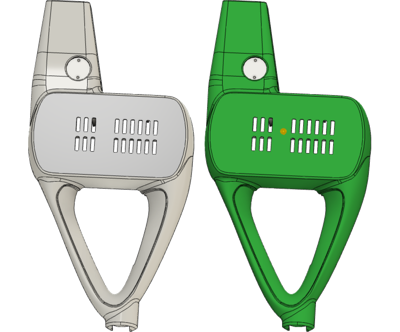
Hedge trimmer model (left) and Hedge trimmer model ready to solve (right).
Prerequisties
- Activity 1 is complete.
Steps
Check the properties of the default material for the study and confirm the melt temperature and mold surface temperature are appropriate for that material.
In the Setup Summary dialog, or on the Simulation toolbar, click Materials to open the Study Materials dialog.
In the Study Materials dialog, above the table of materials, click Generic PP, which is the selected material, to view its properties.
In the left panel of the Study Materials dialog, click Recommended Processing to view the manufacturer's recommended processing temperatures.
Compare the values in the Study Materials dialog with those in the Setup Summary dialog to confirm the setup values are within the recommended range of values.
In the Study Materials dialog, click Cancel to close the materials database.
Note: You may want to take this opportunity to look at other properties of the material, as well as other materials in the database.
Identify the number and position of default injection locations, and edit them if necessary to place them on the top surface of the flat face.
In the Setup Summary dialog, find the entry for Injection Locations, and confirm that one injection location has been placed.
Identify the position of the injection location.
Note: If the location is not immediately apparent, you may need to rotate the model.Note: An injection location on the underside of this model is not ideal from a molding perspective and will need to be moved.If the injection location is on the underside of the model, right-click the injection location glyph, to activate the marking menu, and click Edit Injection Location.
With the Edit Injection Location dialog open, click on the blue circle at the tip of the injection location glyph and move it to the centre of the top face.
In the Edit Injection Location dialog, click OK to accept the change and close the dialog.
Select the outside faces of the Hedge Trimmer model as aesthetic faces.
In the Setup Summary dialog, or on the Simulation toolbar, click Aesthetic Faces to open the Aesthetic Faces dialog.
Confirm that Tangent Chain is selected to ensure all connected faces are selected together.
On the model, select the top surface of the flat face.
Notice that all the faces on the top surface turn blue.
In the Aesthetic Faces dialog, click OK to accept the selection and close the dialog.
Note: Once selected, aesthetic faces appear green on the model.In the Setup Summary dialog, click Close if you don't need it anymore.
Check that the study is setup properly, then run the analysis.
Click
 (Simulation workspace > Setup tab > Solve panel > Pre-check), to open the Pre-check dialog.
Notice that there is a yellow warning icon which indicates that although the study can be solved, some inputs may not be ideal. In this case, we have placed the injection location on an aesthetic face. We will leave it here for the time being and solve the study.
In the Pre-check dialog, click Close once you have reviewed the suggestions.
Click
 (Simulation workspace > Setup tab > Solve panel > Solve), to open the Solve dialog.
Click Solve 1 Study to run the analysis and close the dialog.
*Note: Meshing and solving the analysis can take several minutes.
When the analysis is complete, click Close to close the Job Status dialog.
Activity 2 summary
In this activity, you
- Confirmed that the mold and melt temperatures are appropriate for the material selected.
- Identified the number and position of the default injection locations
- Selected aesthetic faces that should be free from blemishes
- Confirmed the study was set up properly, then solved it.