Activity 1: Sketch the handle
In this activity, you create the handle of the tuning fork, with a rectangle and a circle. The center of the rectangle is located at the sketch origin.
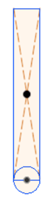
Handle created
Steps
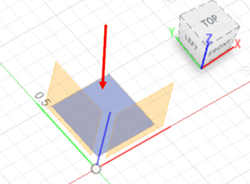
Create a sketch on the XY plane.
- Click Solid > Create > Create Sketch.
- Orbit the model as necessary to be able to click on the XY plane.
Create a rectangle that is centered at the origin of the sketch. The size is not important but try to make it like the shape shown here.
There are three rectangle tools; 2-Point Rectangle, 3-Point Rectangle, and Center Rectangle. The two Point Rectangle defines opposite corners. With this tool, the shape of the rectangle is defined, but we cannot define the exact center of the rectangle during the creation of the rectangle. The 3-Point Rectangle allows us to define a rectangle that is not orthogonal, so the sides are not parallel to the X, and Y-axes. The Center Rectangle first defines the center of the rectangle, then one corner so the exact location of the rectangle is defined. The Center Rectangle is the tool used for this case.
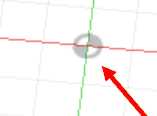
- Identify the origin. The origin is represented by a circle with two quadrants shaded.
- Click Solid > Create > Rectangle > Center Rectangle.
- Click on the origin.
- Drag the mouse to form the rectangle. Click the mouse when you have the size and shape of the rectangle you want.
Create a circle on the bottom of the rectangle that is tangent to both long sides, with its center on the short side.
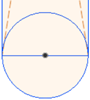
There are five circle tools; Center diameter Circle, 2-Point Circle, 3-Point Circle, 2-Tangent Circle, and 3 Tangent Circle. How the circle is defined is described in the tool's name. For type of circle needed, two tools work, Center diameter Circle and 2-Point Circle. For this activity the 2-Point circle is used.
- Click Solid > Create > Circle > 2-Point Circle.
- Click on the lower left corner of the rectangle, to define the starting point of the circle.
- Click on the lower right corner of the rectangle, to define the end point of the circle.
Activity 1 summary
You created a rectangle and circle to represent the handle. The Center Rectangle was used because the center of the rectangle was defined at the origin. The 2-Point Circle tool was used because it was easy to snap to the corners of the rectangle, making the circle tangent to the long sides of the rectangle.
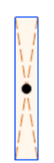
When still in sketch mode, there are gray glyphs that represent different constraints that were created as you created the rectangle and circle. In this tutorial, you will not specifically set any constraints.
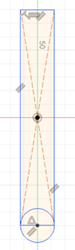
Handle created, shown in sketch mode