Verify that you have ODBC network connectivity by using the "ODBC Data Source Administrator (64-bit)" tool to configure an ODBC Data Source Name (DSN).
The DSN is used to validate the machine has access to the PI server.
For RQTP-based DAS (modern PI servers)
- Run the Windows ODBC Data Source Administrator (64-bit) tool, go to the System DSN tab and select Add to add a temporary system DSN.
- Double-click on the PI SQL Client driver you installed.
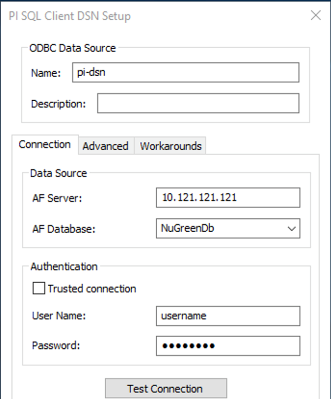
- Enter a name for your DSN.
- On the Connection tab, fill out the following fields:
- AF Server: IP address or hostname of the RQTP-based DAS machine.
- AF Database: Specify the AF database.
- Trusted connection: This is typically unchecked, but this depends on your security setup.
- User Name and Password: These are used for testing the connection but not used by the DSN.

- On the Workarounds tab, we recommend that you check the following boxes:
- Variant as String
- Guid as String
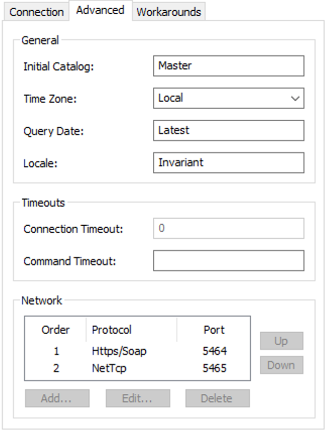
- On the Advanced tab:
- Specify the time zone.
You will also need to specify the time zone when creating a System Connection, and these settings must match.
- Configure the firewall.
PI drivers support two protocols, whose ports and order are configurable. The typical port selection for PI SQL Client drivers is (NetTcp) 5465.

Make sure this port is opened between the PI server(s) and the Info360 Insight Data Connector.
- Specify the time zone.
- Verify connectivity to your database by selecting Test Connection.
Important: We strongly recommend that you create a ReadOnly account with access to only the databases that are needed.
- Once you are connected, save the system DSN.
Next step: Create a System Connection in Info360 Insight.
For OLEDB-based DAS (older PI servers)
- Run the Windows ODBC Data Source Administrator (64-bit) tool, go to the System DSN tab and select Add to add a temporary system DSN.
- Double-click on the PI ODBC driver you installed.
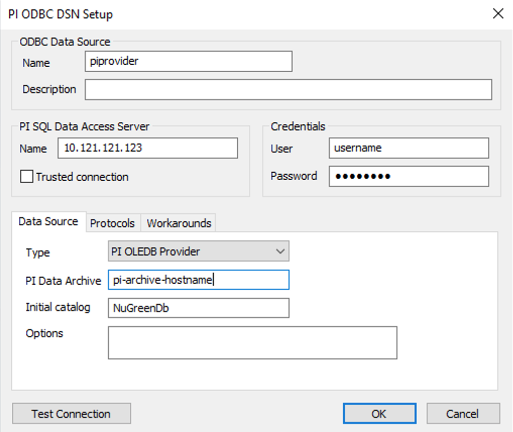
- Enter a name for your DSN.
- Under PI SQL Data Access Server, fill out the following:
- Name: IP address or hostname of the OLEDB-based DAS machine.
- Trusted connection: This is typically unchecked, but this depends on your security setup.

- Under Credentials, fill out the following:
- User and Password: These are used for testing the connection but not used by the DSN.
- Under Data Source, fill out the following:
- Type: PI OLEDB Provider
- PI Data Archive: Enter the hostname of the PI archive (not an IP address)
- Initial Catalog: Default database
- On the Workarounds tab, we recommend that you check the following boxes:
- Variant as String
- Guid as String
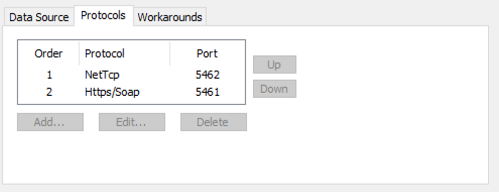
- On the Protocols tab, configure the firewall:
- PI drivers support two protocols, whose ports and order are configurable. The typical port selection for PI ODBC drivers is (NetTcp) 5462.

- Make sure this port is opened between the PI server(s) and the Info360 Insight Data Connector.
- PI drivers support two protocols, whose ports and order are configurable. The typical port selection for PI ODBC drivers is (NetTcp) 5462.
- Verify connectivity to your database by selecting Test Connection.
Important: We strongly recommend that you create a ReadOnly account with access to only the databases that are needed.
- Once you are connected, save the system DSN.
Next step: Create a System Connection in Info360 Insight.