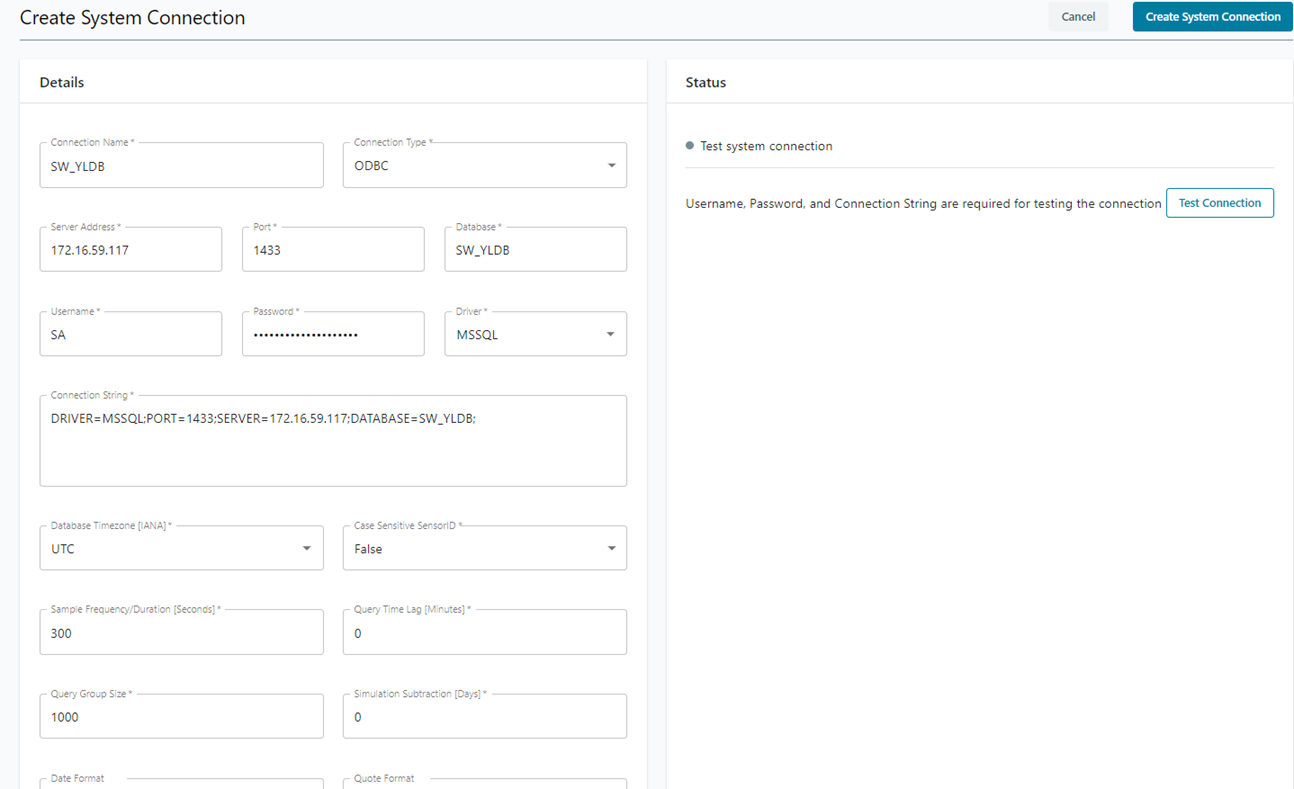
Configure your database connection in Admin  System Connections.
Create a new system connection
- Go to Admin
 System Connections and click New Connection.
- Add your database details and credentials. See below for guidance on completing the fields.
- Click Test Connection.
Note: You must have ODBC network connectivity in order to test the connection. The Test Connection button remotely triggers the Info360 Insight Data Connector to issue a test query against your historian/database using the details and credentials you entered, and reports a success or failure.
- Once the connection is established, click Create System Connection in the top-right corner.

When filling out the connection details, bear in mind the following:
- Connection Name: The Connection Name will be referenced by the Sensor Configuration pages via the Data Source field. It can also be referenced during the Bulk Sensor Creation process (the CSV file supports a column called “Data Source Name”). We recommend that you create the system connection before running the Bulk Sensor Creation process as the Data Source Name cannot be applied retroactively to a CSV ingest.
- Server Address: Note that MS SQL named instances are not supported. MS SQL named instances include a path-like specifier (for example, 10.121.100.100\instance_name) rather than a simple numeric IP address or a hostname. If your server uses named instances, please use a DSN instead. See Verify MS SQL ODBC Connection for information on using a DSN.
- Driver: You can choose from the options in the drop-down menu or type in a registered driver name (e.g., SQL Server, Oracle in instantclient_21_6). You can find a list of registered drivers in the Drivers tab in Windows ODBC Data Source Administrator (64-bit) tool.
For OSI PI drivers, select PI for RQTP-based DAS and PIProvider for OLEDB-based DAS.
Note: If you manually specify the driver, make sure to select the appropriate Date Format and Quote Format in the fields below. - Username and Password: Credentials will be saved (but not visible) and users are only required to reenter them in order to edit the fields above and including the Connection String.
- Database Timezone: Usually, this setting should match your local time zone. However, it depends on factors such as the SQL database engine, version, configuration or even schema types.
For example, a typical misconfiguration for ODBC uses the default UTC (instead of local time zone), which results in SQL queries into the future and returns empty data, but no errors. If misconfigured the other way, older data would be retrieved but displayed as current.
- Case Sensitive SensorID: It is recommended to use the (default) “False” in most cases.
- Sample Frequency/Duration: Determines how frequently data is retrieved (streamed) from the Historian. The default is 300 seconds. This means that sensor data will be retrieved every 300 seconds. This can result in multiple SQL queries depending on where your sensor data is located. Typically, there would be 1 SQL query for each table.
Note: This interval is only used if the Sensor Interval field is left undefined when configuring your sensors. If the interval here is larger, this will override the Sensor Interval.
- Query Time Lag: In some systems, there can be a significant lag between when the data is sampled and when it becomes available to the Historian. This setting will introduce a delay (in minutes) before trying to stream the current data. It is recommended that you use the smallest value which allows ALL the sensor data to be available and reliably retrieved.
- Query Group Size: Typically, SQL servers are more efficient at collecting and returning data for many sensors within one query than they are at processing large numbers of queries. But for tables with a very large sensor count, it is possible that the SQL queries might exceed Historian limits or cause performance issues. This option imposes an upper limit on the number of sensors sampled within a single SQL query. When the limit is exceeded, the query will simply be broken into multiple smaller SQL queries.
- Simulation Subtraction: This is used for demonstration purposes only. Leave it at 0.
- Timestamp Conversion: For Oracle and ClearSCADA, make sure the appropriate formatting option is selected. For all others, leave as Implicit.
- Tag Field Format: For ClearSCADA, make sure this is set to Number. For all others, leave as String.