The Info360 Insight Data Connector supports Oracle Databases, but drivers must be manually installed.
Supported Drivers: instantclient-odbc-windows.x64-21.3 and above
Supported Databases: Oracle 9i and above (which support ANSI timestamps)
Verified against: Oracle Database 12c Standard Edition Release 12.1.0.2.0 (using 21.3 drivers)
Install Oracle Drivers
- Create the directory C:\Oracle
- From the Oracle download page, download the Oracle Instant Client for Microsoft Windows (x64). Download both the Basic or Basic Light package and the ODBC package.
- Unzip both packages to C:\Oracle
There should be only one new folder similar to: C:\Oracle\instantclient_21_3
- Create the file "C:\Oracle\instantclient_21_3\network\admin\tnsnames.ora", replacing "instantclient_21_3" with the version of the drivers you are using.
- Add the following content to the file:
___ORACLE-TNS___ = (DESCRIPTION= (ADDRESS=(PROTOCOL=tcp)(HOST=___PUT_YOUR_DATABSE_HOSTNAME _HERE___)(PORT=1521)) (CONNECT_DATA= (SERVICE_NAME=___PUT_YOUR_DATABASE_NAME_HERE___))) - Replace the following placeholders with your specific environment details:
- ___ORACLE_TNS___ (This will be the TNS ID that is referenced externally)
- ___PUT_YOUR_DATABSE_HOSTNAME _HERE___
- ___PUT_YOUR_DATABASE_NAME_HERE___
- If you are using a custom port, replace 1521 with the appropriate number
- Add the following content to the file:
- Create a new system environment variable: ORACLE_HOME=C:\Oracle\instantclient_21_3
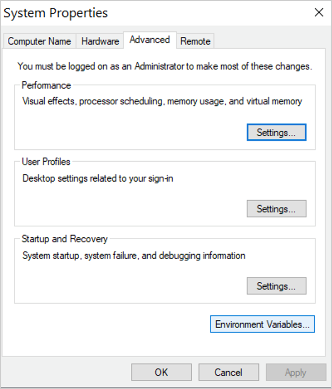
- Open System Properties
 Advanced and select Environment Variables.

- Under System Variables, click New.
- Add Oracle details and click OK
- Variable name: ORACLE
- Variable value: C:\Oracle\instantclient_21_3 or appropriate version
Note: This change will apply on new windows but typically doesn't impact existing shell windows. - Open System Properties
- Run the ODBC driver installation command to make the new drivers visible in the ODBC Data Source Administrators Tool:
cd c:\Oracle\instantclient_21_3
.\odbc_install.exe
Next step: Verify Oracle ODBC Connection.