To add a culvert manually
Add culverts manually, one at a time. This method is useful for adding a culvert where the watershed analysis does not identify a watershed for a portion of a road.
Alternatively, select the desired component road and choose Drainage ![]() Add Culverts from the right-click context menu. If you have performed a watershed analysis for the area including the road, this tool will add culverts at each location that a stream crosses the selected road.
Add Culverts from the right-click context menu. If you have performed a watershed analysis for the area including the road, this tool will add culverts at each location that a stream crosses the selected road.
When you add culverts manually to locations without a watershed nearby, Drainage Design utilizes the Design Flow value shown on the Stack Panel to generate analysis data.
Click Create
 Drainage
  Culvert.
Left-click at start position, drag cursor along stream and across road, double-click at end position or right-click End Run.
Drainage Design displays the new culvert.
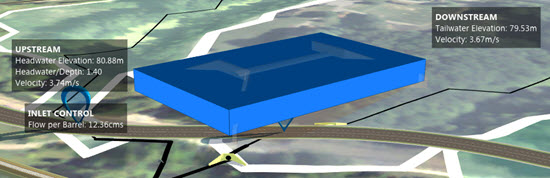
- Zoom-in to view the culvert, or display Profile View and click on diamond at culvert location.
- To locate small culverts, in Model Explorer, click on the Culvert feature, then choose View in Data Table from its right-click menu. Click on a culvert in the table to display its properties and attributes on the Stack Panel.
After adding a culvert, Zoom in to view it. Click the culvert to display its property types and attributes in the Stack Panel. In edit mode, you can change various of the attribute values.