
To paint smooth skin point weights
- Select the smooth skin objects you want to paint.
- Turn on smooth shading mode by selecting Shading > Smooth Shade All (hotkey: press 5).
- Open the
Paint Skin Weights Tool (Skin > Paint Skin Weights Tool >
 ).
Note:
).
Note:Reflection is disabled for the Paint Skin Weights Tool, but you can use Mirror Skin Weights (in the Skin menu Weight Maps section) as an alternative method to reflect skin weights.
- Do one of the following to select a joint:
- Select the joint name in the Influences list of the Paint Skin Weights Tool.
- Right-click the joint you want to paint, then choose Select Influence in the marking menu that appears.
Tip: You can middle-click a joint and press the up and down arrow keys to navigate your character's joint hierarchy.When you select an influence to paint, the mesh displays weighting feedback (by default) in black and white, with smaller values shown as darker, and larger values shown as lighter.
Use the Color Ramp or Numeric feedback under the Visualization heading to identify the weighting influence by showing them in colors, number values, or both.
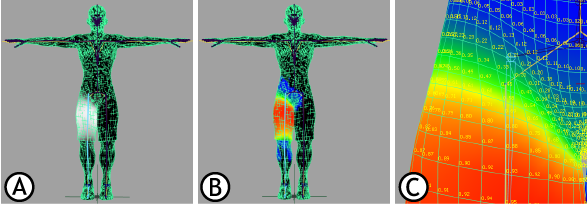
Weight Visualization options: A. Default color B. Color Ramp C. Numeric values
Note: The default hotkey Alt + c (or Option + c on Mac OS X) turns Color Feedback on and off outside the Paint Skin Weights Tool. - Make sure the brush, paint operation, value, and any other settings you want are set in the
Paint Skin Weights Tool.
For example, make sure that the Weight Type drop-down list is set to Skin Weight, and select the Normalize Weights mode you want.
- Drag across the skin to paint weights.
The values you paint set how much this joint influences the painted vertices relative to the other joints making up the smooth body (up to the number specified as the Max Influences in the Bind Skin Options).
 or shrink
 the Influences list.