- In the Rigging menu set (F3), select
Skin > Paint Skin Weights Tool >
 .
.
- In the Animation menu set (F4), select
Skin > Paint Skin Weights Tool >
.
The Paint Skin Weights Tool lets you paint weight intensity values on the current smooth skin. See the following topics for more information on working with the Paint Skin Weights Tool:
- To resize the brush, press B and drag. M - drag to change opacity.
- The Paint Skin Weights Tool use only a limited number of the Artisan brush tools, and does not include options such as Stylus Pressure or Reflection. To reflect skin weights, use Skin > Mirror Skin Weights (in the Skin menu weight Maps section) as an alternative method.
The following settings are specific to the Paint Skin Weights Tool.
Skin Clusters
The Skin Cluster area lets you control individual skin clusters on geometry that has more than one skin cluster applied. If you select a skin cluster in the Skin Clusters list, the Influence section also updates with data about the selected skin cluster.
The Influences list and Skin Clusters list are linked
- Skin Cluster list
- If you add more than one
skin cluster to the scene, it appears here. See
Manage multiple Skin Clusters for more.
Note: If no skin cluster is selected, this list remains empty.
- The most recently added skin cluster appears at the top of the list.
Influences
- Sort
-
These options let you set how joints are displayed in the Influences list. Select from the following options:
- Alphabetically
-
Sorts the joint names alphabetically.
- By Hierarchy
-
Sorts the joint names by hierarchy (parent-child) and displays them as branches that you can expand and collapse. The top of the list shows the root joint of the hierarchy.
This option is useful if you are painting a single a region of the skin—the joints you need to select from the list while painting are typically next to one another.
- Flat
-
Sorts the joint names by hierarchy, but displays them in a flat list. Parent influences still display above child influences in the list, but you cannot expand and collapse the influences.
- Reset to Default
-
 Resets the
Influences list to the default size.
Resets the
Influences list to the default size.
- Expand Influence List
-
 Click to expand the
Influences list and display more rows.
Click to expand the
Influences list and display more rows.
Right-click the button to open the Row Increments Options window and set how many more rows to display with each click.
- Shrink Influence List
-
 Click to shrink the
Influences list and display fewer rows.
Click to shrink the
Influences list and display fewer rows.
Right-click the button to open the Row Increments Options window and set how many fewer rows to display with each click.
- Influences list
-
This area displays a list of all influences bound to the selected mesh. For example, all joints that influence skin weights for a selected character mesh.
Tip: Use the Size controls above the Influences list to expand the panel and view more influences.
Within the Influences list, you can use the following controls.
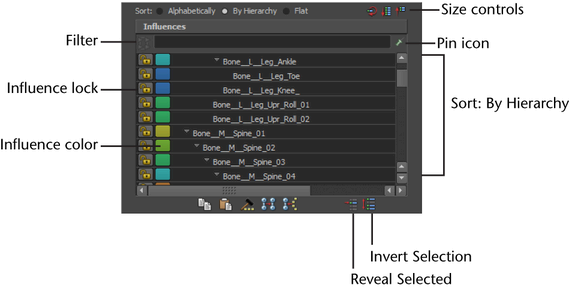
- Filter
-
Enter text to filter the influences that display in the list. This can make it easier to locate and select influences you want to work with, especially if you have a complex rig.
- Pin icon
-

Pins the influence list to display only the selected influences.
- Influence Lock icons
-


Lets you lock and unlock each influence from receiving weight as you paint.
- Influence color buttons
-
Opens the Influence color window, which lets you assign a new color to the selected influence.
- Copy weights
-

Click to copy the weight value of a selected vertex. See Copy smooth skin weights.
- Paste weights
-

Click to paste a copied vertex weight value to other selected vertices.
- Weight hammer
-

Click to fix selected vertices that have weights causing undesirable deformation on the mesh. Maya assigns the selected vertices with the same weight values as their neighboring vertices, resulting in smoother deformation. See Fix smooth weights.
- Move weights
-

Click to move the weight values of selected vertices from the first selected (source) influence to other selected (target) influence(s). See also Move weights to other influences.
When you click the Move weights button (or select Skin > Edit Smooth Skin > Move Weights To Influences), the weight values of the selected vertices are removed from the selected source influence and re-assigned to any selected target influence(s).
Note: Re-assigned weights may also be normalized if you have the Normalize Weights mode set to Interactive. - Show Influences
-

Click to select all influences that affect the selected vertices. This can help you troubleshoot areas of the mesh where you find unexpected deformations.
- Invert Selection
-

Click to quickly reverse which influences are selected in the list. This option is useful in conjunction with the Influences list hold and un-hold buttons.
For example, select only those influences you want to work with, then click Invert Selection to change your selection to all other influences in the list. You can then click to hold all other influences.
- Reveal Selected
-

Click to automatically scroll the Influences list to display the selected influence. This can be helpful when working with a complex character that has many influences.
Brush
- Mode
-
Lets you toggle between paint modes.
Tip:Use the hotkeys Ctrl + < and Ctrl + > to quickly toggle between these modes.
Select from the following options:
- Paint
-
When on, you set weights by painting values on vertices.
- Select
-
When on, you switch from painting skin weights to selecting skin points and influences. This mode is important for several skin weighting tasks, such as Fix smooth weights and Move weights to other influences. Select mode also provides the ability to select multiple vertices, then view and modify their weight in the Value field.
- Paint Select
-
When on, you can paint-select vertices.
- Paint Select
- Three additional options let you set whether you add or remove vertices from your selection as you paint:
- Add
-
When on, painting adds vertices to your selection.
- Remove
-
When on, painting removes vertices from your selection.
- Toggle
-
When on, painting toggles the selection of vertices. As you paint, selected vertices are removed from your selection, and deselected vertices are added.
- Select Geometry
-
Click to quickly select the entire mesh.
Depending on your workflow, this button can save time as you go back and forth painting weights on the mesh (in Paint mode) and completing other operations like fixing weights on selected vertices (using Select or Paint Select mode and the Weight hammer).
- Paint Operation
-
Select one of the following options.
- Replace
-
The brush stroke replaces the skin weight with the weight set for the brush.
- Add
-
The brush stroke increases the influence of nearby joints.
- Scale
-
The brush stroke decreases the influence of far away joints.
- Smooth
-
The brush stroke smooths out the influences of the joints.
- Weight Type
-
Select from the following types of weight to paint.
- Skin Weights
-
Select this option to paint basic skin weights for the selected influences. This is the default.
- DQ Blend Weights
-
Select this option to paint weights values to control the blend between classic linear and dual quaternion skinning on a per-vertex basis. See Smooth skinning methods and Blend smooth skinning methods.
- Normalize Weights mode
-
Select from the following options:
- Off
-
Select to turn off smooth skin weight normalization.
Note: Be aware that this option lets you create weights of greater than one or less than one, which can allow for odd or incorrect deformation as you exercise the character. - Interactive
-
When on, Maya normalizes skin weight values as you add or remove influences, and as you paint skin weights. (This is the default.)
As you work, Maya adds or removes weights from other influences in order to make the total weights on all influences add up to 1.0. You can view the exact weights used for deformation on the skinCluster node weightList attribute.
For example, if you change a weight from 1.0 to 0.5, Maya distributes the remaining 0.5 amongst neighboring influences. This mode replicates the normalization process in previous versions of Maya.
Use the Weight Distribution setting to determine how Maya creates new weights during normalization, if necessary.
- Post
-
When on, Maya calculates normalized skin weight values as you deform the mesh, preventing any odd or incorrect deformation. No normalized weight values are stored on the mesh, which lets you continue painting weights or adjusting interactive bind manipulators without having the normalization process change your previous skin weighting work.
Selecting this mode lets you paint or change weights without affecting the weights for other influences, and still have the skin normalization occur when you deform the mesh.
Note: Since Maya calculates the normalized weight values dynamically at deformation time, you cannot view the normalized values on the skinCluster node weightList attribute. Your mesh will deform with normalized values, but the actual weight values on your skinCluster node may add up to more or less than 1.If you use interactive skin binding, this mode is automatically selected for you. (See Interactive bind for smooth skinning.) As a result, for interactive binding, weights are not normalized until you deform the mesh.
For more information on skin weight normalization, see Smooth skin weight normalization and Set normalization mode and normalize weights.
- Opacity
-
Lets you produce more gradual changes to achieve more subtle effects. For example, with a Value of 1.0, setting Opacity to 0.5 paints a weight of 0.5. When you set Opacity to 0, your brush stroke has no effect.
- Value
-
Sets the weight value the brush stroke applies.
- Min/Max Value
-
Sets the minimum and maximum possible paint values. By default, you can paint values between 0 and 1. By setting the Min/Max values you can extend or narrow the range of weight values.
Negative values are useful for subtracting weight. For example, if you set Min value to -1, Max value to -0.5, and select Add for the operation, you would then subtract 0.5 from the weight of your skin when you paint. Positive values are used as multipliers.
- Flood
-
Click Flood to apply the brush settings to all weights on the base shape's vertices. The result depends on the brush settings defined when you perform the flood.
Visualization
This section covers ways you can view the way weighting influences the mesh, either by using colors to show the strength of the weighting on a specific area or with numbers depicting precise values.
- Geometry Color
- These settings let you show weighting in a color gradient.
-
- Color Ramp
-
Turn on this option to show weight values in color on the mesh. This can make it easier to see small values when painting, and to determine whether a joint is influencing vertices where it should not. For more information on using color ramps, see Set attributes using ramps.
Different Color Ramp types
-
When Color Ramp is on, you can use the Weight Color ramp and Selected Color options to customize the color ramp. You can also select one of the Color Preset options.
- Weight Color (0 -1)
-
When Color Ramp is on, this area lets you edit the color ramp. Click the swatches on either side of the ramp to set colors to represent values of 0 and 1, or select part of the ramp and click the Selected Color swatch to re-set that color.
- Selected Color
-
Click to open the Color Chooser window and set a new color for a selected part of the color ramp. Only available when Color Ramp is on.
- Color Presets
-
Select from three pre-defined color ramp options.
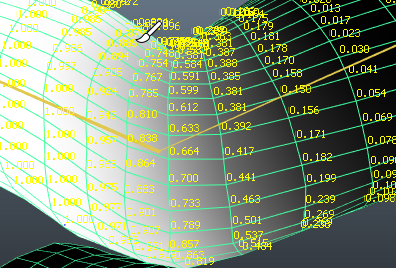
- Numeric
-

Weighting with both color ramp and numeric values
- These settings let you show weighting values as numbers.
Note: Weight values of 0.00 are hidden. Increase the value of the Decimal Places setting to show more precise weighting values
-
- Show Numbers
- Turn on this option to display the weighting influence values as numbers.
- Decimal Places
-
Skin weight showing 3 Decimal Places
- Lets you set the amount of numbers the influence weighting shows, (for example, 1.25, 1.255, or 1.2555,) to create exacting weighting effects. The default is 2.
- Number Color
- Click the color swatch to open the Color Chooser or use the slider to select a color for the Weight Values.
- Color Ramp
-
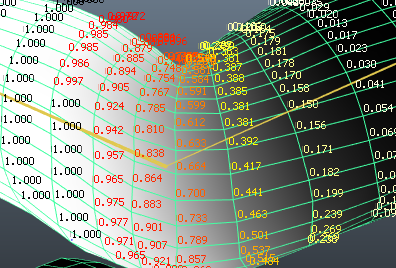
Skin weight using a Color Ramp
- Activate this option to show weight value numbers in a color gradient.
- Weight Color
-
Click the swatches on either side of the ramp to set colors to represent values of 0 and 1, or select part of the ramp and click the Selected Color swatch to re-set that color.Note: There are no color ramp presets for the Numeric visualization.
- Selected Color
-
Click to open the Color Chooser window and set a new color for a selected part of the color ramp. Only available when Use color ramp is on.
Stroke settings
- Radius (U)
- If you are using a stylus, set the upper or maximum possible radius for the brush. No matter how hard you press the stylus, the brush radius will not exceed this radius. If you are not using a stylus, this setting defines the radius for the brush. The maximum value is 50 when using the slider; but if you use the hotkey (press b and drag the left mouse button) you can set a value higher than 50.
- Radius (L)
- If you are using a stylus, set the lowest or smallest possible radius for the brush when pressure is applied to the stylus. If you are not using a stylus, this setting is not used.
- Screen Projection
- When this option is off (the default), the brush is oriented along the surface. When this option is on, the brush is oriented on the view plane and the stamp is projected on the selected surface.
-
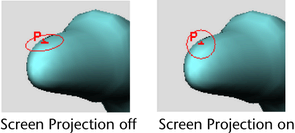
Using Screen Projection may produce smearing where the surface is nearly perpendicular to the screen and performance may be slower. Simply tumble to make the surface approximately parallel to the screen.
- Reflection
-
Reflection is disabled for the Paint Skin Weights Tool. Another method to do reflection of the skin weights is to set the Mirror Skin Weights Options in the Rigging menu set (Skin > Mirror Skin Weights >
 ).
).
- Stamp Spacing
-
Clicking the brush on a surface creates a stamp. A brush stroke is made up of many overlapping stamps. You can set how the stamps overlap. If you set Stamp Spacing to 1, the edges of each stamp just touch each other. If you set the spacing to be greater than one, there will be spaces between the stamps. If you set the spacing to be less than one, the stamps will overlap.

- Stamp Depth
-
The Stamp Depth value determines how far the stamp is projected. For example, when you are painting with the 3D Paint Tool where there are folds in the surface, decrease the Stamp Depth value so the paint does not run into other areas of the surface. The default setting is 0.5.
Stylus Pressure
Use the settings in this section to define the effects of stylus pressure on your strokes when you use a stylus and pressure sensitive tablet.
- Stylus Pressure
-
Turn this on to activate the effect of pressure on your stylus.
- Pressure Mapping
-
Select which Artisan brush attribute you want affected by stylus pressure. Adding pressure to the stylus increases values for the selected attribute. You can affect Opacity, Radius, or Both.
Display section
Define how the brush and surface display.
- Draw brush
-
Turn this on to display the paint tool in the scene view.
- Draw brush while painting
-
Turn this on to display the paint tool’s brush outline when painting on a surface. Turn this off to display only the brush pointer when painting on a surface. Draw brush while painting is off by default.
If you notice slow interaction while you paint, try turning this option off. This greatly improves performance on graphic cards without overlay planes.
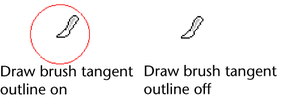
- Draw brush tangent outline
-
Turn this on to display the paint tool’s brush outline when you move the pointer over the selected surface. If this setting is off, you will not see the brush outline when you move the pointer over the selected surface.
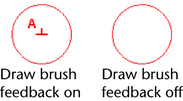
- Draw brush feedback
-
Displays additional information on the brush outline indicating the operation the brush is set to perform.
- Show wireframe
-
Displays the wireframes on the selected surfaces.
- Color feedback
-
For Paint Attributes, Paint Cluster Weights, Paint Skin Weights, Paint Soft Body Weights, and Paint Set Membership Tools only.
Turn this option on to display surface attributes as grayscale values. This helps you see the area as you paint and helps identify what the values are (smaller values are darker, larger values are lighter). To display color feedback, you must turn on smooth shading in Maya Creative.
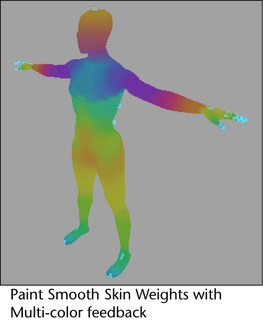
Note: Color Feedback does not work correctly for Degree 1 NURBS surfaces. - Multi-color feedback
-
Turn on this setting to view the distribution of painted skin weights on your bound geometry as multi-color feedback. The colors that appear on your bound pieces of geometry correspond to the colors of their skeletons’ joints and bones, and they indicate the areas of skin each of their joints affect. You can view Multi-color Feedback in the scene view when in Vertex mode or when using the Paint Skin Weights Tool.
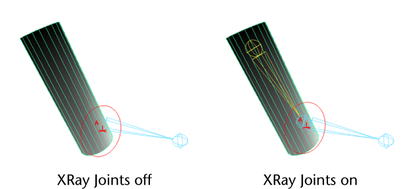
- X-Ray Joints
-
This option is also available from the panel menus. See Panel menu: Shading for more information.
Turn this option on to have wireframe joints display on top of the mesh you are painting. This lets you view the mesh in a shaded mode and easily select wireframe Influence objects without switching between wireframe and shaded views.
- Min color
-
For Paint Attributes, Paint Cluster Weights Tools only. Sets the value at which the minimum color displays. This is useful if your attribute values are very close to each other, making the color feedback display too subtle to detect.
- Max color
-
For Paint Attributes, Paint Cluster Weights Tools only. Sets the value at which the maximum color displays. This is useful if your attribute values are very close to each other, making the color feedback display too subtle to detect.