The condition node is a branching utility. It does one thing if a logical expression is true and something else if it is false.
It compares the value in A with the value in B to find out whether the value in A is greater, smaller, equal to, less than, less than or equal to, greater than or equal to, or not equal to the value in B, and produces a result based on the conditions you set.
You can incorporate the condition utility in rigs capable of acting one way in one set of circumstances and another way in a different set of circumstances. For example, to enable or disable IK handles.
As shown in the following examples, the node requires one logical operator (Operation) and two choice values (First Term and Second Term):
If (IK == 0)
ikBlend = 0
else
ikBlend = 1
If (A operation B)
Outcolor = Color1
else
Outcolor = Color2
To create a condition utility node
- Do any of the following:
- In the Hypershade window, find this utility in the Create tab.
- See Create a node in the Node Editor.
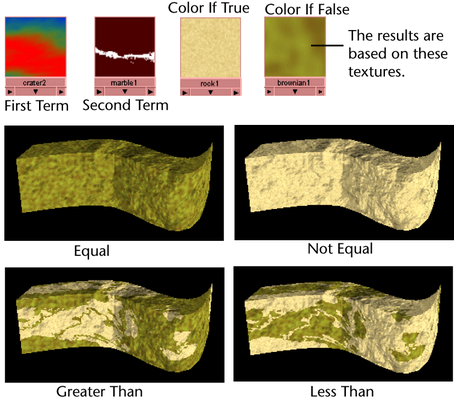
The following shows some examples of the Condition utility in use:

Example
To map the Condition utility to four textures
- Create a material, assign it to an object, then map the Condition utility to the material’s Color attribute.
- Adjust the material’s attributes if necessary.
- In the Attribute Editor, select the condition node tab, then set the following:
- Map a texture to First Term.
This texture represents the Second Term’s texture coverage.
- Map a texture to Second Term.
This texture represents the pattern of the coverage.
- Map a texture to Color If True.
This texture represents the surface color.
- Map a texture to Color If False.
This texture represents the color of the overlying texture.
- Change the attributes for each texture and use the texture placement object to adjust the texture on the object if necessary.
- Use the Operation drop-down list items to see the transition between textures. Tip: Set the Operation option to Greater Than or Less Than to see the combined results.
- Map a texture to First Term.