Maps any image input onto an object (such as a shading network, or a file texture). You can mask the input image to control how it covers a surface, to overlay different textures and control what parts of the texture are visible, or to label map a surface.
Find this utility in the Create tab (see Create tab).
To use this utility, see Use the Stencil utility.
- Image
-
The texture that is used as a stencil.
- Edge Blend
-
Controls the sharpness of the texture edges. The default Stencil’s color is the color of the edge blend. Increase this value to blend edges softly.
- Mask
-
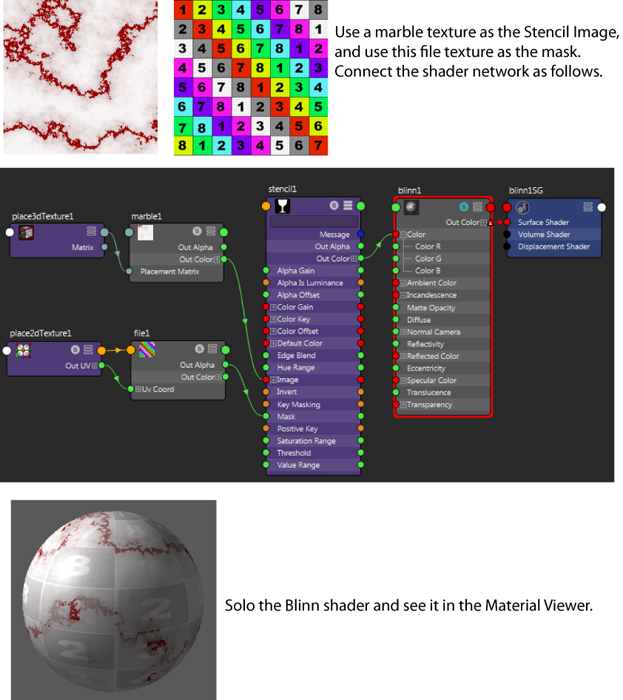
Represents the Stencil’s transparency. Use to control the overall transparency of the entire texture. To control the transparency of selected regions of the texture, map another texture to Mask.
For example, this is what happens when you map a File texture to the Mask attribute.

HSV Color Key
- Key Masking
-
Enables or disables Chroma Key masking. When on, Maya selects the areas in the texture similar to or equal to the Color Key color and masks them out. When off, all other key attributes have no effect.
- Positive Key
-
Inverts the chroma key mask (only the colors specified in the Color Key and HSV Range are displayed). The default setting is off (the colors specified in the Color Key and HSV Range are masked).
- Color Key
-
The color to be masked in the texture. The default setting is black. To mask a range of colors, you must also set the Hue/Sat/Val Range parameters.
- Hue Range
-
The range of hues (H) centered on the Color Key color which are also masked. The valid range is 0 to 1. The default value is 0.5.
- Saturation Range
-
The range of saturations (S) centered on the Color Key color which are also masked. The valid range is 0 to 1. The default value is 0.5.
- Value Range
-
The range of values (V) centered on the Color Key color which are also masked. The valid range is 0 to 1. The default value is 0.5. If you want to mask out the exact key color, set V to 0.
- Threshold
-
Controls the point at which the color state changes.