The following section describes the for on the .
- Size
-
Sets the radius of the tool. Hotkeys: B + drag .
- Strength
-
Determines how much the tool affects the surface. Depending on the tool, this value represents either a percentage of the maximum power available or a height expressed in world space units. Hotkeys: M + drag .
- Mirror
-
Reflects a stroke from one side of a model to the other, along the specified axis.
- Off
-
Strokes are not reflected.
- X
-
Reflects strokes across the world space X-axis.
- Y
-
Reflects strokes across the world space Y-axis.
- Z
-
Reflects strokes across the world space Z-axis.
- Local X
-
Reflects strokes across the local space X-axis.
- Local Y
-
Reflects strokes across the local space Y-axis.
- Local Z
-
Reflects strokes across the local space Z-axis.
- Constrain to Surface
- Twist
- Specific to the
Grab tool. Rotates using the brush radius and falloff. The direction of the rotation is determined by the
Direction setting.
Hotkeys: Ctrl-drag left or up to rotate in a counterclockwise direction. Ctrl-drag right or down to rotate in a clockwise direction.
Falloff
Lets you specify how the tool effect diminishes (or not) from its center point to its outer edge. The falloff is represented as a curve that can be edited. See also Adjust tool falloff.
- Falloff Type
- Determines how the deformation will occur for the selected region:
- Surface/Volume
- Falloff only affects the surface under the brush's center point. If the center point of the brush is above a bridge area where multiple surfaces meet, all surfaces are affected.
- Volume
-
Falloff always affects the surface under the brush's center point and the surface within the brush's radius.
- Falloff curve
- Controls the profile (cross-section) of sculpting tools. The falloff curve determines how the tool strength diminishes from the center towards its outer edge. Depending on how you set the falloff, your sculpt strokes can feather off gently, blending smoothly with the surrounding surface, or appear with a sharp edge. See Adjust sculpting tool falloff.
- Snap to Grid
-
Constrains points to the Falloff curve grid.
Advanced
- Remember Size
-
Preserves the size of the tool after use. When off, the brush inherits the size of the previously used brush.
- Orient To Surface
-
Orients the tool cursor display (in the 3D View) along the normal of the face under the center of the cursor ring. Influences cursor display only, does not influence the effect of the brush on the surface.
- Draw From Center
-
Specific to the Imprint tool. Sets how the stamp image expands outward from where you click-drag to apply it. When on (default), the center of the stamp is anchored where you click. When off, the edge of the stamp is anchored. Keeping this option on can be useful especially when using an extracted vector displacement map as your stamp.
- Affects All Layers
-
Specific to the Smooth tool. When on, all sculpt layers are affected by the tool. When off, Smooth affects only the current sculpt layer.
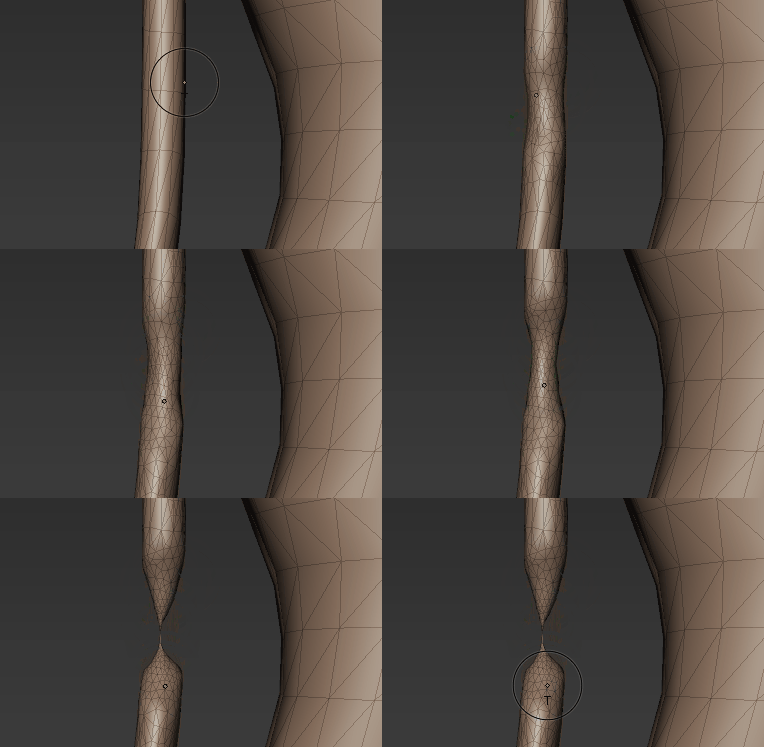
- Preserve Volume
- Specific to the
Smooth tool. This option is
off by default.
Turn this option on to stop cases where smoothing can degrade the mesh excessively, as shown in the animation below. When set to off, the legacy smoothing behavior is retained.

- Update Plane
-
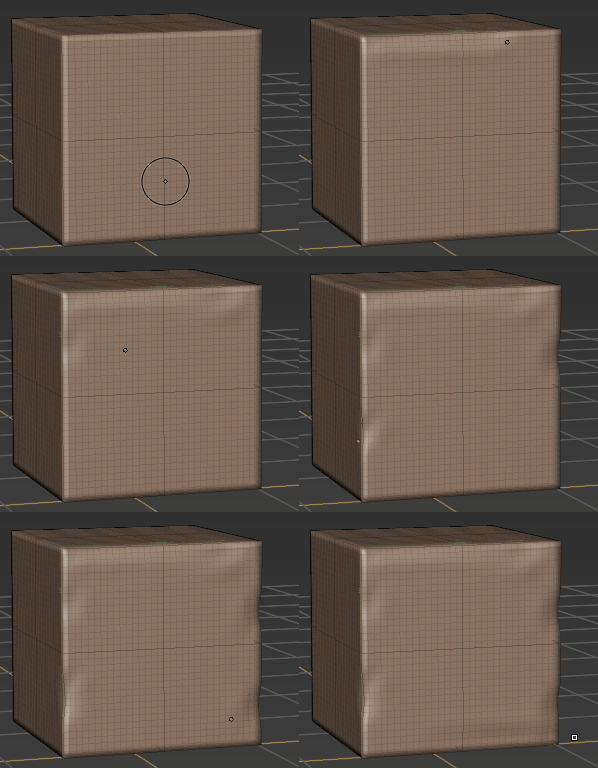
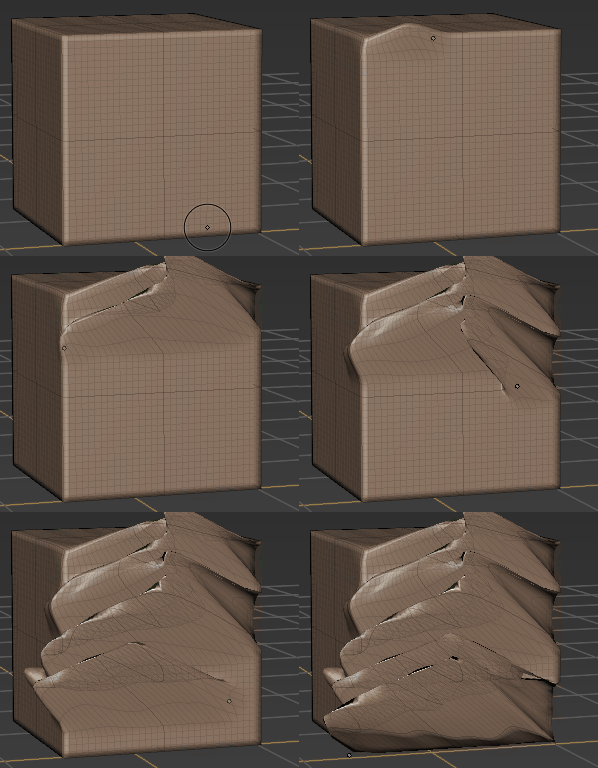
Specific to the Flatten, Wax, Scrape, Fill, and Contrast tools. Recalculates the underlying tool plane (that affected vertices within the tool cursor move toward) for each stamp in a stroke. When on (default), the tool adheres to the curvature of the sculpted surface. When off, the underlying plane is determined by the initial stamp and remains fixed for the duration of the stroke.


A continuous stroke with Update Plane on versus off
- Whole Stroke
-
Specific to the Flatten, Wax, Scrape, Fill, and Contrast tools only when Update Plane is on. Continuously recalculates the underlying tool plane from all the vertices affected during the stroke, creating a more planar effect throughout the stroke. Whole Stroke is only available when Update Plane is on.
When on (default), the tool adheres to the curvature of the sculpted surface. When off, the underlying plane is determined by the initial stamp and remains fixed for the duration of the stroke.
- Smooth Values
-
Specific to the Freeze, Mask, and Erase tools. Switches the current brush from applying freezing or masking (depending on which tool is selected) so the stroke blurs the color per vertex information on any existing freezing or masking. This only works if Smooth&Paint Values is off. Hotkey: Shift.
- Smooth & Paint Values
-
Specific to the Freeze, Mask, and Erase sculpt tools. Applies freezing or masking (depending on which tool is selected) while blurring the color per vertex information.
Pen Pressure
- Min Size
-
Specifies how small the tool is when the lightest pressure is applied to the pen, expressed as a percentage of the tool’s Size property. For example, a Min Size of 100 indicates there is no size variance, regardless of the pressure applied.
- Min Strength
-
Specifies how weak the tool strength is when the lightest pressure is applied to the pen, expressed as a percentage of the primary tool Strength value. For example, a Min Strength of 100 indicates there is no strength variance, regardless of the pressure applied.
- Direction
-
Specifies the direction vertices move when affected by a tool:
- Center Normal
-
Moves vertices in the direction of the normal of the face directly under the center of the tool.
- Averaged Normal
-
(Default) Moves vertices in the direction of the average of the normals of all affected faces.
- Vertex Normal
-
Moves each vertex in the direction of its own normal.
- Forward
-
Moves vertices in the direction of the stroke.
- Right
-
Moves vertices perpendicular to the direction of the stroke.
- X
-
Moves vertices along the world space X-axis.
- Y
-
Moves vertices along the world space Y-axis.
- Z
-
Moves vertices along the world space Z-axis.
- Camera
-
Moves vertices toward the camera.
- Screen
- (This is the default setting for the Grab brush.) Moves vertices along the screen plane.
- XY
- (This setting is only available for the Grab brush.) Moves vertices along the XY plane.
- XZ
- (This setting is only available for the Grab brush.) Moves vertices along the XZ plane.
- YZ
- (This setting is only available for the Grab brush.) Moves vertices along the YZ plane.