In Mudbox you sculpt virtual 3D surfaces much like you sculpt real 3D objects from clay or other modeling materials. Instead of using clay, the virtual 3D surfaces are constructed using polygons. Mudbox works with polygonal models that you create in other 3D modeling applications and then import. See Prepare a model for sculpting for more information.
Polygonal meshes
Mudbox works with models that use polygons as the underlying surface type. Polygons are widely used in the development of 3D content for animated effects in film, video games, digital prototypes for industrial design, and for creating virtual 3D content for the Internet.
Polygons are comprised of straight-sided shapes (3 or more sides), defined by three-dimensional points (vertices) and the straight lines that connect them (edges). The interior region of the polygon is called the face. Vertices, edges, and faces are the basic components of polygons.

Many faces connected together create a network of faces called a polygonal mesh (also referred to as a polyset, polygonal object, or polygonal model). Polygonal meshes can be created in many 3D software applications (3ds Max, Maya, StudioTools, and so on), then exported for use within Mudbox.
Polygons represent complex 3D forms easily and accurately. They are simple to construct and easy to modify, with the right digital modeling tools. For these reasons they are ideal as the ‘digital clay’ in Mudbox.
Dynamic Tessellation
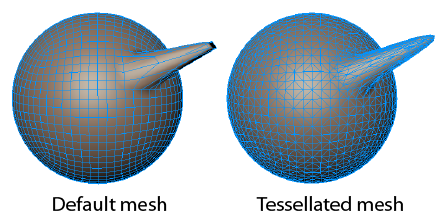
Dynamic Tessellation respects the currently active Sculpting Tool Falloff Type, so that Tessellation affects the mesh surface in the same way as the selected sculpting tool so that faces within the Falloff range are tessellated and faces outside are not. See Falloff Type for descriptions of the different settings.
If Dynamic Tessellation creates spikes on your model, use the Smooth Tool with a high Collapse Threshold value in the Tessellation settings to shrink the spike down to its base. You can also bulk up the volume of your mesh with the Bulge tool. Mesh spikes often occur you use the Grab Tool with Tessellation enabled, especially when Follow Path is active.
Sculpting a polygon model
You sculpt a polygonal model with tools from the Sculpt Tools tray.

Stroking a sculpt tool over a region of the model repositions the vertices in that area, changing its 3D form. When vertices are repositioned, the polygonal faces associated with them are also repositioned. Since the polygonal faces reflect light, color, and shading information back to your eye, this changes how the form of the 3D object appears.
The density of the vertices/faces on a polygonal model dictate how much fine detail can be sculpted. If the polygonal model has fewer vertices, there are fewer points to change its 3D shape.
To sculpt finer detail, increase the number of polygons by subdividing(see Add a subdivision level). Each time you subdivide the model, the number of polygons increases by a factor of four (if you are using a quad-based polygon mesh).
Each subdivision operation is stored on a separate layer referred to as a subdivision level. You can return to a coarser level (lower level) and easily switch between subdivision levels as required.