File Saving in SketchBook Pro
Jump to Mobile or Windows 10
Some versions of SketchBook Pro save your files on the device or machine in a separate folder for the app. This means if the app is ever deleted, your sketches still exist elsewhere. If you are using SketchBook Pro Mobile on iOS, the files are saved within the Gallery, which is part of the app. If the app is ever deleted, your files are deleted, as well. Since this isn't the ideal solution, we've added the iCloud storage option. If you're on an iOS device, we highly recommend checking out the section on saving to the cloud to protect your work.
No matter where your drawings are stored, we highly recommend you back them up. The mobile versions have options for exporting to Dropbox, etc. If it would just kill you to lose your work, back it up!
Saving in SketchBook Pro Desktop
When saving your work, you can save out an alpha channel and choose the file format. SketchBook Pro supports TIFF, BMP, GIF, JPEG, png, and PSD. The format you select determines whether the image is saved with all its layers or if it is flattened.
Saving your sketch as an Adobe® Photoshop® file
When saving, select the Adobe Photoshop PSD file type option.
Saving your sketch as an image file
When saving, in the Save as type drop-down, select the type of image you want saved.
Only the TIFF and PSD image formats preserve layers. Saving them as any other image format flattens them. Only use Autodesk SketchBook to read TIFF files containing layers. We do not advise you to open these images in other programs because we cannot guarantee layer preservation.
Where are my files saved
Choose where a project is saved – locally or to iCloud (Mac App Store version only).
For Mac App Store users, use SketchBook IOS Options to fit the file to a specific device. The format resizes the image and changes its orientation to fit the device. A maximum of 6 layers is preserved. Additional top layers will be merged.
For saving a file without these options, see Exporting images.
Saving locally
Save a project to the computer you are using. In the Save or Save As dialog, browse to a location on your machine and tap Save. Files can be saved as any format.
Saving to iCloud
For Mac App Store users*, save a project to iCloud to access it from anywhere and any device or platform. ICloud file management is only supported through the SketchBook iCloud Gallery.
If you aren’t logged into iCloud, enable the system preference iCloud Documents & Data.
If you can’t save to iCloud, in your SketchBook General preferences, check Enable iCloud to access iCloud files and save to your iCloud account.
Select File Save or Save As.
Note:If you suspect your iCloud Gallery could be full, we recommend saving your file locally and moving it to the cloud when space is available.
Note:If a file is open on 2 or more devices, there is no notification. The last device to save will overwrite the file.
Saving in SketchBook Pro Mobile
When saving sketches to your Gallery (a component of SketchBook), you can save, export, and post. All images will be exported at 72 dpi.
INFORMATION: Though when exporting an image, the dpi is set at 72 within SketchBook Pro Mobile, you can import it into SketchBook Pro Desktop and change the dpi there.
If you accidentally delete the app, your Gallery and all the sketching within it are deleted.
So, we recommend:
- Exporting to your SD card and Dropbox.
- Taking snapshots of your canvas to save the image in your Screenshots folder.
- Saving to the cloud.
Files are saved as TIFFs in the SketchBook Pro Gallery and can be accessed through your device’s file manager. You can export these files as a layered PSD, JPEG, or png.
Where are your files saved
On *Android, from your device, select My Files > Device Storage > Autodesk, then open the folder for the version of SketchBook you want. If your device is connected to a computer, double-click the Phone icon to access your files. Then, open the Autodesk folder and the folder for the version of SketchBook you want.
On iOS, there are two places where your sketches can be saved: Local or iCloud. The reason for this is that since iPads, iPhones, and iPods don’t save content to a folder outside apps, we wanted to give you a solution. This way, if you save your sketches to the cloud and anything happens to the app, such as it being deleted, your sketches are safe.
Backing up files
Check out this support article, Backing up files and settings, if you are looking for how to back up your mobile app and sketches.
Saving
SketchBook auto saves after 10 strokes, though, you can save your drawing at any time by following these instructions.
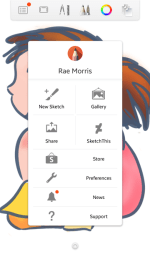
For iOS 10 iPad users, if you’re in Rapid UI mode, tap  to display the UI, then follow the instructions below.
Tap
 , then
  Gallery.
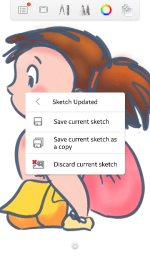
A dialog appears. Select an option.
Save current sketch – updates the saved file.
Save current sketch as a copy – creates a new file and saves the sketch with the changes to that file, while preserving the original.
Discard changes – deletes any modifications to the original file.
The Gallery opens, displaying the images in your current Gallery view. Swipe to the left to ensure your sketch has been saved to the Gallery.

Exporting a layered image
Export layered images to your SD card, Dropbox, or another destination. Images will be exported at 72 dpi.
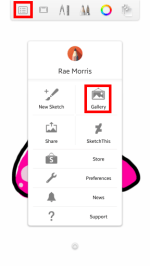
Tap
 , then
  Gallery, and select an option from the dialog that appears.
Swipe to the thumbnail view of the sketch you want to export.
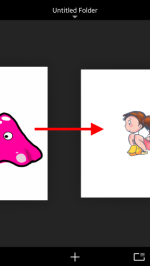
Tap
 and select Export PSD.
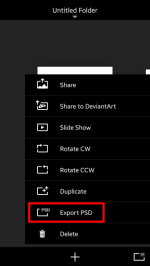
Choose a method for exporting your sketch.
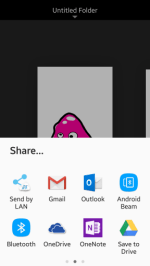
Following the onscreen instructions.
Sharing an image
When you share an image with layers, the image that is sent gets flattened to one layer. Did you know that Share can also be used to save images to your Photos? See how you can use Save Image to do this.
Tap
 Gallery.
Swipe to the thumbnail view of the sketch you want to export.
Tap
 and select Share.
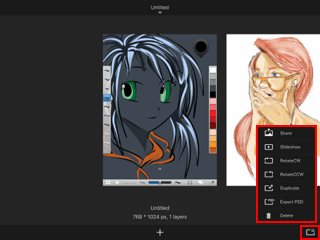
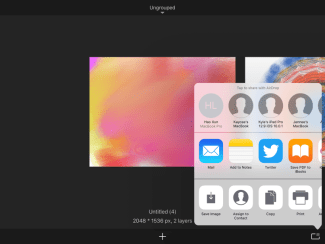
In the next dialog, select Save Image to save your image to Photos.
Saving in SketchBook Pro Windows 10
So, you want to save your file. You don’t mind overwriting the original file. If that’s the case, Save is what you want.
If you don’t want the original file overwritten, try either Save a copy or Export.
When saving your work, you can save out an alpha channel and choose the file format. SketchBook supports TIFF, BMP, GIF, JPEG, png, and PSD. The format you select determines whether the image is saved with all its layers or is flattened. Saving as a TIFF or PSD preserves your layers.
Select  >
> ![]() Save.
Save.
Learn to save out an alpha channel and save as different file formats. Choose where to save things. Export to various devices and orientations.
Saving your sketch as an image file on Windows 10
Select
 >
>  Save a copy.
When using Save a copy, in the Save as type drop-down, select the type of image you want saved.
Note:Only the TIFF and PSD image formats preserve layers. Saving them as any other image format flattens them. Only use Autodesk SketchBook to read TIFF files containing layers. We do not advise you to open these images in other programs because we cannot guarantee layer preservation.
Where are my files saved on Windows 10
You might be wondering where your images are saved. By default, they are saved to This PC > Pictures, though you can change that.
- Select
 >
>  Save.
Save. - Browse to a new location, select the folder, then tap Save.
Exporting
If you want to save changes to your file, but you don’t want to overwrite the original, use Export. Another difference from Save is the file saving options. With Export, you can save as png, JPEG, and PSD.
If you want to keep your layers, select PSD. If you don’t mind if your image is flattened to one layer, select either png and JPEG.
- Select
 Export.
 - Select a location, then tap Save.
Exporting to OneDrive
If you would like to store your work on OneDrive or just back it up, you can.
- Select
 Export.
 - Select OneDrive from the list along the left, then tap Save.