Preferences in SketchBook Pro
Jump to Mobile or Windows 10
Use the preferences to customize the app. Each platform of SketchBook Pro has different preferences.
If you want to turn off data collection, select Help > About SketchBook Pro on desktop and go to your Preferences on mobile.
Preferences in SketchBook Pro Desktop
You will find your SketchBook Pro preferences one of two places, depending on your OS:
- For Mac users, select SketchBook Pro > Preferences.
- For Window users, in the toolbar, select Edit > Preferences.
This opens the Preferences window, which groups the preferences into tabs, based on the following classifications:
General (Desktop)
This tab contains options for making changes to the app.
For Windows users, select Edit > Preferences, then tap the General tab.
For Mac users, select SketchBook Pro > Preferences, then tap the General tab.
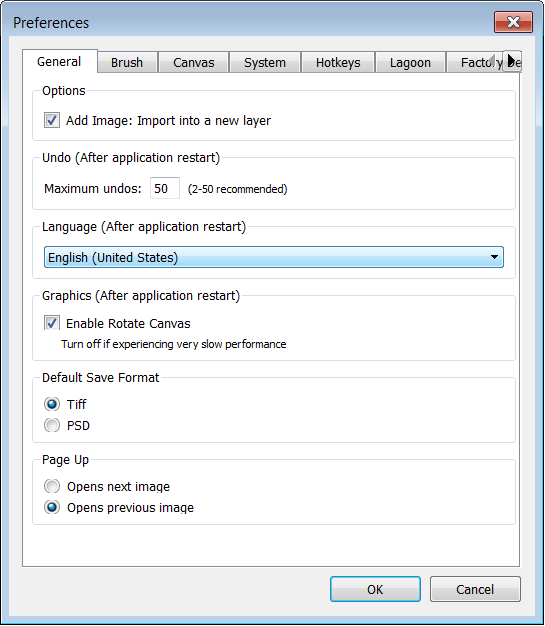
Importing image options
By default, when you add an image, a layer is automatically created and the image is added to it. This is super handy. But, what if you've been drawing on a layer and you import an image? Well, without Add Image: Import into a new layer enabled, the image could cover what you drew. This is why we created this option and it is enabled by default. However, if you prefer for a layer not be be created, say because you have a limited number of layers available, then disable this option.
Setting your maximum level of undos
See Setting your maximum level of undos in Undoing and redoing.
Changing the language displayed in SketchBook Pro
Do you want to use SketchBook Pro and have everything displayed in a language other than English? If so, you can do this in the Language section. See Changing the language displayed in the UI for instructions.
Keep in mind, you need to restart SketchBook Pro for this change to take effect.
Rotating the canvas
By default, Enable Rotate Canvas is enabled. So, what does it do? It lets you rotate the entire canvas, not just one layer. Think of when you draw. Do you rotate the paper as you draw certain parts of your image? If you do, with Enable Rotate Canvas enabled, you can rotate the entire image, the same way you would with a piece of paper.
So, why would you disable it? If you work with large canvases (such as 80 Mpx), rotating the canvas can put a strain on your machine and the app. If you notice slow performance, disabling Enable Rotate Canvas can help considerably.
You need to restart SketchBook for this change to take effect.
Do one of the following:
- For Windows users, select Edit > Preferences, then tap the General tab.
- For Mac users, select SketchBook Pro > Preferences, then tap the General tab.
In the Graphics (After application restart) section, to improve performance, remove the check from Enable Rotate Canvas.
Note:Press the 0 and 9 keys along the top of your keyboard to rotate the canvas to the left of right, respectively.

Setting your saved default file format
Do you need your files saved as PSD, but they keep getting saved as a TIFF by default? Sure you can use Save As every time you save to select what you want. But, why not change your default saving option?
Do one of the following:
- For Windows users, select Edit > Preferences, then tap the General tab.
- For Mac users, select SketchBook Pro > Preferences, then tap the General tab.
Tap the format you want to enable it.
Tap OK.
Using Page Up
Only available for the Windows version.
The Page Up and Page Down keys are used by storyboard artist to move back and forth between images in SketchBook when presenting. Once you have organized your images and put them in order, you can hide the UI and present your boards, using these keys. For more on presenting, see Changing the behavior of Page Up and Page Down.
In your preferences, you can set the behavior for Page Up to either open the next image or open the previous image.
- Select Edit > Preferences, then tap the General tab.
- Tap the option you want to assign to Page Up.
- Tap OK.
Setting your default Color Editor
Only available for the Mac version.
Select SketchBook Pro > Preferences, then tap the General tab.
Enable one of the following:
- If you want to use the SketchBook Color Editor, select Use default Color Editor.
- If you want to use the Mac Color Editor, select Use system Color Editor.
Brush (Desktop)
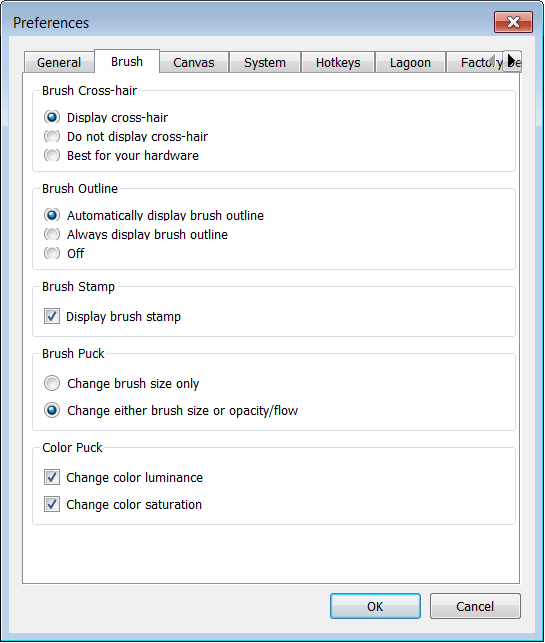
This tab contains options for making changes to your brushes, Brush Puck, and Color Puck.
- For Windows users, select Edit > Preferences, then tap the Brush tab.
- For Mac users, select SketchBook Pro > Preferences, then tap the Brush tab.
Changing your brush cursor
When painting, you may like or not like seeing the brush crosshair. If you would like to change this, see Change the brush cursor for instructions.
Setting the brush outline
Some people like to see the brush outline displayed when working. It can help them determine the size of the stroke they are about to apply. Others find it distracting. In the Brush tab of your preferences, you can set the state of this. See Remove the brush outline for instructions.
Displaying your brush stamp
If you would like to see the stamp of your brush while drawing, enable Brush stamp display. However, if you are noticing a lag in performance when using large brushes, disable this option. You will improve performance and speed things up by turning the brush stamp display off.
For Windows users, select Edit > Preferences, then tap the Brush tab, then turn Display brush stamp OFF.
For Mac users, select SketchBook Pro > Preferences, then tap the Brush tab, then turn Display brush stamp OFF.
Canvas (Desktop)
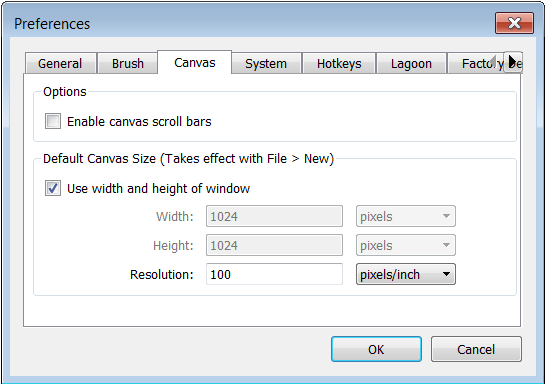
This tab contains options for making changes to the canvas.
- For Windows users, select Edit > Preferences, then tap the Canvas tab.
- For Mac users, select SketchBook Pro > Preferences, then tap the Canvas tab.
Turning scroll bars off
Do you want more screen real estate for drawing and have a scroll bar along the side of your screen? If so, ensure Enable canvas scroll bars doesn't have a check next to it.
If you're working on a large canvas, at some point, you may find enabling Enable canvas scroll bars makes it easier to move to see different parts of your image.
Do one of the following:
- For Windows users, select Edit > Preferences, then tap the Canvas tab.
- For Mac users, select SketchBook Pro > Preferences, then tap the Canvas tab.
Do one of the following:
- To turn off the scroll bars, ensure Enable canvas scroll bars doesn't have a check next to it.
- To display the scroll bars, ensure Enable canvas scroll bars is checked.
Changing the size of your canvas
By default, if you are open/importing an image, the canvas resizes to that of the image. But, what for a new sketch? If you want to change the default size of the canvas, this is where you do it. Keep in mind, the changes won't take effect until you've tapped OK and selected File > New to create a new canvas. See Changing the default canvas size for new files for instructions on how to do this.
Changing the resolution
Are you interested in creating high-resolution art? If so, you will need to change the default resolution used when a canvas is created. For images only meant for web, like graphics for a webpage, the default resolution of 100 is fine. However, for high-res images, we recommend you set this to 300 pixels/inch.
Do one of the following:
For Windows users, select Edit > Preferences, then tap the Canvas tab.
For Mac users, select SketchBook Pro > Preferences, then tap the Canvas tab.
Tap the field next to Resolution.
Enter a value.
If you want to use a different measurement for solution from pixels/inch, tap the drop-down menu next to the number field and select another option.
System (Desktop)
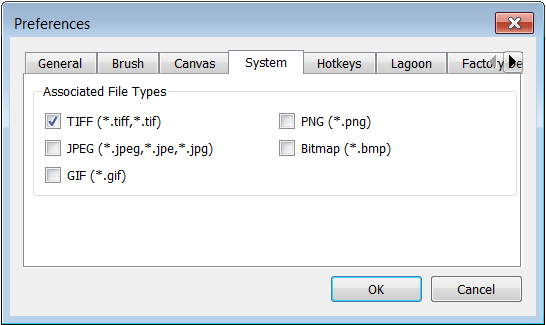
This tab contains options for setting which files types launch SketchBook, when you're trying to open them. You set these during the installation process, but can change them at any time within this tab. Once you've made a change, tap OK to set the change. Like with most of the preferences, this won't come into effect until you've exited out of SketchBook and relaunched the app.
- For Windows users, select Edit > Preferences, then tap the System tab.
- For Mac users, select SketchBook Pro > Preferences, then tap the System tab.
Hotkeys (Desktop)
This tab contains options for assigning and changing key combinations and/or buttons for tools. Tap the menu name to open it and see a list of its tools.
- For Windows users, select Edit > Preferences, then tap the Hotkeys tab.
- For Mac users, select SketchBook Pro > Preferences, then tap the Hotkeys tab.
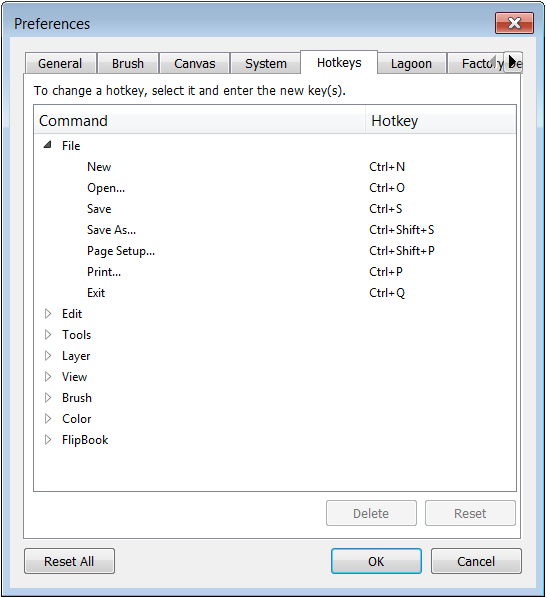
Click the following article for how to do this. There are also options for resetting hotkey assignments for individual tools or all of them. Check out Resetting hotkeys.
Lagoon (Desktop)
This tab contains options for change the tools displayed in the Lagoon and marking menus. If you use certain tools or brushes all the time, wouldn't it be nice to actually have them at your fingertips? When you customize your Lagoon and marking menu, this is what you are doing. Besides assigning different tools to your Lagoon or marking menu, you can change the icons used. Click here for instructions on how to customizing your interface. To reset your lagoon, see Resetting the Lagoon.
- For Windows users, select Edit > Preferences, then tap the Lagoon tab.
- For Mac users, select SketchBook Pro > Preferences, then tap the Lagoon tab.
Factory Defaults (Desktop)
This tab contains options for resetting preferences for the Brush Library, Brush Palette Color Palette, and all the preferences in the app. Resetting preferences can be done at any time. This sets your version of SketchBook Pro back to its original state.
Resetting your preferences will also reset the Brush Library, Brush Palette and Color Palette to their original default settings. This means you will lose all your custom brushes and color swatches. Back up your preferences before doing a reset to keep these. The other thing to try is resetting your layout, if this is the reason for the reset, by selecting Window > Default Layout.
- For Windows users, select Edit > Preferences, then tap the Factory Defaults tab.
- For Mac users, select SketchBook Pro > Preferences, then tap the Factory Defaults tab.
Resetting palettes and preferences
To reset your Color Palette, Brush Palette, or Preference settings, select the Factory Defaults tab.
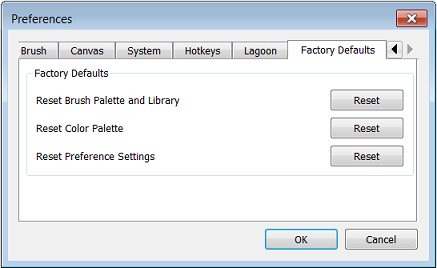
Resets the Color Palette to the factory default colors. All custom swatches are removed.
- For Windows users, select Edit > Preferences > the Factory Defaults tab, for Reset Color Palette, tap Reset.
- For Mac users, select SketchBook Pro > Preferences > the Factory Defaults tab, for Reset Color Palette, tap Reset.
Resets all brushes to their original state. All custom brushes are removed.
- For Windows users, select Edit > Preferences > the Factory Defaults tab, for Reset Brush Palette and Library, tap Reset.
- For Mac users, select SketchBook Pro > Preferences > the Factory Defaults tab, for Reset Brush Palette and Library, tap Reset.
Resets your preferences to the factory default settings.
- For Windows users, select Edit > Preferences > the Factory Defaults tab, for Reset Preference Settings, tap Reset.
- For Mac users, select SketchBook Pro > Preferences > the Factory Defaults tab, for Reset Preference Settings, tap Reset.
Backing up your preferences
This process is slightly different, depending on if you are on Mac or Windows. See Backing up your Mac settings or Backing up your Windows settings.
Preferences in SketchBook Pro Mobile
Use the preferences to customize the app. To access your preferences, tap ![]() and select
and select  Preferences. There are four sections under Preferences:
- General
- Factory Defaults
- Pen Connection
To return to the canvas, along the top of your screen, tap <, or for Android users, the Back button on your device.
Changing the language displayed in SketchBook Pro Mobile
If you want to change the language of the app, see Changing your interface language settings on iOS or Changing your interface language settings on Android. This option is in your device's settings, not SketchBook Pro's preferences.
General
![]()
Tap
 and select
  Preferences.
To turn on a preference, tap the box next to it to add a check.
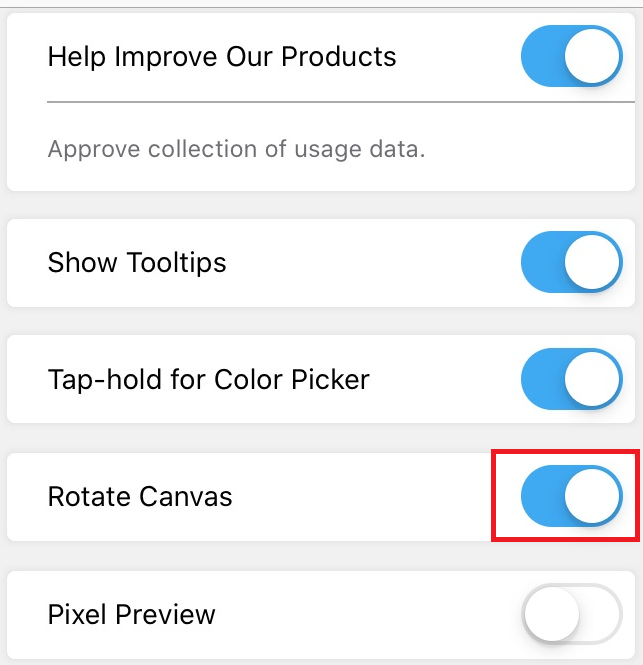
- Help Improve Our Products – Approve collection of usage information.
- Show Tooltips – Use to display or hide tool tips as you sketch.
- Tap-hold for Color Picker – Use to turn on or off the Color Picker that appears. The Color Picker does not appear by default. However, when turned on, it does.
- Rotate Canvas – Use to rotate the canvas with two fingers. When disabled, you need to use the Transform tool to do this.
- Pixel Preview – Use so your strokes don't look pixelated when viewing them, while editing. For this effect, toggle Pixel Preview OFF. If you need to zoom into the canvas and view the pixels, toggle Pixel Preview ON.
- For Android users only: Pinch to Gallery – Quickly and easily save a sketch and access the Gallery.
- double-tap Corner Shortcuts – Assign frequently used tools to the four corners of the canvas for quick access.
- 3-finger Tap to Toggle Full Screen – When toggled on, tapping with three fingers will remove the interface, so you have the full real estate of the canvas to work.
- 3-finger Swipe Menu – Assign frequently used tools to the four 3-finger swipe positions for quick access.
Rotate canvas preference
Rotate the canvas interactively by tap-dragging and rotating with two fingers.
Tap
 and select
  Preferences.
Turn Rotate canvas on.
Pinch to Gallery
Only available for the Android version
Quickly and easily save a sketch and access the Gallery.
- In the canvas, with two fingers, pinch the screen. As your fingers come together, a message appears and the screen changes to black.
- Lift or release the image to enter the Gallery.
To reopen the image in the canvas, tap it.
Pen Connection
Only available for the iOS version.
Turn on or off the connection of a 3rd party pen.
Tap
 and select
  Preferences.
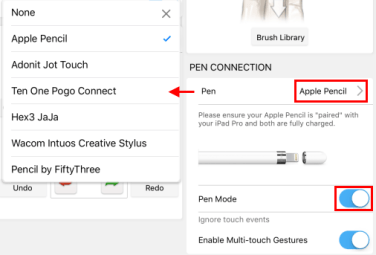
Tap None > to access a list of 3rd party supported styli.
Disabling multi-touch gestures
Only available for the iOS version.
When sketching with a stylus, your palm or hand might get in the way, so the device registers these accidental touches as inputs. Now you have unwanted marks to your sketch. Use Enable Multi-touch Gestures.
- Tap
 and select
  Preferences.
 - Turn off Enable Multi-touch Gestures, so SketchBook Pro only look at the input from your stylus, not your hand.
Customizing the Double-tap Apple Pencil Gesture
For users with a 2nd Generation Apple Pencil, there is a customizable double-tap gesture.
Open your iPad Settings app.
Scroll down to Apple Pencil and tap it.
Choose from one of four options:
- Switch Between Current Tool and Eraser
- Switch Between Current Tool and Last Used
- Show Color Palette
- Off
For more information, check out this article.
Tap-hold for Color Picker by Apple Pencil
Only available for the iOS version.
Some Apple Pencil users have mentioned they’d prefer not to have the Color Picker appear when the are zoomed in and tap-hold. So, we added a preference in the Pen Connection section. By default, this option is off.
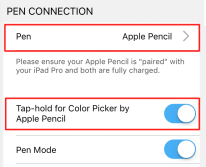
- Tap
 and select
  Preferences.
 - If you want the Color Picker to appear when you tap-hold, in Pen Connection, once Apple Pencil is selected, tap Tap-hold for Color Picker by Apple Pencil to activate it.
3rd party stylus support
SketchBook Pro supports pressure sensitivity for the Apple Pencil.
Pressure will only work with brushes that have differing Min/Max settings for Radius and/or Opacity. The pressure applied to the stylus affects the opacity of a brush stroke.
Ensure that your stylus is set up as specified by the manufacturer’s documentation before launching the app. Next, enable Pen Connection in the SketchBook Pro preferences and select your stylus from the list.
If your tablet enters sleep mode or any app crashes and you see  , reinitialize your connection and restart SketchBook to continue sketching with the stylus. You will see
  .
.
These older styli are no longer supported; however, if you are using a 32-bit device running iOS 10 or below, they will work:
- Adonit Jot Touch: iPad gen 2 and above
- TenOne Pogo: iPad only
- Hex3 JaJa: iPad gen 2 and above
- Wacom Intuos Creative Stylus: iPad gen 3 and above
- Pencil by FiftyThree: iPad gen 3 and above
If your Hex 3 JaJa is not working, ensure you have enabled the microphone, which is required by Hex Jaja. In your iPad settings, select Privacy > Microphone, and enable access for SketchBook Pro.
Each manufacturer’s product will deliver a differing feel and result. Realize that using a 3rd party accessory will affect your experience with SketchBook Pro. Due to the variety of devices, we cannot provide technical support.
Pen Settings
When Pen Mode is enabled, after selecting the type of pen you have, your pen settings appear.
The pen you have determines the settings available to you. Some show battery life or customizable buttons that can be changed from the default Undo and Redo to others actions. Some pens have support info available or display the firmware version. If you are using an Adonit Jot Touch, you will have writing style options.
There’s an offset to my strokes
If you haven’t set the writing style, you may notice an offset to your strokes. This can be quickly remedied by going to the Pen Connection preference.
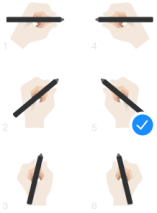
- Tap
 and select
  Preferences.
 - In Pen Connection, set Pen to the stylus you’re using and Pen Mode is on. A Writing style option appears.
- Tap it and select the image that best represents how you hold the stylus as you draw.
Factory Defaults

Use the Factor Defaults to reset all your color swatches and brushes to their original state. If you don’t want to restore all the brushes, you can reset individual ones.
Tap
 and select
  Preferences.
In Factor Defaults, tap the following:
- Reset Color Swatches to change your color swatches back to their original state.
- Reset All Brushes Settings to change brushes back to their original state.
- Reset Quick Tour (Android ONLY) to view the Quick Tour again and learn about the app.
- Reset Preference Settings to change back all your preferences to their original state.
Note:For tablet users, before using Reset Color Swatches, keep in mind, it resets the Color Palette.
Preferences in SketchBook Pro Windows 10
Check out the following section to learn about the various preferences in SketchBook Pro Windows 10.
![]()
Select  >
> ![]() to access your preferences.
to access your preferences.
Changing the language displayed in SketchBook Pro Windows 10
Check out this link for how to change the language displayed in the app. It requires you to change the language settings of your machine.
General in SketchBook Pro Windows 10
In the General preferences, you can turn collection of usage data, Pen Mode, and Pixel Preview on or off.
Viewing your image at the pixel level
Do you want to look at something from at a pixel level? Now you can with Pixel Preview.
Select
 >
>  .
.Tap General, then enable Pixel Preview. To change your view back, turn Pixel Preview off.
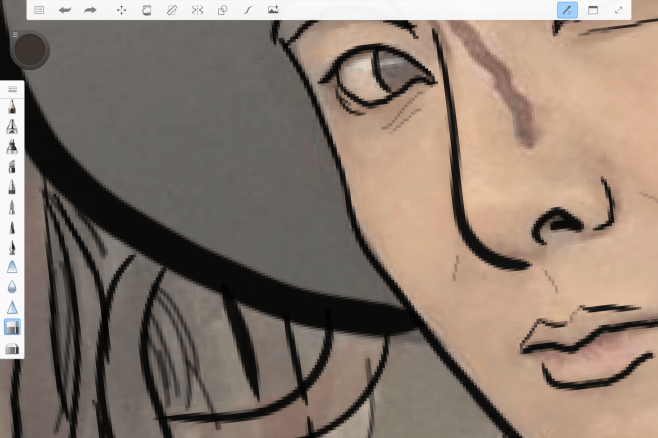
Gestures in SketchBook Pro Windows 10
Under Gestures, you can enable or disable the 3-finger swiping action for undoing and redoing.
- Select
 >
>  .
. - Tap Gestures, then enable or disable the 3-finger swipe to Toggle Undo / Redo.
Factory Default in SketchBook Pro Windows 10
In Factory Default, if you tap Reset, it reverts the app back to the factory settings. This means all custom brushes and brush sets, as well as custom brush and set names will be lost. If you need to reset the app, before you do this add all custom brushes to brush sets and export them.
- Select
 >
>  .
. - Tap Factory Default, then tap Reset to revert the app back to the factory settings.
About in SketchBook Pro Windows 10
The About section provides the app name and version number, and lists trademarks, patents, and third-party software credits and attributions. You will also find our Data Collection Notice, which explains what data is collected, why, and how it is used.
- Select
 >
>  .
. - Tap About.