Exporting images
Jump to Mobile or Windows 10
Export sketches to share with others or save elsewhere. Import images into SketchBook Pro to continue working on them.
Exporting in SketchBook Pro Desktop
When you export an image, there are a few things to keep in mind. The first is the orientation. If you are exporting to a device, see the section below on exporting landscape-oriented images. Another thing to consider is the capacity of the device in regards to layer capacity and canvas size. See the other section below for this.
Exporting SketchBook Pro landscape-oriented images to a device
When you export a layered landscape-oriented image from SketchBook Pro to an iPad or iPhone, the image is cropped. The iPad maps the bottom left corner of the exported image to its bottom left corner. If the original layered image is wider than the iPad or iPhone, do one of the following:
- Set the canvas to the same resolution as the device before exporting
Select Image > Image Size. In the Image Size dialog, change the value for Resolution.
- Take the image from DropBox or iTunes, open it in any application that can open PSDs, then make changes to fit it to the device
- Rotate your layers to change the image’s orientation and ensure the canvas is no longer than the length of the intended device’s canvas
To rotate your layers (the whole canvas), tap-hold the Spacebar to access the Transform puck. With the Spacebar still pressed, drag left or right.
To change the canvas length, select Image > Image Size. In the Image Size dialog, change the value for Document Size. Then select Image > Canvas Size. In the New Size dialog, tap the center of Anchor, then change the value for Document Size.
Exporting SketchBook Pro images to a device
When you export an image with layers and/or a large canvas size from SketchBook Pro Desktop to a device, if the device cannot support the file, a warning appears. The warning will let you know what the issue is.
- If the version of SketchBook Pro you're bringing the file into doesn't have layer grouping, then the layers come in ungrouped.
- If the canvas is too large, you can reduce your image in SketchBook Pro Desktop before bringing it into the other device.
To change the canvas length, select Image > Image Size. In the Image Size dialog, change the value for Document Size. Then select Image > Canvas Size. In the New Size dialog, tap the center of Anchor, then change the value for Document Size.
With older devices and older versions of SketchBook, here is an example of what could happen. When you export an image with 8 layers from SketchBook Pro Desktop to an older device running an older version of SketchBook, layers may be missing.
- The iPad2 has a limit of 4 high-resolution or 12 regular layers. Layers 5 and up from the original image are not loaded for a device with high-resolution layers. Turn off High-resolution canvas, then re-import the file.
- The iPad1 has 6 layers, so layers 7 and 8 are not loaded. Merge some of the layers before exporting for an iPad1 user.
- The iPhone has from 3 - 6 layers, so some layers are not loaded. Merge some of the layers, then select File > Save a Copy As and rename the file.
Exporting in SketchBook Pro Mobile
This section deals with the exporting of images. For exporting to the cloud, see How to use iCloud.
Exporting a layered image
Export layered images to your SD card, Dropbox, or another destination. Images will be exported at 72 dpi.
Tap
 , then
  Gallery, and select an option from the dialog that appears.
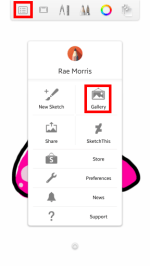
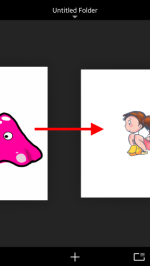
Swipe to the thumbnail view of the sketch you want to export.
Tap
 and select Export PSD.
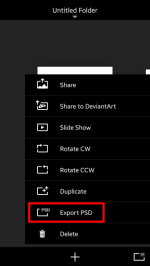
Choose a method for exporting your sketch.
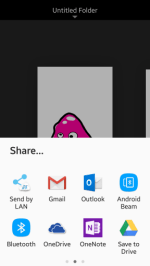
Following the onscreen instructions.
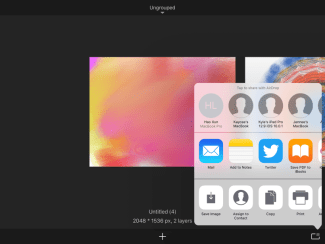
Sharing an image
When you share an image with layers, the image that is sent gets flattened to one layer. Did you know that Share can also be used to save images to your Photos? See how you can use Save Image to do this.
Tap
, then Gallery.Swipe to the thumbnail view of the sketch you want to export.
Tap
and select either Share or Share to DeviantArt (Android only).
In the next dialog, select Save Image to save your image to Photos.
Exporting in SketchBook Pro Windows 10
If you want to save changes to your file, but you don’t want to overwrite the original, use Export. Another difference from Save is the file saving options. With Export, you can save as PNG, JPEG, and PSD.
Select
Export.Tap the Save as type option and select a file format.
INFORMATION: If you want to keep your layers, select PSD. If you don’t mind if your image is flattened to one layer, select either png and JPEG.
Select Save.