Customizing your UI
Jump to Mobile or Windows 10
Each version of SketchBook Pro has tools for customizing the interface and/or tools. See the section below for the version you're using.
Customizing your UI in SketchBook Pro Desktop
The icons in the lagoon and tools found in the marking menus can be customized, along with the brushes in the Brush Palette. Move the tools you use the most to where you can get to them in a flick. If you spend a lot of time in SketchBook Pro, a few customizations can go a long way toward improving your productivity.
Don't forget, there are hotkeys to access tools quickly, as well. You can customize those, as well.
Customizing your desktop
In the Lagoon, the first icon at the top (  houses the Interface Controls. Use these to change your layout and set what interface elements are visible.
 Full UI – Displays the toolbar and lagoon and flips it to the left corner of the canvas.
![]() Title Bar Off – Hide the standard Windows/Mac UI bar and SketchBook Pro menu bar. Select to get them back.
Title Bar Off – Hide the standard Windows/Mac UI bar and SketchBook Pro menu bar. Select to get them back.
 Lagoon Right – Display the toolbar and lagoon and flips the lagoon to the right corner of the canvas.
 UI Off – Hide the toolbar and lagoon.
 Title Bar Only – Display all the UI, with the exception of the lagoon. Select to get the lagoon back.
I can't find my Layer Editor, Color Editor, or other UI elements
If you either can't find an editor or other UI element or they are on one monitor, while your canvas is on the other, here is a quick fix:
- In the menu bar, select Window > Default Layout. This will centralize things.
- Next, either open the editors you need through the toolbar or by selecting them from the Window menu.
Where's my menu bar
If your menu bar is not visible, select , then .
I want to hide my UI
If you want to hide your interface to have your entire canvas to work on, select , then .
To turn everything back on, select , then .
Customizing your lagoon
The Lagoon (the round UI element) by default is found in the bottom left corner of the canvas. This where you can find lots of useful tools. It is gesture driven, like the Layer Editor.

Do one of the following:
- For Windows users, select Edit Preferences, then tap the Lagoon tab.
- For Mac users, select SketchBook Preferences, then tap the Lagoon tab.
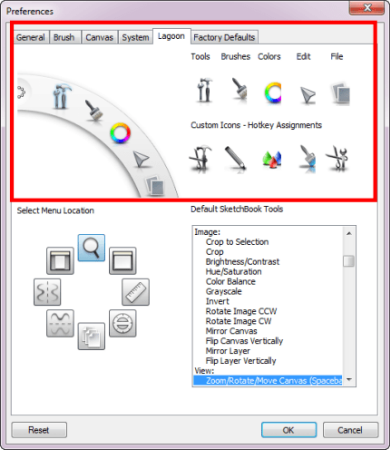
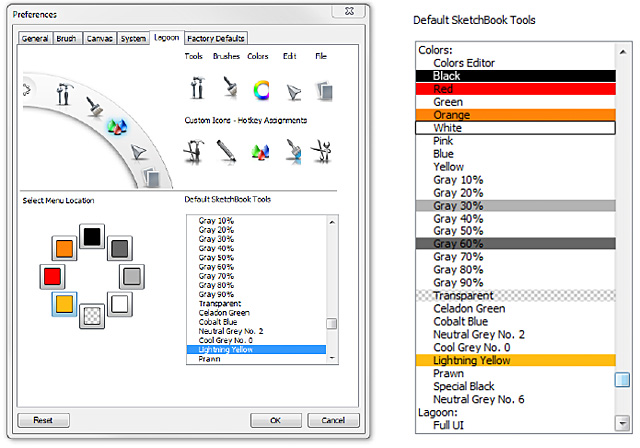
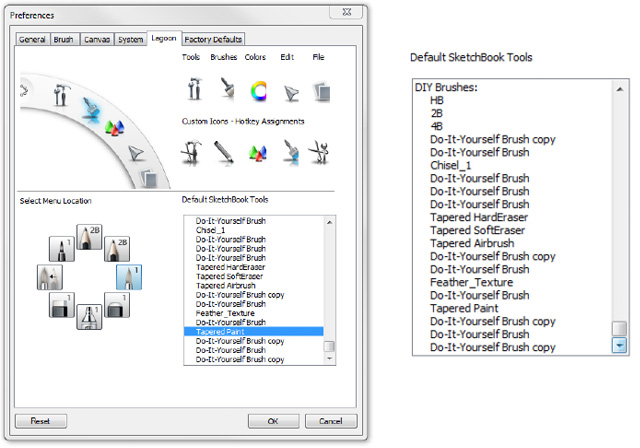
Change or rearrange the icons displayed in the lagoon, using the top section of the Lagoon Preferences. Use the existing icons or select new ones from the Custom Icons – Hotkey Assignments list to the right.
Customizing marking menus
Do one of the following:
- For Windows users, select Edit > Preferences, then tap the Lagoon tab.
- For Mac users, select SketchBook > Preferences, then tap the Lagoon tab.
Customize the marking menu for an icon in the lagoon, using the lower section of the Lagoon Preferences to add tools you commonly use.
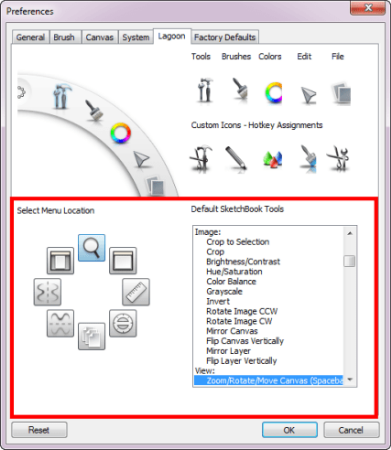
By default, the top marking menu icon is selected. In this case, it’s Zoom/Rotate/Move Canvas. In the Default SketchBook Pro Tools list to the right, you’ll see that Zoom/Rotate/Move Canvas is selected. To change the tool assigned to this location in the marking menu, scroll through the list to find a new tool and click it. You can always revert back to default settings by tapping Reset in the bottom left corner.
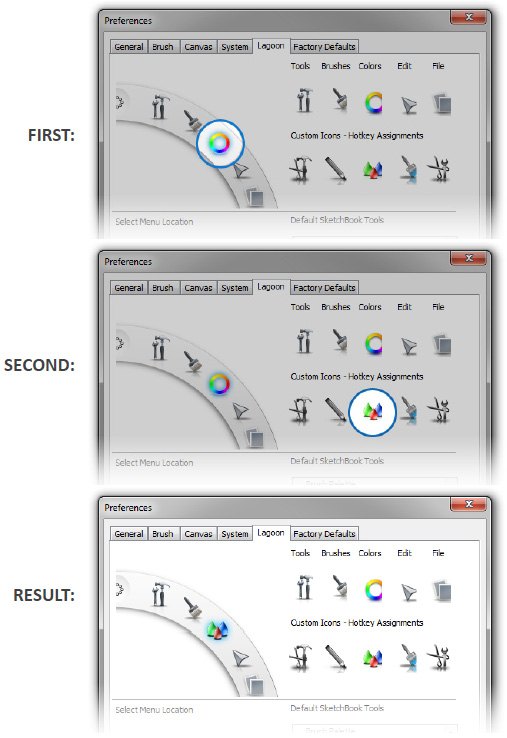
Changing Lagoon icons
You can manually swap out or rearrange the existing icons with any of the choices to the right. Simply click the icon you want to change. Once highlighted, select an icon from the list to the right. It will update the lagoon in this tab.
Do one of the following:
For Windows users, select Edit > Preferences, then tap the Lagoon tab.
For Mac users, select SketchBook > Preferences, then tap the Lagoon tab.
The actual lagoon WON'T update until you click OK and close the Preference window.
You cannot change the Interface Controls icon.
Once done, you can use hotkeys (1-6) or right-click to access these custom marking menus without visiting the lagoon. If you have made any custom changes to the lagoon marking menus, the hotkey assignment will have changed (based on your customization of the lagoon). The new custom marking menus will always be pinned to those hotkeys. The only way to reset them is to tap Reset to set them.
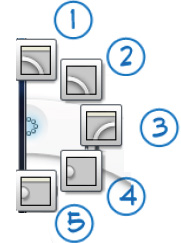
| Lagoon position | Mouse | Stylus |
|---|---|---|
|
First press 1, then right-click | Press-hold 1 and pen-down (left click) |
 |
First press 2, then right-click | Press-hold 2 and pen-down (left click) |
 |
First press 3, then right-click | Press-hold 3 and pen-down (left click) |
| First press 4, then right-click | Press-hold 4 and pen-down (left click | |
 |
First press 5, then right-click | Press-hold 5 and pen-down (left click) |
 |
First press 6, then right-click | Press-hold 6 and pen-down (left click) |
Naming custom brushes
When creating custom brushes, there are a few reasons it is important to assign names. The first is lagoon customization. Without names, you will have a hard time identifying your custom brushes from a list of Do-It-Yourself-Brushes and Do-It-Yourself-Brush copies. Once you've learned this the hard way and had to back-track to name these brushes in the Brushes marking menu, you'll see just how important this is. For instructions on how to do this, see How to rename brushes and brush sets.
Change the brush cursor
Do one of the following:
- For Windows users, select Edit > Preferences, then tap the Brush tab.
- For Mac users, select SketchBook > Preferences, then tap the Brush tab.
In the Brush Cross-hair section, select one of the following options to set your brush cursor appearance:
- To hide the cursor, select Do not display cross-hair.
- To display your cursor, select Display cross-hair.
Remove the brush outline
By default, a brush outline appears for the sharpen, blur, and smear brushes, eraser, and other low-opacity brushes such as the airbrush. This outline lets you see the brush size before you start drawing.
Do one of the following:
- For Windows users, select Edit > Preferences, then tap the Brush tab.
- For Mac users, select SketchBook > Preferences, then tap the Brush tab.
In the Brush Outline section, select the option you want. To remove the outline, select Off.
Changing the language displayed in the UI
If you want to change the language that is used for the UI, you can do this through the Preferences.
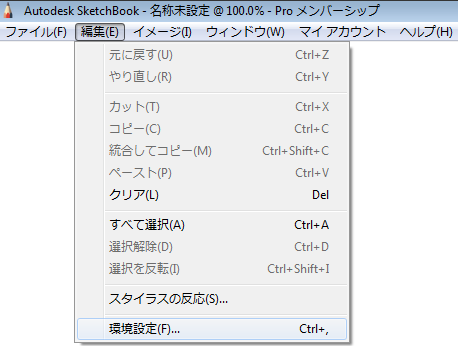
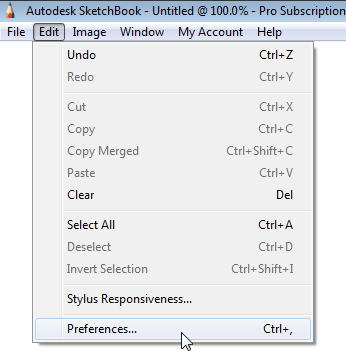
In the second menu, Edit, select the last option, Preferences.
In the first tab (General) of the window, select the Language option. It's the option with the dropdown menu.
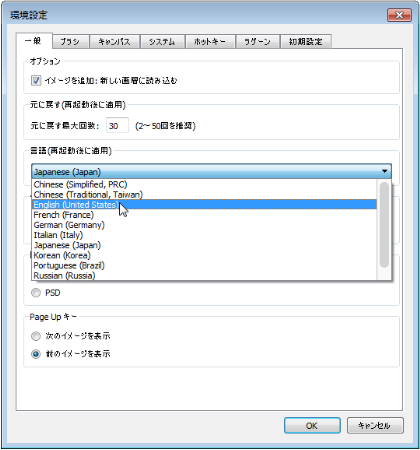
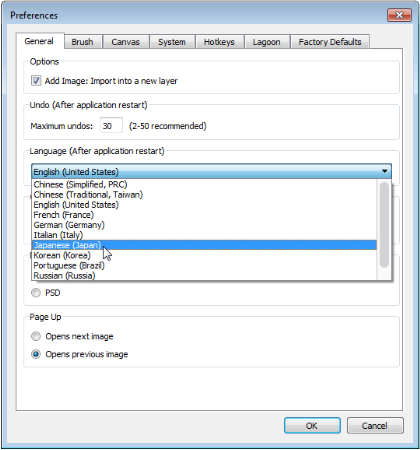
Select the language you want.
Tap OK.
Close SketchBook, then relaunch it. The language changes will now be visible.
Related topics
Here are some other articles you might be interested in:
Customizing your UI in SketchBook Pro Mobile
You can customize your Corner Shortcuts and 3-finger Swipe tools, along with the brushes in the Brush Palette. If you spend a lot of time in SketchBook, a few customizations can go a long way toward improving your productivity.
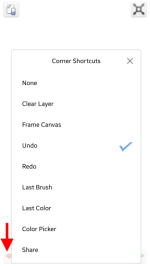
Customizing the corner tools
Change your corner tools to ones you use all the time.
Tap
 and select
  Preferences.
Scroll down to the Corner Shortcuts section. Tap a corner tool to display a list of all available tools.
Select a new tool from the list. This new tools will replace the previous one.
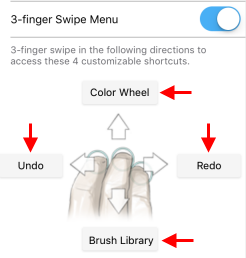
Customizing the 3-finger swipe menu
Change the tools accessed when you 3-finger swipe.
Tap
and select Preferences.In the 3-finger Swipe Menu section, tap a tool you want to change to display a list of available tools.
Select a new tool from the list. This new tools will replace the previous one.
How to hide your UI
If you like to sketch without the visual clutter of the UI, tap  to hide it.
For iPad users For accessing tools, you will be in Rapid UI mode and can access the Palette Sliders and Trigger. See Rapid UI mode for all the details.
For handheld device users
When you need a tool, you can access the Corner tools or tools found in the marking menu. For any tools not in either of those, you will need to tap again to display the UI.
Changing the language displayed in the UI on Mobile
If you would like to change the language displayed in the app to something else, you can do this through the settings of your device.
iOS
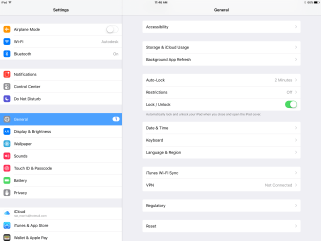
- On your device, open your Settings > General and scroll to the bottom of the page. Look for and tap Language & Region.
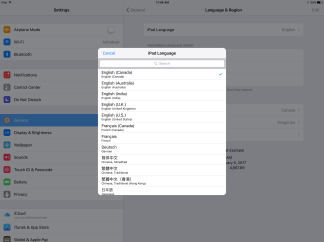
- Tap iPad Language and select the language you want from there.
- Tap Done. A message appears asking if you would like the language settings changed.
- Tap Continue to change the displayed language.
Android
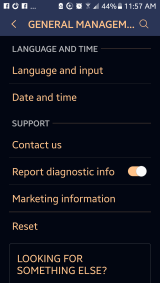
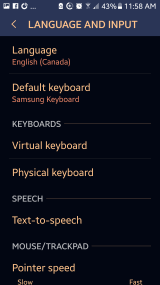
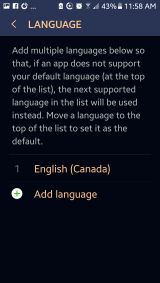
On your device, open your Settings > General Management and select Language and input, then Language. You might need to press Add language to load the one you want.
Customizing your UI in SketchBook Pro Windows 10
SketchBook Pro Windows 10 doesn't currently have tools for customizing your UI. However, you can move the UI around as you like.
- If you want to create a custom sized canvas, see Creating a custom canvas size.
- If you want to create custom brush sets, see How to create a new brush set.
Using Fullscreen mode
Are there times when you want to hide the UI, work in full screen mode, and just sketch? Are there windows you want displayed and others you don’t? Go between fullscreen mode with no UI and regular view, which displays the UI.
In the toolbar, at the far right end, tap  (Toggle Fullscreen On/Off) to enter Fullscreen mode.
To exit this mode, tap  (Toggle Fullscreen On/Off).

Showing/hiding some UI
To select individual UI elements, use  UI Toggle. The following options from the UI Toggle menu show or hide the selected UI:
- Brush Library – access a library of 140+ brushes
- Brush Editor – access both the Brush Puck and "Brush Properties to customize brushes to your specifications
- Color Editor – access both the Color Puck and Color Editor to create and tweak colors
- Layer Editor – access the Layer menu, blend modes, and layers
- Default Layout – reset the UI to its default arrangement
This is particularly handy for using multiple monitors. If you move the canvas to a different monitor and the UI still appears on the other monitor, select Default Layout to move it all to the new location with the canvas.
Changing the language displayed in SketchBook Pro
In SketchBook Pro Windows 10, there are no language settings within the app. This doesn’t mean you can’t change the language the app displays, it just means there is another way to do this. SketchBook Pro takes its cues for the language it displays from your operating system (OS).
Check out this video on how to change your language settings on Windows 10.