Creating a texture brush
Jump to Mobile or Windows 10

What is a texture brush and why use one? A texture brush turns a smooth stroke into something far more interesting, by adding a texture to it. Use this texture to help simulate the look and feel of something in the real world. Texture brushes can make something look soft, fluffy, even gritty. If you want to create a brick wall and add graffiti to it, you’ll need a texture brush to simulate the textured surface and the paint of the graffiti that soaked into the pores of the brick.
If you want to create a brush stroke that looks like you’ve painted over a surface with a texture, such as canvas, or like you’ve shaded over a piece of paper with a coin underneath it, try creating a texture brush. It adds another dimension to your stroke. Once you have selected a texture, you can play with it, making it subtle or adding complexity.
Once you’ve created brush (see Changing brush properties and Custom brushes), a texture can be added to it, using either one of the default textures, by importing a texture or by capturing one.
Creating a texture brush in SketchBook Pro Desktop
Tap
 to access the Brush Library.
Tap a brush set, then tap-hold
 and flick
  and select a brush from the Create Do-It-Yourself Brush dialog and tap Create.
Double-tap the new Do-It-Yourself Brush to open Brush Properties.
In Brush Properties, tap the Advanced tab, scroll down to Nib and open it, then scroll down to Texture.
Tap
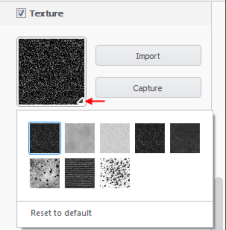
 (the triangle in the bottom right corner of Texture) and select a texture from the list of options.
If you want to modify the texture further, try inverting the texture, or changing the scale. brightness, or contrast. There are many options you can play with, so experiment.
Creating a texture brush in SketchBook Pro Mobile
SketchBook Pro Mobile doesn't have the functionality for creating a texture brush, yet. However, if you're running version 4.0 or higher, you do have two sets of texture brushes, Basic and Texture Essentials.
Creating a texture brush in SketchBook Pro Windows 10
Once you’ve created a DIY brush, if you don't want to use one of the textures from the default library, you can Import or Capture to a texture.

Tap
 to access the Brush Library.
Tap a brush set, then tap-hold
 and flick
  to select it to create a Do-It-Yourself Brush.
Double-tap the Do-It-Yourself Brush to open Brush Properties.
In Brush Properties, tap the Advanced tab, scroll down to Nib and open it, then scroll down to Texture.
Tap
 (the triangle in the bottom right corner of Texture) and select a texture from the list of options.
INFORMATION: As you import texture patterns, they will appear in this library.
If you want to modify the texture further, try inverting the texture, or changing the scale, brightness, or contrast. There are many options you can play with, so experiment.