Using Brush Properties
Jump to Mobile or Windows 10
Use Brush Properties to customize and change the characteristics of a brush. Though we try to create brushes you will love, sometimes, what might be just right for one person isn’t for another. This is why we have Brush Properties. You will find properties like wetness, slant, and tilt. However, keep in mind, each brush has a specific set of properties. Not every brush will have a wetness or tilt setting.
The Brush Properties look slightly different from version to version, the functionality can also vary greatly. For differences in functionality, see the sections that follow.
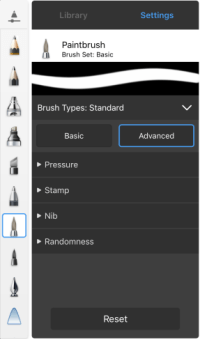
Advanced brush properties
Tilt settings, edge hardness, brush radius, opacity and flow, stamp properties, texture, and randomizing options are found in the Advanced tab.
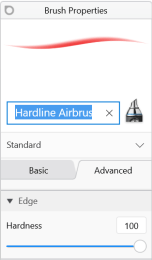
Edge
By setting the edge of the brush stamp, you also affect the brush stroke. A brush with a soft edge gives the brush stamp a gradient/fade around the edge. A sharp edge creates a crisp stamp, almost right to the edge. However, there will be a bit of a blur, to help with anti-aliasing. Setting the stamp to a mid-value creates a stamp midway between a soft or sharp edge.

Brush Radius, Opacity, and Flow
For many of our users (especially those who’s work is heavy on line-work), the majority of their custom brushes are built using only this section. A set of great pencils and tapered paint brushes is crucial for them.
- Radius with Heavy/Light Pressure – Sets brush thickness. Like on mobile, these settings can be reversed.
- Opacity with Heavy/Light Pressure – Sets the opacity (opaqueness/transparency) of the stroke. For example, your main pencil may have a maximum of 80%, but your airbrush 30%.
- Flow – Handles the speed of the paint. When adding a stroke, the more pressure you apply, the faster the paint appears (and the more that appears) on the canvas. A light touch results in less and lighter paint applied to the canvas.
Stamp
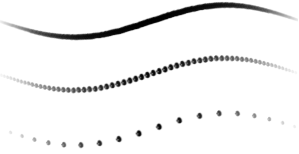
Spacing – The distance between stamps in a single stroke. The default spacing of the Pencil is 1.2. The minimum spacing is 0.1, this will give you a very dense brush, and may slow performance. The max is 10.0.
Roundness – The default for most brushes is 100%. For a brush that requires rotation or simulated tilt, this is where you start. None of the Rotation tools (see Rotation Dynamics) have any affect without an aspect ratio (Roundness) below 100% (since the stamp would be a perfect circle).
Rotation Dynamics:
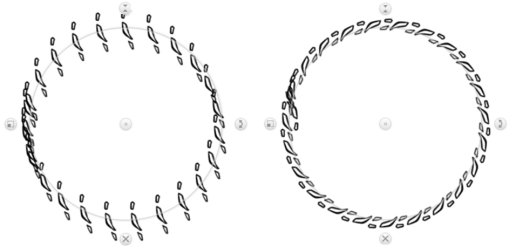
Rotate to stroke – This can be very handy, specifically when doing concept designs with quick detailed electronics, braided hoses, springs/suspension, and materials like carbon fiber. For example, you’re trying to simulate the profile tire tread. Using an ellipse, you can put a stroke down without Rotate to Stroke. However, if you turn on Rotate to Stroke, and fine tuned the Rotation value, it hugs a circle – which is what you need for a tread profile. To finish it off, play around with Spacing and Brush Size to perfect the loop pattern.
For creating a brush with tilt added to its stroke, use Controlled by stylus tilt and check out the Tilt section that follows.
Tilt
What does tilt do? It controls how the stroke of the brush is drawn. If you want to control the tilt of your stylus, use Scaling Percentage and Controlled by stylus tilt.
In Brush Properties, tap the Advanced tab.
Scroll down to Stamp, select Rotation > Rotation Dynamics, then Controlled by stylus tilt. Without this set, the tilt of your stylus won’t have any effect on the strokes of your brush.
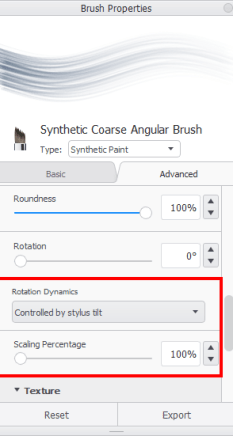
Tap-drag the Scaling Percentage slider to control the elongating of the brush stamp in conjunction with the tilt of your stylus.
- With a low Scaling Percentage, you have to tilt your stylus a lot more to achieve the tilting effect.
- With a higher value, you don’t have to tilt your stylus as much to reach a similar effect.
If your stylus has an eraser, Scaling Percentage will apply to both the eraser and stylus tip.
Texture
When creating a brush, beyond customizing the settings of a brush, you can also create its stamp. Either use Import to being in an image for the stamp or Capture to grab elements from your canvas, be it a drawing, painting or imported image, and create a brush based on that stamp. See Creating a texture brush to see how to capture a stamp for a custom texture brush.
Randomize
Depending on the brush selected, some of these setting may not be available. For color randomization, see How to randomize color.
- Size Randomize – Changes the size of the brush stamp within the stroke.
- Opacity Randomize – Behaves in the same way as Size Randomize only varying the stamp opacity/transparency.
- Flow Randomize – Varies the speed and amount of paint applied to the stamp.
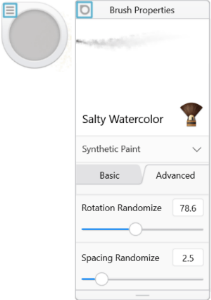
- Rotation Randomize – Changes the rotation of the stamp as the stroke is created. The only time this will not be noticeable is for perfectly symmetrical stamps. This is more visible for a brush with a roundness values below 50%.
- Space Randomize – Varies the amount of space between stamps in a stroke. This is more noticeable with a higher Spacing value.
Brush Properties in SketchBook Pro Desktop
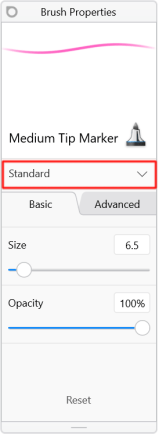
Brush Properties are opened by tapping  at the top of the Brush Palette. Depending on the brush selected, there may be two tabs of properties – Basic and Advanced – and an option for changing the brush type.


Changing brush properties
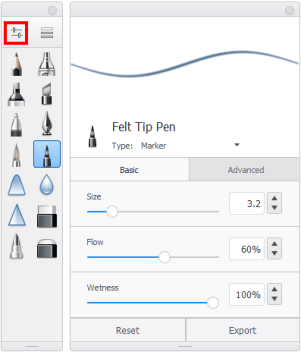
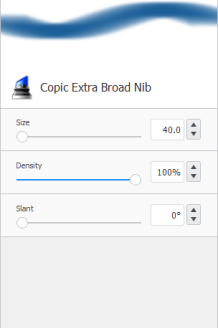
In the Brush Palette, tap or double-tap a brush to access the Brush Properties window and change brush settings, such as Flow and Wetness.
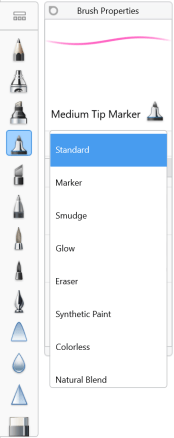
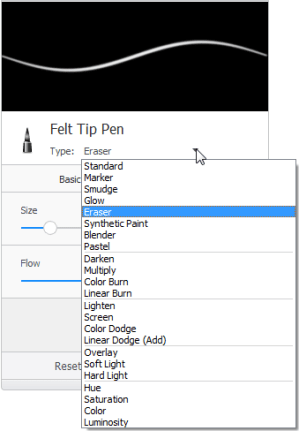
Don’t forget, for many of the brushes additional properties can be found in the Advanced tab. Tap the arrow next to Type to change the type of brush.
Brush Properties in SketchBook Pro Mobile
Though Brush Properties might look slightly different depending on the type of device you're using, the functionality is pretty similar. For differences in functionality, see the sections that follow.
Brush Properties for tablets
In the Brush Palette, tap
 to open the Brush Library.
In the Brush Library, select the brush you want to customize.
Tap Settings to access Brush Properties and edit the brush.
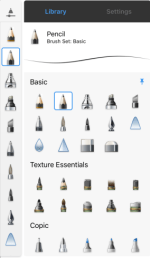
To return to your brushes, tap Library.
INFORMATION: If your interface is hidden, see Rapid Mode for how to access Brush Properties without having to unhide your interface.
Brush Properties for handheld device
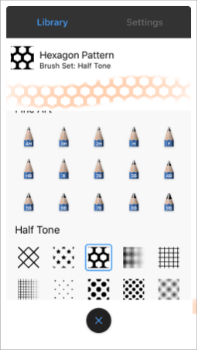
- Tap to open the Brush Library.
- In the Brush Library, select the brush you want to customize.
- Tap Settings to access Brush Properties and edit the brush.
- To return to your brushes, tap Library.
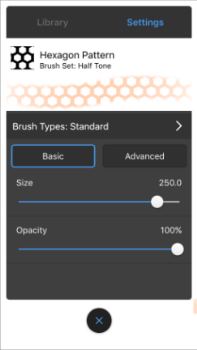
Changing brush properties on Mobile
Is your brush too big, opacity too high, or the tilt not quite what you want? Use the sliders in Brush Properties to change these settings. Flick up to access even more properties.
Changing brush properties on an iPad
In the Brush Palette, tap
to open the Brush Library.In the Brush Library, select the brush you want to customize.
Tap Settings to access access Brush Properties and edit the brush.
To return to your brushes, tap Library.
INFORMATION: If your interface is hidden, see Rapid Mode for how to access Brush Properties without having to unhide your interface.
Changing brush properties on handheld devices
Tap
to open the Brush Library.Select a brush.
Tap Settings to access Brush Properties, then do either of the following:
- Tap-drag the slider to the right to increase its value.
- Tap-drag the slider to the left to decrease its value.
Brush Properties in SketchBook Pro Windows 10
Want to customize or tweak a brush? In the Brush Puck, tap ![]() or double-tap a brush to switch the Brush Puck to Brush Properties.
or double-tap a brush to switch the Brush Puck to Brush Properties.
Depending on the brush selected, there may be two tabs of properties – Basic and Advanced (Pro). However, before we get to that, let’s look a bit closer at the features in Brush Properties. Within this window, you can:
- change the name of a brush
- change the brush icon
- change the type of brush
- change the properties of a brush
- reset the brush
Renaming a brush
In the Brush Properties, tap the brush name.
Enter a new name.
Tap Enter.
Changing brush properties on Windows 10
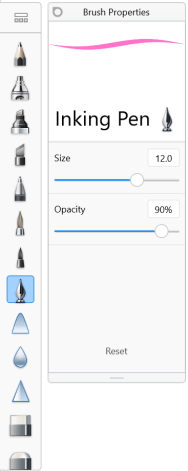
In the Brush Palette, double-tap a brush to access the Brush Properties window and change brush settings, such as Flow and Wetness.
Don’t forget, for many of the brushes additional properties can be found in the Advanced tab.
Tap the arrow next to Type to change the type of brush.
If a default brush is selected, like in the image to the left, its brush type can’t be changed.