Tessellation is a tiled representation of a surface using polygons. Smaller polygons give a more accurate representation and better strategies and analyses, but need more system resources. By default, Inventor surfaces are tessellated in TruPlan and can then considered to be TruPlan surfaces. You might want to change tessellation settings for a surface occasionally, either to improve appearance or optimize system resources. Using the Tessellate Surface Properties dialog box, you can change these settings, or even replace an Inventor surface with another Inventor surface.
To Change Tessellation Settings on a Surface
- Double-click an Inventor surface node in the
TruPlan browser.
The Tessellate Surface Properties dialog box opens.
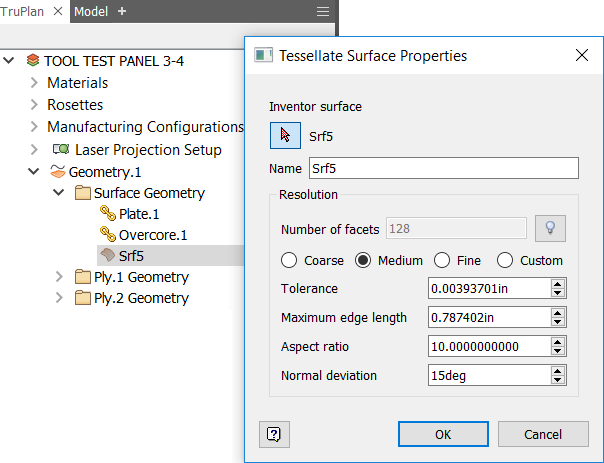
- Optional: Enter a name for the surface in the Name box.
This is the name you will see for the surface in the TruPlan browser.
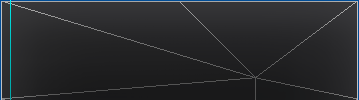
- Zoom into the surface to see its tessellation polygons.
- Click
Preview
 and adjust tessellation settings as needed.
Tip: See Tessellation Dialog Box Reference for descriptions of the Tessellation controls.With Preview enabled, black lines representing the new settings are show on the surface alongside the current settings (white lines).
and adjust tessellation settings as needed.
Tip: See Tessellation Dialog Box Reference for descriptions of the Tessellation controls.With Preview enabled, black lines representing the new settings are show on the surface alongside the current settings (white lines).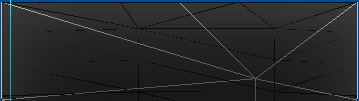
- Click OK to save the new settings.
To Replace one Inventor Surface with Another
At times you might want to replace one surface with another; for example if the surface is not quite the right shape, or if it has characteristics that you want to change, such as using fillets instead of sharp transitions.
- If you have not already done so, create a sketch in Inventor that you want to use as the new surface, and add it to your TruPlan part.
- In the
TruPlan browser, double-click the node of the surface that you want to replace.
The Tessellate Surface Properties dialog box opens, showing the name of the surface you double-clicked.
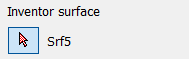
- In the
TruPlan window, select the surface that will replace the current surface.
The new surface name is added to the Tessellate Surface Properties dialog box.
- Optional: Adjust tessellation settings for the new surface.
- Click OK.