Create a new item
Upchain CAD plugins enable you to create items when registering part and assembly files into Upchain. Each selected part and assembly file is registered to its own item and assigned an item number (according to the item numbering rules configured by your Tenant Admin).
Autodesk recommends you register your CAD files into Upchain as soon as possible so that file and attribute changes can be tracked and managed within one central location from the start. This also means your team members can begin collaborating on designs and associated work as well.
Before you start
File naming
Every [filename + file extension] must be unique in Upchain. This is to ensure consistency in the data, and so that CAD and drawing files are not accidentally mixed up between items. The extension is included in the item name, so you can register Part1.ipt only once, but it is possible to also register Part1.idw, Part1.iam, Part1.dwg, etc. to the same item or a different item.
By default, it is your responsibility to ensure every file name is unique before registering them into Upchain. However, your Tenant Admin can configure the tenant property filename.pattern to specify how CAD files and drawings will be renamed upon registration. This gives your organization control and consistency over the naming convention of all CAD and drawing file names in Upchain. This also means you can register the same CAD file into Upchain since it gets renamed every time.
Item types
By default, all assembly files are associated to an assembly item type. All parts are associated to a manufactured item type. Once the items are registered into Upchain, you can modify the item type as necessary. However, if you have item numbering rules that are specific to the item type, then you won't be able to change the item number to align with the item type after item creation. In other words, the item number is set during item creation and cannot be changed afterwards. Click here to learn how you can set item types during or before item creation. Click here to learn how item types can be predetermined when using Inventor.
File size
If you are attempting to create items for an assembly with more than 20000 nodes, the process will fail because the plugin runs out of memory when attempting to check in too many CAD files. Instead, you should register lower levels first, then use the Root Check In function to register the higher levels.
Register CAD to new items with the Upchain CAD plugin
Open the CAD file in your CAD system.
In the CAD plugin, click the BOM views icon
 in the menu bar.
Select cBOM from the drop-down options if it is not already selected.
Refresh (
 ) the cBOM view.
 Upchain references the files currently opened in your CAD system and displays the cBOM as a hierarchical indented structure that represents the stucture of your CAD.
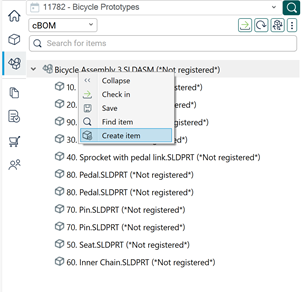
Files are listed as 'Not Registered'
Right-click on the top item in the cBOM and select Create item.
The Project selection window opens.
Click the box next to the project in which to create the item. If you wish to add this item as a child to an existing item within that project's BOM, expand the chevron to the left of the project name and check the box next to the desired item.
Click Select.
If the item you selected already contains child items, Upchain presents you with a message asking if you wish to add new items to the structure. The existing items will remain untouched. Click Yes to continue.
The CAD Check in window opens to provide a preview of the cBOM files (left side) and the engineering BOM items to be created (right side). By default, all files will have a green checkmark icon beside them to indicate that for each file, a corresponding BOM item will be created. You may perform the following actions in this window:
- (Optional) Click the check mark to change it to an X to register the CAD file as a phantom.
- (Optional) Change the item type in the Item Type column.
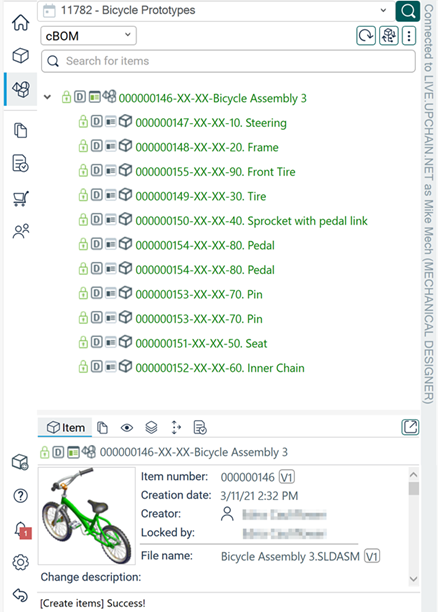
Click OK at the bottom of the CAD Check in window. The designs of the assembly and all child parts are now associated with Upchain items, assigned unique item numbers, and saved in the Upchain database.
Your newly-created items are now locked (checked out) to you as shown with a green check out lock and green text. This is so that you can make changes to the design or the item attributes before checking the item in.
- If you wish to make further edits to the CAD, you can do so now. To create a new file version of the CAD and remove the check out locks, right-click the top parent item and select Check in.
- If you don't want to make further edits and simply wish to remove the check out locks from the item, right-click the item and select Cancel check out. If you wish to remove the check out locks for a parent file and all its children, right-click the parent and select Cancel all check outs.