Assign or reassign the item type
By default, when creating an item in the CAD Plugin, part files are assigned to Manufactured items as their item type, and assembly files are assigned to the Assembly item type. You can read more about the different item types here.
You can modify this default behavior in one of three ways:
Edit the Item type in the item details in the CAD plugin or the web application to reassign the item type.
Important: Changing the item type does not change the item number. The item retains the item number assigned at the time of its creation.Use your CAD software to assign the required item type before registration.
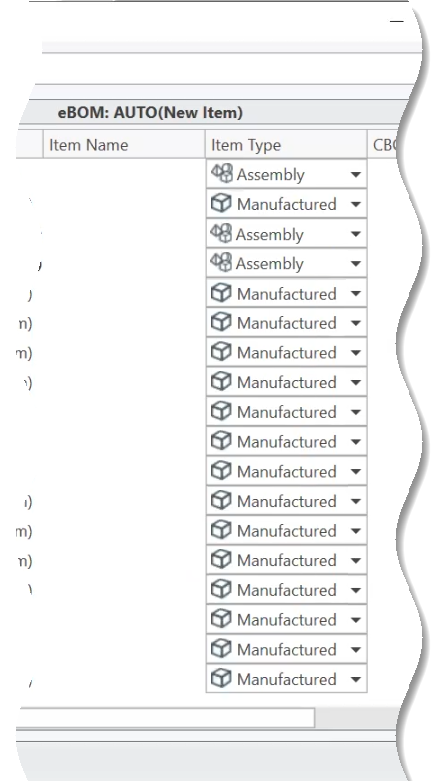
Set multiple item types during registration with the BOM Wizard
Use the BOM Wizard (BOM anomaly window, CAD Check in window) to assign types for multiple items during registration.
Open the assembly in your CAD software.
In the CAD Plugin, refresh
 the cBOM view.
Right-click on the assembly and select Create item.
In the window that opens, select the location in which to create items and click Select.
The CAD Check in window. It includes an Item Type column on the right side (eBOM).
By default, Inventor items are assigned according to their defined type in the Inventor BOM table. For all other CAD items, a new assembly is assigned as Assembly and a part as Manufactured Item.
If you import items as phantom, no item type is assigned. You can check out the item separately to assign a type to it.
For each entry in the Item Type column, select an appropriate item type from the drop-down list.
The drop-down list is populated with all pre-defined item types in the current tenant.
Click OK.
Use your CAD software to set item type before registration
Except for Inventor and Solidworks, follow these steps to set the item type for parts created in all other supported CAD softwares:
Create a hidden .plmworx folder in the same location as your CAD files.
In the .plmworx folder, create a text file using the following naming convention: part or assembly name.file type.cp.
In the .cp file, add a key:value pair.
Enter
PLM_Make_Buyas the key and provide the item type as its value.For example:
PLM_Make_Buy:Purchased Electromagnetic Part.
Repeat these steps for each part that you want to specify its item type.
If the assembly spans multiple folders, then the .plmworx folder and the configured part or assembly name.file type.cp file must be available in each folder where those CAD files reside.
Set the item type using Inventor
- You can modify the item type in Manage > Bill of Materials > BOM Structure column. Click here for more detailed instructions.
Set the item type using Solidworks
- Open the CAD file's custom properties.
- Add
PLM_Make_Buyto the custom properties table and set its value as the required item type. - Close the custom properties and save the CAD file.