Exemples de formules de champs calculés
Opérations arithmétiques
Les champs calculés peuvent être utilisés pour calculer le coût total d’une modification en fonction de divers coûts fournis par l’utilisateur : COST_5 = COST_1 + COST_2 + COST_3 + COST_4.
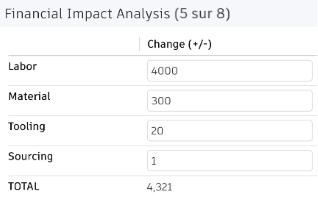
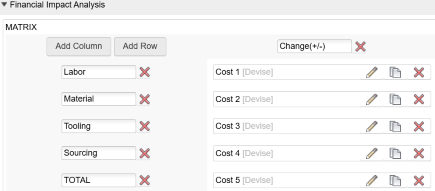
Utilisez la fonction « coalesce » pour faire en sorte que les valeurs nulles soient remplacées par des zéros : coalesce(COST_1,0) + coalesce(COST_2,0) + coalesce(COST_3,0) + coalesce(COST_4,0).
Concaténation
Un champ de dimensions permet d’afficher les valeurs concaténées des champs dédiés : LENGTH||' mm x '||WIDTH||' mm x '||HEIGHT||' mm'.

Conditions et HTML intégré
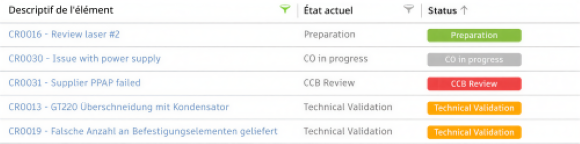
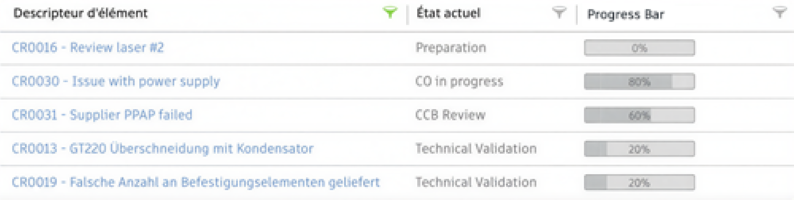
Utilisez des couleurs pour mettre en évidence les champs calculés et indiquer les états pertinents d’un processus métier. Par exemple, voici comment forcer la mise à jour du style d’un champ STATUS_NAME en fonction des transitions de workflow : item.STATUS_NAME = item.descriptor.workflowState.
'<div style="border-radius:4px; height:20px; line-height:20px; text-align:center; font-size:0.9em;font-weight:600;width:140px;color:white;background-color:'||
CASE
    WHEN (STATUS_NAME = 'Preparation') THEN '#87bc40'
    WHEN (STATUS_NAME = 'Technical Validation') THEN '#ffa600'
    WHEN (STATUS_NAME = 'CCB Review') THEN '#ee4444'
    WHEN (STATUS_NAME = 'Fast Track') THEN '#ee4444'
    ELSE '#bbbbbb'
END
||';">'||STATUS_NAME||'</div>'
Illustration d’un tampon
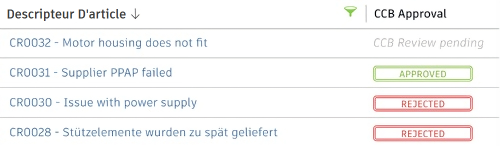
Une illustration de tampon peut être appliquée pour mieux voir si une modification a été approuvée ou rejetée. L’exemple ci-dessous récupère les informations relatives à l’approbation dans un champ, qui peut être défini manuellement ou à l’aide d’un script. Dans cet exemple, nous utilisons le champ CCB_DECISION.
CASE
    WHEN (CCB_DECISION is null) THEN '<span style="white-space:nowrap;color:#bbb;font-style:italic;">CCB Review pending</span>’
    WHEN (CCB_DECISION = 'Approved') THEN '<div style="border-radius:4px;height:19px;line-height:15px;text-align:center;font-size:0.8em;font-weight:600;width:120px;color:#87bc40;border:3px double #87bc40">APPROVED</div>'
    WHEN (CCB_DECISION = 'Rejected') THEN '<div style="border-radius:4px;height:19px;line-height:15px;text-align:center;font-size:0.8em;font-weight:600;width:120px;color:#ee4444;border:3px double #ee4444">REJECTED</div>'
    ELSE ' '
END
Priorité
Cet exemple peut être utilisé pour mieux visualiser la priorité des demandes en appliquant des couleurs et des éléments visuels.

CASE
    WHEN (PRIORITY = 2) THEN '<span sort="4" style="font-size:1.2em;color:#eb4d4d;">■ ■ ■</span>'
    WHEN (PRIORITY = 1) THEN '<span sort="3" style="font-size:1.2em; color:#FAA21B;">■ ■</span><span style="font-size:1.2em;color:#e4e4e4;">■</span>'
    WHEN (PRIORITY = 3) THEN '<span sort="2" style="font-size:1.2em; color:#8fc844;">■</span><span style="font-size:1.2em;color:#e4e4e4;">■ ■</span>'
    ELSE '<span sort="1" style="font-size:1.2em; color:#e4e4e4;">■ ■ ■</span>'
END
Résumer les propriétés d’évaluation
Cet exemple de champ calculé peut être utilisé pour résumer les propriétés d’évaluation, telles que la priorité, les risques et l’effort.

'<div style="float:left;margin-right:2px;
height:20px;width:20px;font-size:0.8em;line-height:20px;border-radius:50%;text-align:center;color:#fff;background:'||
CASE
    WHEN(PRIORITY = 1) THEN '#ffa600">2</div>'
    WHEN(PRIORITY = 2) THEN '#ee4444">1</div>'
    WHEN(PRIORITY = 3) THEN '#8fc844">3</div>'
    ELSE '#eee"></div>'
END
||'<div style="float:left;margin-right:2px;height:20px;width:20px;font-size:0.8em;line-height:20px;border-radius:50%;text-align:center;color:#fff;background:'||
CASE
    WHEN(RISK = 1) THEN '#ffa600">2</div>'
    WHEN(RISK = 2) THEN '#ee4444">1</div>'
    WHEN(RISK = 3) THEN '#8fc844">3</div>'
    ELSE '#eee"></div>'
END||'<div style="float:left;height:20px;width:20px;font-size:0.8em;line-height:20px;border-radius:50%;text-align:center;color:#fff;background:'||
CASE
    WHEN(EFFORT = 1) THEN '#ffa600">2</div>'
    WHEN(EFFORT = 2) THEN '#ee4444">1</div>'
    WHEN(EFFORT = 3) THEN '#8fc844">3</div>'
    ELSE '#eee"></div>'
END
Barre de progression
Visualisez l’avancée d’un processus métier à l’aide d’une barre de progression. Dans l’exemple ci-dessous, le champ de barre de progression doit être défini et mis à jour en fonction des transitions de workflow.
Après la première transition, le champ est mis à jour (item.progressbar = 10) pour indiquer que le processus métier est terminé à 10 %.
'<div style="padding:3px 5px 2px;
    font-size:0.8em;
    text-align:center;
    width:120px;
    background:linear-gradient (to right, #bfc2c3 0%, #bfc2c3 '||PROGRESS||'%, #dedede '||PROGRESS||'%);border:1px solid #8a8a8a;border-radius:2px;">'||PROGRESS||'%
</div>'
La barre de progression peut également être utilisée pour indiquer la consommation réelle des ressources par rapport à la consommation planifiée.
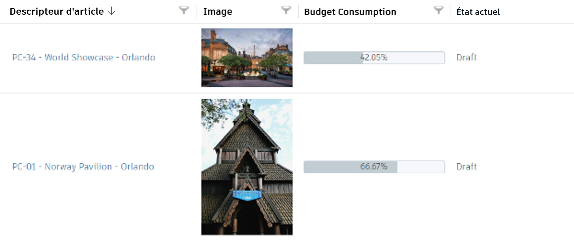
'<div style="min-width:90px;
    max-width:calc(100% - 20px);
    height:20px; line-height:18px;
    border-radius:3px; text-align:center;
    font-size:0.9em;
    background:linear-gradient(to right,#c2cdd3 0%, #c2cdd3 '||ROUND(((BUDGET_ACTUAL/BUDGET)*100)::numeric, 2)||'%, #f5f7fa '||ROUND(((BUDGET_ACTUAL/BUDGET)*100)::numeric, 2)||'%);border:1px solid #c2cdd3">'|| ROUND(((BUDGET_ACTUAL/BUDGET)*100)::numeric, 2) ||'%
</div>'
Calcul des durées et des écarts
Les champs calculés peuvent être utilisés pour calculer les durées et les écarts par rapport au plan en fonction des dates de début et de fin définies par l’utilisateur d’une part, et les dates de début et de fin réelles d’autre part : DATEDIFF('DAY', TARGET_START_DATE, TARGET_COMPLETION_DATE).

Vous pouvez appliquer un code couleur en fonction de l’écart.

'<div style="border-radius:2px; height:20px;line-height:20px;text-align:center;font-size:0.9em;width:90px;color:white;background-color:'||
 CASE
    WHEN (TARGET_START_DATE is null) THEN '#bbb">?</div>
    WHEN (ACTUAL_START_DATE is null) THEN
        CASE
            WHEN (DATE_PART('day', NOW() - TARGET_START_DATE) > 0) THEN '#ee4444;">'||DATE_PART('day', NOW() - TARGET_START_DATE)||' days</div>'
            WHEN (DATE_PART('day', NOW() - TARGET_START_DATE) < 0) THEN '#87bc40;">'||DATE_PART('day', NOW() - TARGET_START_DATE)||' days</div>
            ELSE '#ffa600;">0</div>'
        END
    ELSE
        CASE
            WHEN (DATE_PART('day', ACTUAL_START_DATE - TARGET_START_DATE) > 0) THEN '#ee4444;">'||DATE_PART('day', ACTUAL_START_DATE - TARGET_START_DATE)||' days</div>'
            WHEN (DATE_PART('day', ACTUAL_START_DATE - TARGET_START_DATE) < 0) THEN '#87bc40;">'||DATE_PART('day', ACTUAL_START_DATE - TARGET_START_DATE)||' days</div>'
            ELSE '#ffa600;">0</div>'
        END
END
Mettre en évidence les modifications récentes
Les champs calculés peuvent être utilisés pour aider les utilisateurs à identifier les enregistrements qui ont été modifiés récemment.
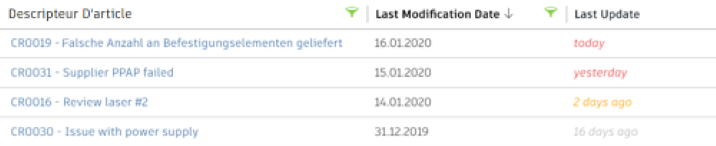
'<span style="font-style:italic;color:'||
CASE
    WHEN (DATE_PART('day’, CURRENT_DATE - LAST_MODIFICATION_DATE) > 10) THEN '#bbbbbb;">'||DATE_PART('day’, CURRENT_DATE - LAST_MODIFICATION_DATE)||' days ago</span>'
    WHEN (DATE_PART('day', CURRENT_DATE - LAST_MODIFICATION_DATE) <  1) THEN '#eb4d4d;">today</span>'
    WHEN (DATE_PART('day', CURRENT_DATE - LAST_MODIFICATION_DATE) <  2) THEN '#eb4d4d;">yesterday</span>
    ELSE '#ffa600;">'||DATE_PART('day', CURRENT_DATE - LAST_MODIFICATION_DATE)||' days ago</span>'
END
Jours restants
Les champs calculés peuvent être utilisés pour calculer le nombre de jours restants. Là aussi, un code couleur peut être appliqué pour indiquer les retards et les processus terminés.
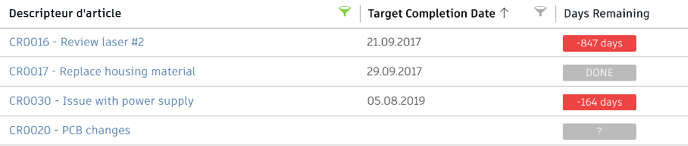
'<div style="border-radius:2px;height:20px;line-height:20px;text-align:center;font-size:0.9em;width:90px;color:white;background-color:'||
CASE
    WHEN (TARGET_COMPLETION_DATE is null) THEN '#bbb">?</div>'
    WHEN (PROGRESS < 100) THEN
        CASE
            WHEN (DATE_PART('day', TARGET_COMPLETION_DATE - NOW()) <  0) THEN '#ee4444;">'||DATE_PART('day', TARGET_COMPLETION_DATE - NOW())||' days</div>'
            WHEN (DATE_PART('day', TARGET_COMPLETION_DATE - NOW()) < 10) THEN '#ffa600;">'||DATE_PART('day', TARGET_COMPLETION_DATE - NOW())||' days</div>'
            ELSE '#87bc40;">'||DATE_PART('day', TARGET_COMPLETION_DATE - NOW())||' days</div>'
        END
    ELSE '#bbb">DONE</div>
END
Code QR
Les champs calculés peuvent être utilisés pour afficher des codes QR. Vous pouvez alors les imprimer pour permettre un accès facile aux enregistrements sur les appareils mobiles. Pour que cette option soit utilisable, le champ DMS_ID doit être défini dès la création d’un article à l’aide d’un script. Le nom du site et la valeur workspace_ID (identifiant d’espace de travail) dans l’URL doivent être modifiés pour correspondre à votre site.
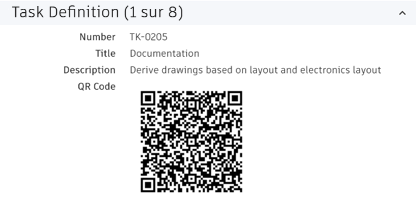
'<img src="https://chart.googleapis.com/chart?cht=qr&chs=180x180&chl=https://<tenantname>.autodeskplm360.net/plm/workspaces/2/items/itemDetails?view=full%26tab=details%26mode=view%26itemId=urn%60adsk,plm%60tenant,workspace,item%60adskdickmans,2,'||DMS_ID||'">'Processus d’approbation d’étape
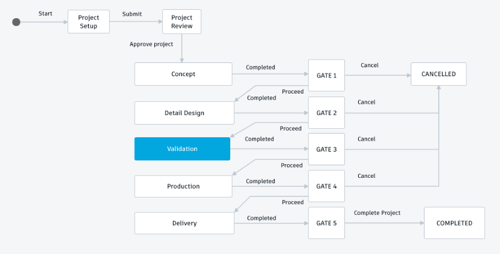
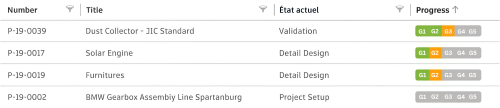
L’avancement d’un projet à travers différentes phases et étapes peut être affiché visuellement et sous forme de graphique.
CASE
WHEN (STEP = 99) THEN '<span style="color:#c2cdd3;font-style:italic;">Project cancelled</span>'
ELSE
'<div style="padding-left:3px;border-radius: 4px 0px 0px 4px;border-right:1px solid white;font-size:0.9em;line-height:20px;width:36px;height:20px;text-align:center;color:#fff;float:left;background:'||
CASE
WHEN (STEP = 0) THEN '#c2cdd3'
WHEN (STEP = 1) THEN '#ffa600'
WHEN (STEP = 2) THEN '#ee4444'
ELSE '#8fc844'
END
||'">G1</div><div style="border-right:1px solid white;font-size:0.9em;line-height:20px;width:36px;height:20px;text-align:center;color:#fff;float:left;background:'||
CASE
WHEN (STEP < 3) THEN '#c2cdd3'
WHEN (STEP = 3) THEN '#ffa600'
WHEN (STEP = 4) THEN '#ee4444'
ELSE '#8fc844'
END
||'">G2</div><div style="border-right:1px solid white;font-size:0.9em;line-height:20px;width:36px;height:20px;text-align:center;color:#fff;float:left;background:'||
CASE
WHEN (STEP < 5) THEN '#c2cdd3'
WHEN (STEP = 5) THEN '#ffa600'
WHEN (STEP = 6) THEN '#ee4444'
ELSE '#8fc844'
END
||'">G3</div><div style="border-right:1px solid white;font-size:0.9em;line-height:20px;width:36px;height:20px;text-align:center;color:#fff;float:left;background:'||
CASE
WHEN (STEP < 7) THEN '#c2cdd3'
WHEN (STEP = 7) THEN '#ffa600'
WHEN (STEP = 8) THEN '#ee4444'
ELSE '#8fc844'
END
||'">G4</div><div style="font-size:0.9em;line-height:20px;width:36px;height:20px;text-align:center;color:#fff;float:left;border-radius: 0px 4px 4px 0px;padding-right:3px;background:'||
CASE
WHEN (STEP < 9) THEN '#c2cdd3'
WHEN (STEP = 9) THEN '#ffa600'
WHEN (STEP = 10) THEN '#ee4444'
ELSE '#8fc844'
END
||'">G5</div>'
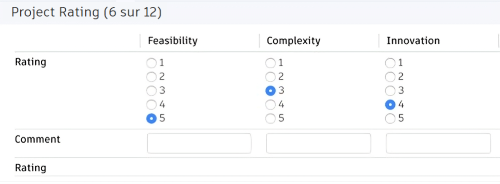
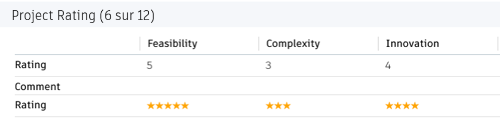
ENDNotation
Les champs calculés peuvent être utilisés pour afficher une notation en nombre d’étoiles. Ainsi, les utilisateurs disposent instantanément d’un repère visuel pour comprendre les priorités.
CASE
    WHEN (RATING_1 = 1) THEN '<span style="color:#ffa600">★</span>'
    WHEN (RATING_1 = 2) THEN '<span style="color:#ffa600">★★</span>'
    WHEN (RATING_1 = 3) THEN '<span style="color:#ffa600">★★★</span>'
    WHEN (RATING_1 = 4) THEN '<span style="color:#ffa600">★★★★</span>'
    WHEN (RATING_1 = 5) THEN '<span style="color:#ffa600">★★★★★</span>'
END
Créer des boutons pour les liens
Les champs calculés peuvent aider à simplifier l’affichage des URL longues en les transformant en boutons.

'<a style="border: 1px solid #bec8d2;border-radius:3px;padding:6px 20px;color: #0a131c;font-weight:600;line-height:32px;text-align:center;text-decoration:none !important;white-space:nowrap;" target="_blank" href ="https://<tenantname>.autodeskplm360.net/plm/workspaces/54/addItem">Create Problem Report</a>'