The Vault client and the add-in clients each have an options page to help you customize your Vault experience. Refer to the section for your client for more information.
Vault Client Options
The Options dialog box in the Vault stand-alone client allows you to customize as well as streamline your workflow by suppressing certain dialog boxes and prompts.
You can also enable the document previewer. The document previewer allows you to preview a document in the preview pane without launching the application associated with the document.
Access the Options Dialog
- From within Autodesk Vault, select .
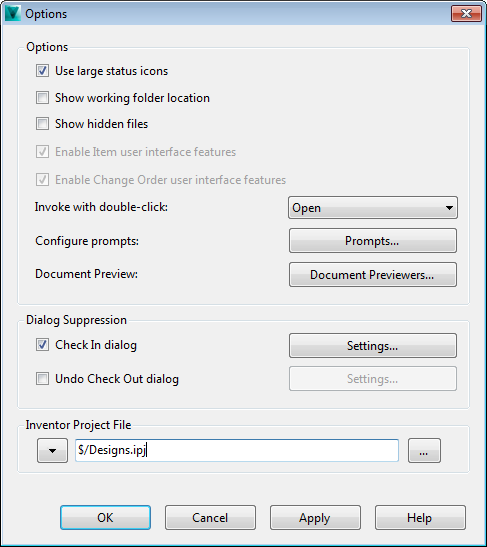
Options Dialog Details
- Use large status icons
- By default, small icons are used to indicate status. Turn on the Use large status icons check box to display large icons. Note: The Vault client must be restarted to see the large status icons.
- Show working folder location
- By default, the location of the working folder is not displayed. Turn on the Show working folder location in title bar check box to display the location of the working folder in the interface.
- Show hidden files
- You can choose whether or not to display the automatically generated .dwf files. By default, they are hidden in the file list. Turn on the Show hidden files check box to display the hidden files in the file list.
- Enable Items user interface features
- If the administrator has authorized overrides, you can enable the Items interface by selecting the Enable item user interface features check box.
- Enable Change Order user interface features
- If the administrator has authorized overrides, you can enable the Change Orders interface by selecting the Enable change order user interface features check box.
- Invoke with double-click
- Configure the default behavior for double-clicking a file with the Invoke with double-click setting. When you double-click a file in the vault, the default action is to display the read-only file in a new window. If Open is selected as the default, the file is checked out of the vault and opened in the associated application for editing. To change the default action, select an action from the drop-down list. Note: Inventor .dwg files are opened in Inventor for editing. If Inventor is not installed, the .dwg file is opened in AutoCAD.
When you double-click a component in Product View, the default action is performed on the associated file.
- Configure Prompts
- You can specify the default response for common dialogs so that every time certain dialogs are displayed, your preferred response is the default selection. You can also specify which commands are automatically performed without prompting you for input, reducing the number of times you need to directly interact with the vault.
- Document Preview
- A list of applications installed on your current system are listed in the Document Previewer Options dialog. Here you can enable certain applications for previewing documents in the Preview Pane.
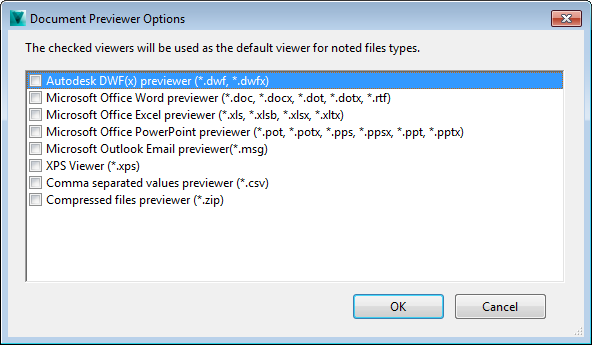
By default, the Autodesk Vault preview carousel view is used.
- Check In dialog
-
The Check In dialog has settings associated with it. You can specify default values for the dialog and choose whether or not the dialog actively prompts you while working with files in a vault.
- Undo Check Out dialog
-
The Undo Check Out dialog has settings associated with it. You can specify default values for the dialog and choose whether or not the dialog actively prompts you while working with files in a vault.
- Inventor Project File Field
- When working with Autodesk Inventor files in Vault, Inventor project files are involved in path change operations for Inventor files (such as renaming a file, moving a file, copy design or replace). You can select whether to use the default Inventor Project File configured by your Administrator, or if you want to use the last Vault controlled project file checked into the Vault with the Inventor Vault add-in.
Vault Add-in Options
There are several ways to streamline your vault workflow. You can specify the default response for common dialogs so that every time certain dialogs are displayed, your preferred response is the default selection. You can also specify which commands are automatically performed without prompting you for input, reducing the number of times you need to directly interact with the vault.
Application settings and dialog suppression options vary, depending on the add-in. Refer to the section for your particular add-in for more information about the settings available.
AutoCAD Vault Add-in
Access Application Options
- Click Options on the Vault ribbon.
Edit Options
- By default, small icons are used to indicate status. Turn on the Use large status icons check box to display large icons.
- Turn on Ignore AutoCAD View only changes to manipulate the view in the drawing file through panning, zooming, and so on, without being prompted to check out the drawing files.
- Click Prompts to manage the default responses to prompts and the frequency with which you are prompted during your work session.
Inventor Vault Add-in
Access Vault Options
- Select Vault Options from the Autodesk Vault ribbon.
Options
- By default, small icons are used to indicate status. Turn on the Use large status icons check box to display large icons.
- Select the Generate file numbers for drawing and presentation files if you want Vault to automatically create a number for these files. Note: A file numbering scheme must already be defined by your administrator. Refer to Manage Numbering Schemes for more information.
- Click Prompts to manage the default responses to prompts and the frequency with which you are prompted during your work session.
Dialog Suppression
- Turn on the check box next to a dialog box name to suppress that dialog.
- Click Settings to specify whether or not to include child and parent files when the dialog is suppressed, and .dwf attachment options.
- Click OK.
Revit Vault Add-in
To best use the Vault Revit Add-in, folder mappings should be configured to at least the top level folder of the Revit projects, Revit Server, or Revit Central file locations. The folder mapping capability provides an easy and flexible way to map multiple folder structures between Vault and the Revit Server to help streamline collaboration.
To optimize collaboration, configure sharing and mapping options in Revit.
Access the Vault Options Dialog
- Click Options on the Vault Ribbon tab to launch the Vault Options dialog.
Sharing Options
-
Vault Upload Options
Vault Upload options allow you to configure when a synchronized file is added to the vault.
- Always Upload on Synchronization with Central–Every time a Synchronize with Central command is performed, a new version of the file is added to the vault.
- Upload Every # hours on Synchronization–When a Synchronize with Central command is performed, if the version in the vault is older than the set number of hours, then a new version is added to the vault.
- No automatic upload on Synchronization–When a Synchronize with Central command is performed, no upload occurs.
- Upload on Close–A new file version is added to the vault whenever a file is closed and changes have been made to local file.
-
Visualization Attachment Options
Visualization Attachment Options control how Visualization files are created when files are added through the Vault add-in for Revit.
- Send to Job Server–When a file is added to vault, a job is queued to an active job server.
- Create when adding files-Each file generates a visualization file during the add process. Note: This option adds processing time to the add operation.
- Do not create–No visualization files are generated when a file is added to the vault.
- Include linked files–Ensures that any selected options list above also apply to linked files.
-
Add to Vault
- Add File and Add Folder options apply only to the file extensions in this list.
If you do not want to filter files based on a list, clear the Filter by extension check box.
- Add File and Add Folder options apply only to the file extensions in this list.
Configure your synchronization and visualization attachment options on the Sharing tab.

Mapping Options
- Click Options on the Vault add-in ribbon.
- Click the ellipses (...) button under Folder Location.
- Select the folder that you want to map. To select a Revit Server folder, check the Use Revit Server check box. Note: Make sure that you use a folder at the root level for Revit 2013 (without subscription), such as $\Projects, as it will only pick up the setting from there. Subfolders from Revit Server are honored in the structure so setting it up once is sufficient.
- Click OK.
- Click the ellipses (...) button under Vault location.
- Select the Folder in Vault where files from the selected Windows folder should be added.
- To delete a mapping, click the associated delete button.
This option allows the ability to map any local, network, or Revit server folder to any Vault folder
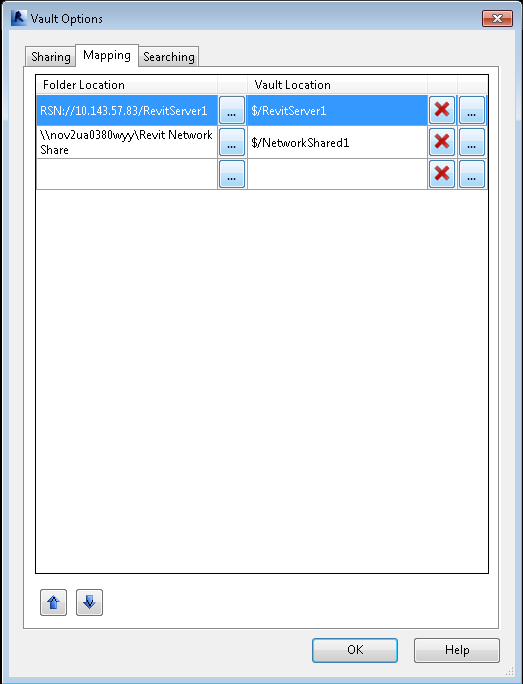
Configure Mapping Options
Configure the Share Path
-
Log in to the Autodesk Vault stand-alone client for Workgroup, Collaboration, or Professional.
- Select or create a vault folder that contains the project folders.
- Go to the Edit menu and select Edit Properties.
- On the Property Edit dialog click Select Properties.
- On the Customize Fields dialog, set the Select available fields from value to Folders.
- Select Share Path on the left side of the dialog, click Add -> to move SharePath to the right side.
- Click OK to close the dialog.
- On the Property Edit dialog, enter the path to the network share location of the Revit project folders in the Share Path field.
- Click OK to close the Property Edit dialog.
- Review the Property Edit Results and click OK if everything is accurate.
- Open a local copy of a Revit project that has its central file in the network share path that you just added to the vault.
- Log into vault from Revit.
- When the next Revit Synchronize with Central is performed, a new version of the file is added to the vault
-
Log in to the Autodesk Vault stand-alone client for Workgroup, Collaboration, or Professional.
- Select or create a vault folder that contains the project folders.
- Go to the Edit menu and select Edit Properties.
- On the Property Edit dialog click Select Properties.
- On the Customize Fields dialog, set the Select available fields from value to Folders.
- Select Share Path on the left side of the dialog, click Add -> to move SharePath to the right side.
- Click OK to close the dialog.
- On the Property Edit dialog, enter the path to the network share location of the Revit project folders in the Share Path field.
- Click OK to close the Property Edit dialog.
- Review the Property Edit Results and click OK if everything is accurate.
- Open a local copy of a Revit project that has its central file in the network share path that you just added to the vault.
- Log into vault from Revit.
- When the next Revit Synchronize with Central is performed, a new version of the file is added to the vault.
-
For Vault 2014: Log in to the Autodesk Vault Professional stand-alone client.
For Vault 2013: Log in to the Autodesk Vault stand-alone client for Workgroup, Collaboration, or Professional.
- Select or create a vault folder that contains the project folders.
- Go to the Edit menu and select Edit Properties.
- On the Property Edit dialog click Select Properties.
- On the Customize Fields dialog, set the Select available fields from value to Folders.
- Select Share Path on the left side of the dialog, click Add -> to move SharePath to the right side.
- Click OK to close the dialog.
- On the Property Edit dialog, enter the path to the network share location of the Revit project folders in the Share Path field.
- Click OK to close the Property Edit dialog.
- Review the Property Edit Results and click OK if everything is accurate.
- Open a local copy of a Revit project that has its central file in the network share path that you just added to the vault.
- Log into vault from Revit.
- When the next Revit Synchronize with Central is performed, a new version of the file is added to the vault.
Share Path is a vault property that may be added to a vault folder. This property provides vault with the location of the Revit central project files on your network. The advantage of using the Share Path is that the Revit add-in will duplicate the folder structure of the network share inside vault. Having the Share Path configured also removes the need for users to select the vault folder while adding files to the vault.
How you configure the share path depends on which version of the Autodesk Vault Revit Add-in you are using.
Autodesk Vault Revit Add-in for 2012
By configuring Share Path, the folder structure on the network share is duplicated automatically in the vault as files are added.
Autodesk Vault Revit Add-in for 2013
By configuring Share Path, the folder structure on the network share is duplicated automatically in the vault as files are added.
Autodesk Vault Revit Add-in for 2013 Subscription Extension and 2014
By configuring Share Path, the folder structure on the network share is duplicated automatically in the vault as files are added.
When using Revit Server, the Sharepath value should match the value in the RSN.ini file for the Revit server being mapped. For example if the server's IP address is 10.1.1.10 then the value for the Share path should be RSN://10.1.1.10.
Searching Options
- Click Options on the Vault add-in ribbon.
- Select the Search tab on the Vault Options dialog.
A list of all indexed Categories in the Vault is displayed.
- Select a Category.
- Select the check box for each parameter that you want displayed in the Parameters list when searching this category.
- Click OK to save your changes.
You can control which parameters are displayed in searches in the left pane of the Load Family dialog by configuring the settings on the Searching tab of the Vault Options dialog. The settings allow you to control which parameters show up for each Category. For example, you can determine the types of parameters that show up for the category Doors, as shown in this image.
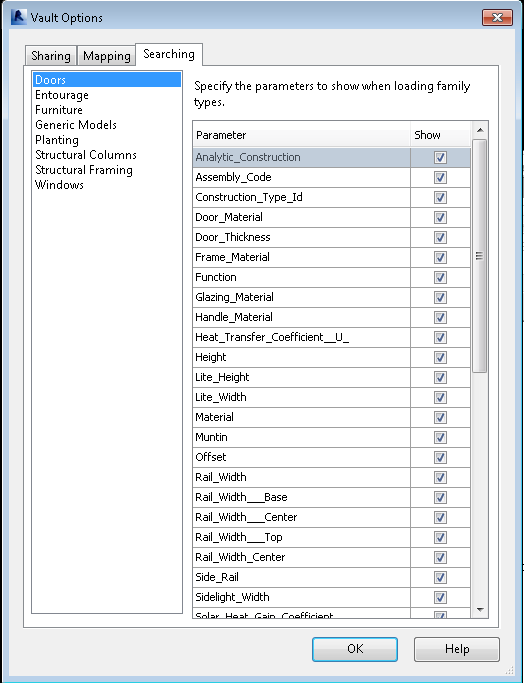
Configure Searching Options
Fast-Pick Options
- Click Options on the Vault add-in ribbon.
- Select the Search tab on the Vault Options dialog.
A list of all indexed Categories in the Vault is displayed.
- Select a category.
- Perform one of the following tasks:
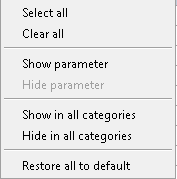
- Right-click anywhere in the list of parameters and choose Select all to select all parameters for that category.
- Right-click anywhere in the list of parameters and choose Clear all to deselect all parameters for that category.
- Select a particular parameter, right-click and select Show parameter to select that parameter.
- Select a particular parameter, right-click and select Hide parameter to deselect that parameter.
- Select a particular parameter, right-click and select Show in all categories to select that parameter across all categories.
- Select a particular parameter, right-click and select Hide in all categories to deselect that parameter across all categories.
- Right-click anywhere in the Searching tab and select Restore all to default to reset all parameters to their original product settings.
- Click OK to save your changes.
You can manually select the parameters that you want to show up in searches, or you can select them all for a category, unselect them all for a category, or select a certain parameter across all categories by using the context menu.
Autodesk Vault Office
The following dialog boxes can be suppressed, making your vault experience more transparent within your everyday tasks:
- Check In
- Check In dialog on close
Each dialog has settings associated with it. You can specify default values for these dialogs and choose whether or not the dialogs actively prompt you while working with files in a vault.
Set Application Options
Access Application Options
- Select Options from the Autodesk Vault ribbon.
Prompts
- Click Prompts to manage the default responses to prompts and the frequency with which you are prompted during your work session.
Dialog Suppression
- Turn on the check box next to a dialog box name to suppress that dialog.
- Click Settings to specify which options to use for the corresponding dialog when it is suppressed.
- Click OK.
Other Vault Add-ins
Depending on your particular add-in, one or more of the following dialog boxes can be suppressed, making your vault experience more transparent with your everyday tasks:
- Check In
- Undo Check Out
- Check In dialog on file close
- Check Out dialog on file open
Each dialog has settings associated with it. You can specify default values for these dialogs and choose whether or not the dialogs actively prompt you while working with files in a vault.
Access Vault Application Settings
- Select Vault Options from the Autodesk Vault ribbon.
Or select
Options
- By default, small icons are used to indicate status. Turn on the Use large status icons check box to display large icons.
- Click Prompts to manage the default responses to prompts and the frequency with which you are prompted during your work session.