
This example explains how to create a basic dialog box and display it using AutoLISP.
Creating the DCL File
This DCL defines a dialog box labeled Sample Dialog Box that contains a text tile and a single OK button. The DCL resides in a file named hello.dcl.
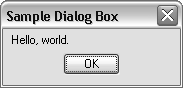
hello : dialog
{
  label = "Sample Dialog Box";
  : text {
    label = "Hello, world.";
  }
  ok_only;
}
- Windows
-
- Highlight the sample DCL code above and press Ctrl+C, or right-click and choose Copy to copy the text to the Clipboard.
- Click Start button
 Windows Accessories Notepad.
- In Notepad, click in the new editor window, and then press Ctrl+V, or right-click and choose Paste to paste the contents from the Clipboard.
- Click File menu Save As.
- In the Save As dialog box, browse to the location in which you want to store the DCL file.
Note: Make sure the DCL file is saved to one of the folders in the AutoCAD Support File Search Path.
- In the File Name text box, type hello.dcl.
- Click the Save As Type drop-down list and select All Files (*.*).
- Click the Encoding drop-down list and select ANSI. Click Save.
- Mac OS
-
- Highlight the sample DCL code above and press Command+C, or secondary click and choose Copy to copy the text to the Clipboard.
- In Finder, on the Mac OS menu bar, click Go menu Applications.
- In the Applications window, double-click TextEdit.
- In TextEdit, on the Mac OS menu bar, click TextEdit menu Preferences.
- In the Preferences dialog box, under the Format section, click Plain Text. Click the Close button.
- Click in the editor window, and press Command+V, or secondary click and choose Paste.
- On the Mac OS menu bar, click File menu Save As.
- In the Untitled dialog box, browse to the folder in which you want to save the DCL file.
Note: Make sure the DCL file is saved to one of the folders in the AutoCAD Support File Search Path.
- In the Save As text box, type hello.dcl and click Save.
- If prompted to use the .dcl file extension, click Use .DCL.
Displaying the dialog box and responding to the user pressing OK
(defun C:HELLO ( / dcl_id )
  (setq dcl_id (load_dialog "hello.dcl")) ; Load the DCL file.
  (if (not (new_dialog "hello" dcl_id))   ; Initialize the dialog.
    (exit)                                ; Exit if this does not work.
  )
  (start_dialog)                          ; Display the dialog box.
  (unload_dialog dcl_id)                  ; Unload the DCL file.
 (princ)
)
- Highlight and copy the sample LSP code above to the Clipboard.
- Create a new file in Notepad or TextEdit, and save it to the same location as the hello.dcl file you previously saved with the hello.lsp filename.
- In AutoCAD, at the Command prompt, enter appload.
- In the Load/Unload Applications dialog box, browse and select hello.lsp file. Click Load.
- If the File Loading – Security Concern dialog box is displayed, click Load again.
- Click Close to return to the application window.
- At the Command prompt, enter hello.
- In Sample Dialog Box, click OK.
The following explains line by line what the AutoLISP program does:
- Line 1 – Defines a command named HELLO with a local variable of dcl_id.
- Line 2 – Loads the DCL file into memory with the load_dialog function. The load_dialog function returns a DCL identification number. You need this to identify the dialog in subsequent function calls.
- Lines 3-5 – Initializes the dialog box with the
new_dialog function. The dialog box name and DCL identification number are passed as arguments.
With other dialog boxes, you would also set up tile values, lists, and images. This DCL example above uses a predefined tile named ok_only, so you do not have to initialize the tile unless you want to override its default values. The ok_only tile also has an action named done_dialog assigned to it. If the user presses the OK button, AutoCAD passes the done_dialog call to your AutoLISP application and ends the dialog.
- Line 6 – Control of the dialog is passed to AutoCAD for display with the start_dialog function.
- Line 7 – Removes the dialog from memory after the finishes responding to it with the unload_dialog function.
- Line 8 – Exists the command quietly.
- Line 9 – Ends the definition of the HELLO command.
For the sake of simplicity, no error processing is included in this example.
Note that the start_dialog call remains active until the user selects a tile (usually a button) whose associated action expression calls done_dialog. The done_dialog call can be issued explicitly by the tile. The done_dialog call is also issued by the selected tile if its is_cancel attribute is set to true.