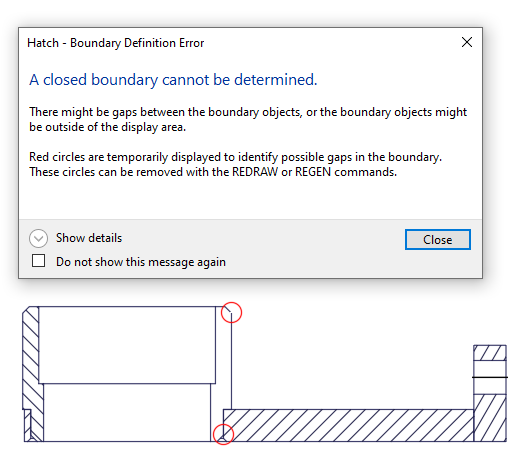
Issues can arise that impact the creation and display of hatch objects. This article focuses on the following situations that might occur when creating or displaying hatch objects:
- Valid hatch boundary not found
- Hatch spacing too dense, or dash size too small
- Hatch object isn't visible
- Hatch preview and final hatch object don't match
Valid Hatch Boundary Not Found
It can be frustrating to be informed that a valid hatch boundary wasn't found when trying to create a hatch object. The most common reasons why a valid hatch boundary might not be found are:
- The geometry to be used for the hatch boundary is not completely visible on-screen in the drawing window.
- There is a gap in the geometry you are trying to use to define the hatch boundary.
- There might be an issue with the graphics card driver.
- Geometry to be used for the hatch boundary is only partially visible
-
All objects being used to define the boundary of a hatch object must be visible in the current drawing view. If all objects are not in the current drawing view, do the following:
- Zoom to the extents of the drawing.
You can do one of the following:
- Double-click the scroll wheel on your mouse.
- At the Command prompt, enter zoom and then use the Extents option.
- Zoom to the area of the drawing that shows all the objects for the hatch boundary.
- At the Command prompt, enter zoom and then use the Window option.
- Specify a box around the objects that will define the boundary of the hatch object.
- Start the
HATCH command and specify the boundary for the hatch as normal.

- Zoom to the extents of the drawing.
- Gap in the hatch boundary geometry
-
When defining a hatch boundary, there can't be any gaps in the geometry. Finding gaps in the geometry can be challenging, but AutoCAD will assist in identifying potential gaps between the objects you're trying to fill with a hatch when possible.

When AutoCAD doesn't have any suggestions, you can try one of the following to help handle any gaps between the objects:
- Increase the value of the HPGAPTOL system variable and try hatching again. By default, this system variable is set to 0.000 units, meaning the hatch boundary must be completely closed. At the Command prompt, enter hpgaptol and then enter a new maximum gap size. The maximum gap size will be used to calculate the hatch boundary from objects that are almost enclosed.
- Instead of specifying a point inside a closed area to define the hatch boundary, use the Select Boundary Objects tool on the Hatch contextual ribbon tab and select the objects to define the hatch boundary.
- Hardware acceleration
-
Hardware acceleration is used to improve the display of on-screen graphics and perform calculations related to hatch boundary detection. An outdated graphics card driver can result in poor performance, display issues, and even problems with the calculation of hatch boundaries. If you feel this might be the cause of your problem, try installing a certified graphics card driver for AutoCAD (https://www.autodesk.com/autocad-graphicscard) or the latest driver for your graphics card from the manufacturer.
Hatch Spacing Too Dense, or Dash Size Too Small
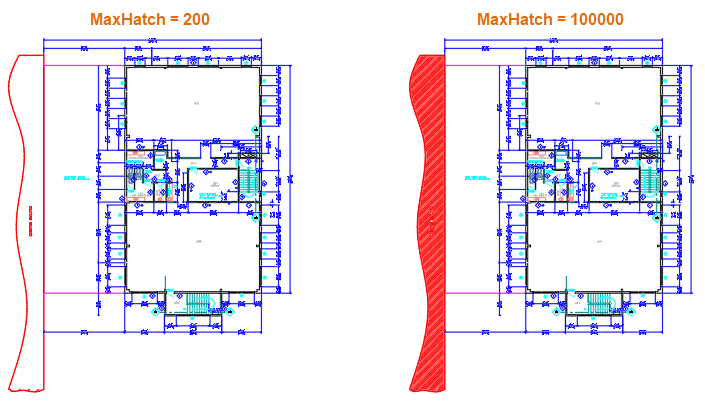
Have you hatched an area only for the pattern to not be displayed? If so, it could be the result of a pattern being too dense or the dash size being too small resulting in a large number of lines in the pattern. If this happens, you may need to adjust the Maximum Hatch display setting or the scale assigned to the hatch object. By default, the Maximum Hatch display setting is set to a value of 100,000 which in most cases is ideal. However, if you are seeing this issue with your drawings, the value of the Maximum Hatch setting might need to be increased. The Maximum Hatch setting can be changed with the MaxHatch environment variable.

- Adjust the Maximum Hatch display setting
-
You can change the Maximum Hatch display setting by following one of these methods:
- setenv AutoLISP function in AutoCAD and AutoCAD-based products.
The syntax of the setenv AutoLISP function is as follows:
(setenv "MaxHatch" "<value>")
For example, to increase the value from 100,000 to 200,000 lines allowed in a single hatch pattern, you would enter the following at the Command prompt:
(setenv "MaxHatch" "200000")
Note: MaxHatch is case sensitive and must be entered exactly as previously shown. - SETENV command in AutoCAD LT.
For example, to increase the value from 100,000 to 200,000 lines allowed in a single hatch pattern, you would perform the following at the Command prompt:
- At the Command prompt, enter setenv.
- At the Enter variable name prompt, enter
MaxHatch.
Note: MaxHatch is case sensitive and must be entered exactly as shown.
- At the Value prompt, enter 200000.
- setenv AutoLISP function in AutoCAD and AutoCAD-based products.
- Adjust the scale of a hatch object
-
You can change the scale of a hatch object by doing the following:
- Select the hatch object whose scale you want to adjust.
- On the Hatch Editor contextual ribbon tab, click in the Hatch Scale Pattern text box.
- Highlight the current scale factor and enter a new value.
- Press Enter to apply the new scale factor.
Hatch Object Isn't Visible
Other reasons why your hatch might not be visible or displayed in your drawing can include:
- Fill Mode setting is turned off. Fill Mode setting controls whether the pattern of a hatch object is suppressed and only its boundary is displayed.
To turn Fill Mode on, do the following:
- At the Command prompt, enter fillmode.
- At the Enter new value for FILLMODE prompt, enter 1.
- At the Command prompt, enter regen to regenerate the display of the drawing.
- Layer on which the hatch is placed is turned off or frozen. Turn on or thaw the layer using the Layers Control on the ribbon or the Layer Properties Manager (LAYER command).
Preview and Final Hatch Object Don't Match
There might be times when the hatch preview doesn't match the appearance of the final hatch object. This can happen because AutoCAD performs fewer calculations when generating the hatch preview than when it is creating the final hatch object. This is done to keep the preview fast and responsive.