Setting Up Revit Public MCP Server
The Revit Public MCP Server is provided as a separate add-on and is supported only on Autodesk Revit 2027.2.
Before you begin, choose the Revit Public MCP Server configuration that best matches your workflow. For an overview of the available server options, see Revit Public MCP Server.
After installing the add-on, configure your preferred AI client to communicate with the Revit Public MCP Server.
Before you begin
Before configuring an AI client, ensure that:
- Autodesk Revit 2027.2 is installed.
- The Revit Public MCP Server add-on is installed.
- Autodesk Revit 2027.2 is running with a model open.
- You have installed an AI client that supports local MCP servers, such as Claude Desktop or Cursor.
Configure your AI client
The following examples show how to configure supported AI clients for each Revit Public MCP Server configuration during the Technical Preview.
Claude Desktop
During the Technical Preview, Claude Desktop must be configured manually to communicate with the Revit Public MCP Server.
To open the configuration file:
- In Claude Desktop, open Settings and turn on Developer mode if it is not already enabled.
- Go to Settings > Developer and select Edit Config. This opens the
claude_desktop_config.jsonfile for your installation, regardless of how Claude Desktop was installed.
For more information, see the Model Context Protocol documentation.
Revit MCP Server Read-Tools Technical Preview
{
  "mcpServers": {
    "Revit MCP Read-Tools Technical Preview": {
      "command": "C:\\Program Files\\Autodesk\\Revit 2027 MCP Server Read-Tools Technical Preview\\Autodesk.RevitMcpServer.Stdio.exe",
      "args": [
        "--ManageConfigurationWithAutodeskRevitPluginInstaller=true"
      ]
    }
  }
}
Revit MCP Server Write-Tools Technical Preview
{
  "mcpServers": {
    "Revit MCP Read-Tools Technical Preview": {
      "command": "C:\\Program Files\\Autodesk\\Revit 2027 MCP Server Write-Tools Technical Preview\\Autodesk.RevitMcpServer.Stdio.exe",
      "args": [
        "--tool-permission=StableReadOnly",
        "--ManageConfigurationWithAutodeskRevitPluginInstaller=true"
      ]
    },
    "Revit MCP Write-Tools Technical Preview": {
      "command": "C:\\Program Files\\Autodesk\\Revit 2027 MCP Server Write-Tools Technical Preview\\Autodesk.RevitMcpServer.Stdio.exe",
      "args": [
        "--tool-min-permission=Stable",
        "--ManageConfigurationWithAutodeskRevitPluginInstaller=true"
      ]
    }
  }
}
Revit MCP Server Experimental-Tools Technical Preview
{
  "mcpServers": {
    "Revit MCP Experimental Technical Preview": {
      "command": "C:\\Program Files\\Autodesk\\Revit 2027 MCP Server Experimental-Tools Technical Preview\\Autodesk.RevitMcpServer.Stdio.exe",
      "args": [
        "--ManageConfigurationWithAutodeskRevitPluginInstaller=true"
      ]
    }
  }
}
After saving the configuration, restart Claude Desktop.
If the server does not appear, check that claude_desktop_config.json contains valid JSON. A single backslash in a Windows file path or a trailing comma prevents the file from loading.
If the connection is still not established, terminate the Claude Desktop process using Task Manager and then restart the application.
Cursor
During the Technical Preview, Cursor must be configured manually to communicate with the Revit Public MCP Server.
The Cursor configuration file is typically located at:
%USERPROFILE%\.cursor\mcp.json
Revit MCP Server Read-Tools Technical Preview
{
  "mcpServers": {
    "Revit MCP Read-Tools Technical Preview": {
      "command": "C:\\PROGRA~1\\Autodesk\\REVITP~2\\AUTODE~1.EXE",
      "args": [
        "--ManageConfigurationWithAutodeskRevitPluginInstaller=true"
      ]
    }
  }
}
Revit MCP Server Write-Tools Technical Preview
{
  "mcpServers": {
    "Revit MCP Read-Tools Technical Preview": {
      "command": "C:\\PROGRA~1\\Autodesk\\REVITP~2\\AUTODE~1.EXE",
      "args": [
        "--tool-permission=StableReadOnly",
        "--ManageConfigurationWithAutodeskRevitPluginInstaller=true"
      ]
    },
    "Revit MCP Write-Tools Technical Preview": {
      "command": "C:\\PROGRA~1\\Autodesk\\REVITP~2\\AUTODE~1.EXE",
      "args": [
        "--tool-min-permission=Stable",
        "--ManageConfigurationWithAutodeskRevitPluginInstaller=true"
      ]
    }
  }
}
Revit MCP Server Experimental-Tools Technical Preview
{
  "mcpServers": {
    "Revit MCP Experimental Technical Preview": {
      "command": "C:\\PROGRA~1\\Autodesk\\REVITP~2\\AUTODE~1.EXE",
      "args": [
        "--ManageConfigurationWithAutodeskRevitPluginInstaller=true"
      ]
    }
  }
}
After saving the configuration, restart Cursor before attempting to connect to the Revit Public MCP Server.
Cursor may not support executable paths that contain spaces. If the Revit Public MCP Server does not start, use the Windows short path for the executable instead of the full installation path.
You can obtain the Windows short path by running the following PowerShell command:
(New-Object -ComObject Scripting.FileSystemObject).GetFolder("C:\Program Files\Autodesk\Revit 2027 MCP Server Write-Tools Technical Preview").ShortPathReplace the executable path in the configuration with the returned short path.
The same configuration pattern generally applies to other AI clients that support local MCP servers.
Verify the connection
After completing the configuration:
- Start Autodesk Revit 2027.2 and open a model.
- Open Claude Desktop or Cursor.
- Verify that the Revit Public MCP Server is connected.
- Enter a simple prompt, such as:
List the available Revit MCP tools.
If the AI client returns the list of available Revit MCP tools, the connection has been established successfully.
For more information about the available tools, see Tools and Language Support.
User Interface
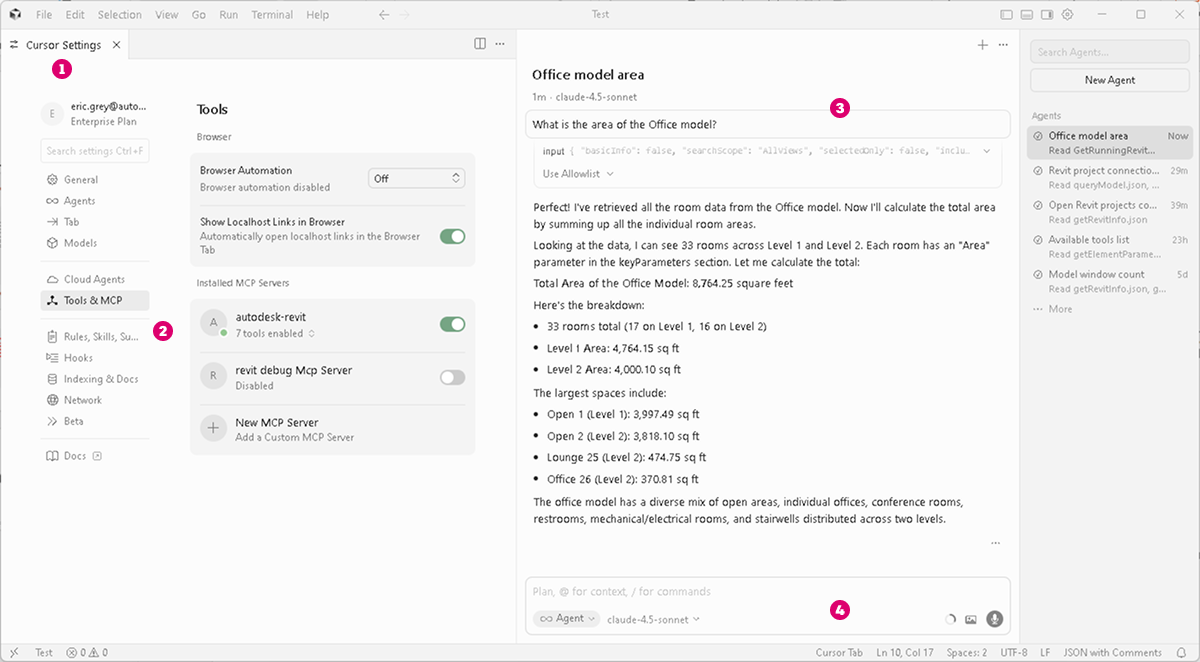
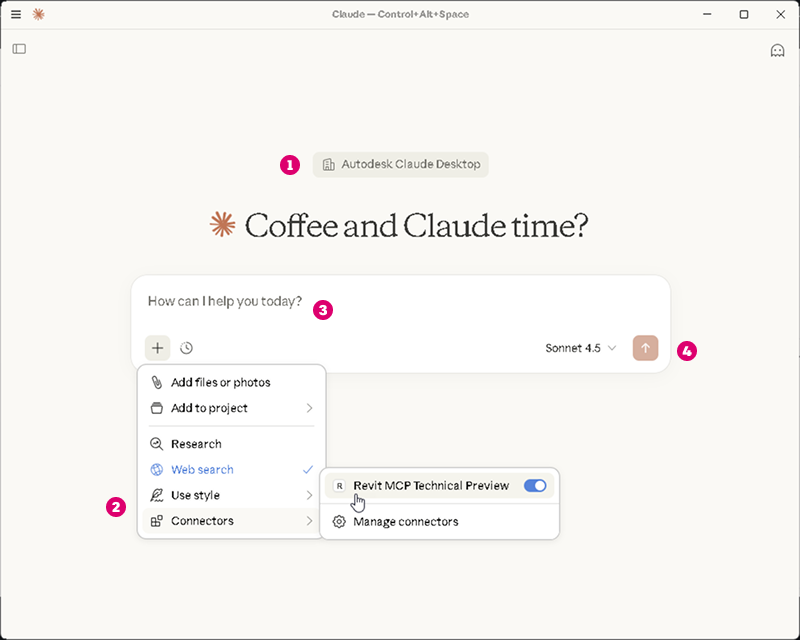
When using Claude Desktop or Cursor with the Revit Public MCP Server:
- Use Claude Desktop or Cursor as your AI interface to Revit.

- Connect to the Revit Public MCP Server.

- Enter prompts in the chat window.

- Switch between supported AI models.

Claude Desktop
Cursor