
 Soft Proportional Modification
![]()
Transforms multiple CVs with a falloff effect, allowing you to vary the transformation applied across NURBS surfaces, subdivision objects, and curves. The tool offers color feedback to visualize the area of influence, making it easier to control and smooth out surface topology.
The tool is especially useful for smoothly adjusting and transitioning subdivision geometry without manually transforming each CV.
The most affected CVs display in light yellow, with colors darkening to show the gradual decrease in influence. The least affected CVs display in dark blue. Keep the control window open to adjust the tool settings as you work. For example, you can switch between two Falloff Types and see how they affect the selection.
Access this tool from the Transform Palette:

Soft Proportional Modification settings
Mode
Choose the type of transformation you want to apply to the selected CVs.
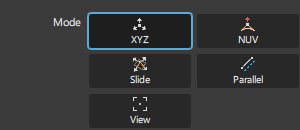
XYZ ![]() - Moves CVs along the X, Y, Z world axes. The mouse buttons operate the same as in the Transform > Move (or Transform > Modify > Proportional mod) tool.
- Moves CVs along the X, Y, Z world axes. The mouse buttons operate the same as in the Transform > Move (or Transform > Modify > Proportional mod) tool.
NUV ![]() - Moves CVs along the normal, or in the U or V direction on a surface, using the LMB, MMB, and RMB respectively.
- Moves CVs along the normal, or in the U or V direction on a surface, using the LMB, MMB, and RMB respectively.
Slide ![]() - Moves CVs along their respective hull.
- Moves CVs along their respective hull.
Parallel ![]() - Moves CVs parallel to a vector or hull line without snapping to it.
- Moves CVs parallel to a vector or hull line without snapping to it.
View ![]() - Moves CVs in the plane of the current view.
- Moves CVs in the plane of the current view.
- LMB - Unconstrained movement in the current plane defined by the direction of the view.
- MMB - Movement constrained to the horizontal axis of the screen.
- RMB - Movement constrained to the vertical axis of the screen.
Falloff Type
Select the Falloff Type to control the influence of the transformation. Note that the Falloff Type and Proportionality Method determine how the transformation affects the geometry.
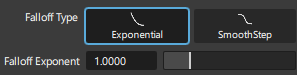
Exponential 
If the Falloff value is 1.0 or greater, the transformation effect decreases for passive CVs further from the active CVs: the greater the value, the stronger the damping effect. More CVs between the active CVs and the boundary of the defined region result in less effect on each CV. A higher number means less effect on the surrounding CVs.
If the Falloff value is less than 1.0, the transformation effect increases for CVs further from an active CV. More CVs between the active CV and the boundary of the defined region result in a greater effect on each CV. Surrounding CVs move farther because the effect is multiplied in the opposite direction. Use the Falloff Exponent slider to set a multiplier value for the falloff effect.
SmoothStep 
Allows you to create a falloff curve with a smooth transition between two points. For example, set a slow transition at the start, increase it in the middle, and slow it at the end. Use the Falloff Start and Falloff End sliders to set the start and end of the transition. This results in an overall smoother falloff.
Control Options
Show CV and Hull Highlights
Toggles the display of CVs and hull lines in the transform heatmap on or off.
Show Hull Highlights
Toggles the display of hull lines in the transform heatmap on or off. When off, only CVs are displayed.
Auto Minimum Weight
When on, all passive CVs have a non-zero weight, unlike non-participating CVs with zero weight. When off, use the Minimum Weight slider to set the minimum falloff weight for passive CVs. Increasing this value decreases falloff by assigning more weight to the CVs. A value of 1.0 removes falloff.
Proportionality Method
Specifies the method to calculate falloff weight between active, passive, and unselected (nonparticipating) CVs. This option mainly affects CVs along the border between passive and unselected/nonparticipating CVs.

Distance 
The falloff weight for passive CVs is determined by their distance from the closest active CV. Unselected (nonparticipating) CVs are ignored in the calculation. Passive CVs closer to an active CV move more than those further away. This may cause a shearing effect at the border between passive and nonparticipating CVs.
Diffusion 
An interpolation calculation determines the falloff weight for passive CVs, including active, passive, and neighboring nonparticipating/unselected CVs, creating a gradient effect. The Diffusion method for falloff weight does not consider distances between CVs.
This produces a more uniform falloff effect from active CVs to those along the border between passive and nonparticipating CVs. Since it does not use distance, differences in distances between active and passive CVs across the surface do not affect CV movement.
Max Iterations - (Applies to Diffusion) You can set the number of calculations the method uses before reaching a final result. Increasing this value tends to relax the CV layout to a state of equilibrium. Depending on the number of CVs being transformed, increasing Max Iterations may have no effect. For example, with more CVs being transformed, the overall shape is more likely to change with increased Max Iterations.
Edge Weighted - (Applies to Diffusion) When on the diffusion calculation takes into account the relative distance between CVs. When off, the diffusion calculation ignores the distance and considers each CV to be the same distance from each other.
This affects how weighting gets applied to neighboring CVs that are close together. For example, when on, CVs close together will have similar weighting as displayed by the visualization color gradient. CVs farther away from each other have relatively different weights. Edge Weighted is on by default.
Selection
Choose the control entities, CVs, edges, faces, edge loops, or face loops by selecting a Pick Method and Pick Type.
Pick Type
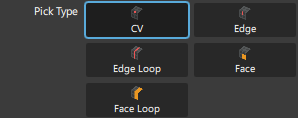
CV ![]() - Selects individual CVs.
Edge
- Selects individual CVs.
Edge ![]() - Picking an edge selects the two CVs that make up an edge.
Edge Loop
- Picking an edge selects the two CVs that make up an edge.
Edge Loop ![]() Picking an edge selects all the CVs that make up the edge loop.
Face
Picking an edge selects all the CVs that make up the edge loop.
Face ![]() - Picking a face selects the four corner CVs that make up a face.
Face Loop
- Picking a face selects the four corner CVs that make up a face.
Face Loop ![]() - Picking a CV selects all CVs the make up the face loop.
- Picking a CV selects all CVs the make up the face loop.
Pick Method

Box Pick ![]() - Pick control entities by dragging around them.
- Pick control entities by dragging around them.
Lasso Pick ![]() - (CV picking only) Drag the mouse to draw a lasso around the CVs you want to pick, instead of a box.
- (CV picking only) Drag the mouse to draw a lasso around the CVs you want to pick, instead of a box.
Paint Pick ![]() - (CV picking only) Pick CVs using a painting motion with your cursor. Use the Paint Pick Radius slider to set the tool radius.
- (CV picking only) Pick CVs using a painting motion with your cursor. Use the Paint Pick Radius slider to set the tool radius.
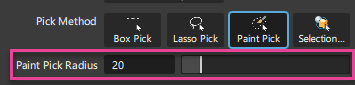
Selection Set - ![]() Pick one or more selection sets in the viewport. A selection set is a collection of objects or components (see Selection Sets Lister).
Pick one or more selection sets in the viewport. A selection set is a collection of objects or components (see Selection Sets Lister).
Shift + Ctrl while dragging for more accurate mouse movements. Viewport buttons
Accept Active CVs  - Select this after choosing all the CVs that you want most affected by the transformation. Pressing the Spacebar also accepts your selection. Click Clear to deselect the active CVs and reselect.
Accept Passive CVs  - Select this after choosing all the CVs you want partially affected by the transformation. Pressing the Spacebar also accepts your selection. Click Clear to deselect and reselect CVs before accepting.
Grow  - Select this as a quick way to pick passive CVs that are adjacent to selected active CVs. Each time you click Grow, the selection expands to adjacent in all directions, starting from the active CVs.
Revise Passive Selection  - Select this to update your passive CV selection for the next transformation. Note that after selecting, you cannot use Reset Xform to clear the previous transformation. See Reset Xform below.
Reset Xform  - Returns CVs to their positions previous to the last transformation. Use this when want you clear your last transform operation so that you start again.
Note that you can only undo the last transformation. If you do any of the following, the tool applies the new CV positions from your last edit to the geometry, then uses these positions as to as the starting point for the next edit:
- Select Revise Passive Selection, then update your passive CV selection.
- Switch to a different Mode, such as going from XYZ to Slide, after a transform operation.
- Deselect the object by selecting Pick > Nothing.
- Exit the tool.
![]() - Deselects your current selection of CVs.
- Deselects your current selection of CVs.
Soft Proportional Modification Workflows
Select the object you want to modify, then shift-select the Soft Proportional Modification tool icon.
In the Selection section, choose a Pick Type and Pick Method for selecting CVs. CVs and Box Pick are the default settings.
Select the CVs that you want to be most affected by the transform, then do one of the following:
- Select Accept Active CVs to keep your selection.
- Select Clear to deselect the CVs so you can change your selection.
Tip: You can choose between select Box Pick, Lasso Pick, or Paint Pick from the Pick Method section. By default, Box Pick is onSelect the neighboring CVs that you want to be partially affected by the transformation, then do one of the following:
Select Accept Passive CVs to keep your selection. Tip: Use Grow as a quick way to select passive CVs that are adjacent to the selected active CVs.
- Select Clear to deselect the CVs so you can change your selection.
In the Mode section, choose the type of transformation you want to apply to the selected CVs, then transform the CVs. By default, Mode is set to XYZ.
If required, adjust the Falloff Type settings to update the way the transformation is affecting the passive CVs.
Note: You can select Reset Xform in the viewport to undo your last transformation so that you can make changes.Select Revise Passive Selection to update your passive CV selection for the next transformation.
Note that after selecting this option, the tool applies the new CV positions from your last edit to the geometry, then uses these positions as to as the starting point for the next edit. This means that Reset Xform will not be available to clear the previous edit.