
In this exercise, you will use the
Toolspace Survey tab and panorama vistas to view some of the data that you imported from the field book file.
You will also browse to the newly created network and figure objects in the Autodesk Civil 3DProspector tab and drawing.
View the survey data
- In
Toolspace, on the
Survey tab, expand
Survey DatabasesSurvey 1 NetworksSurvey Network 1 to display the collections of survey data, including control points, directions, and setups.
Note:
If you cannot expand the collection, right-click the database name and click Open For Edit.
- To view the control points, click the
Control Points collection.
The control points are displayed in the Toolspace list view.
Note:By default, if the Toolspace is docked, the list view is the lower part of the Toolspace.
- To view the setups, select the
Setups collection.
The setups are displayed in the Toolspace list view.
- To view observations for a setup, right-click the setup and click
Edit Observations.
The Observations Editor vista is displayed with all the observations for the selected setup.
Note:The observations for the setup are highlighted in the drawing.
- Click
 to close the
Observations Editor.
to close the
Observations Editor.
- To view the figures, select the
Figures collection.
The figures are displayed in the Toolspace list view.
- In
Toolspace, click the
Prospector tab and expand the
Survey collection to display the collections of survey networks and figures.
These collections are for the survey network and figure drawing objects as opposed to the survey database data that is displayed on the Survey tab.
This exercise uses Survey-3.dwg, which you saved in the My Civil 3D Tutorial Data folder during the previous exercise. If you did not do this, you can use the copy of Survey-3.dwg that is in the tutorials drawings folder, but you will get duplicate objects when you update the survey data.
Browse to the survey data
- To view a figure in the drawing, on the
Prospector tab, expand the
Figures collection, right-click the figure name, for example
BLDG1, and click
Zoom To.
The drawing zooms to the selected figure.
- In the drawing, select the figure that you zoomed to. Right-click. Click
Browse To Survey Data.
The Toolspace switches to the Survey tab with the figure selected. The survey data for the figure is displayed in the Figures Editor.
Note:If you use the Survey-3.dwg that is in the tutorials drawings folder, you are notified that the associated survey database is not available. Click OK.
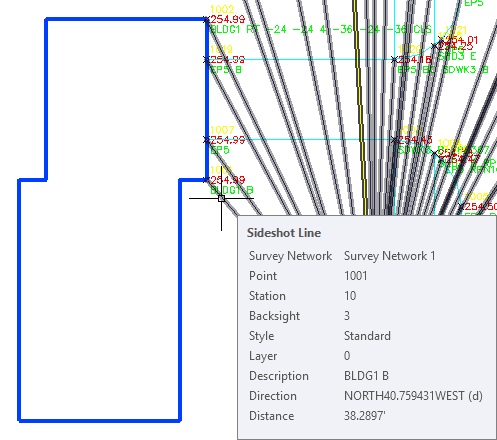
- In the drawing window, hover your cursor over one of the survey network components extending from
BLDG1. Notice that the properties for the network object are displayed in the tooltip.
- Right-click the network object. Click
Browse To Survey Network.
In Toolspace, on the Survey tab, the survey network is selected. The survey data for the survey network is displayed in the list view.
- Ctrl+click one of the survey network components shown in the previous image. Right-click. Click
Browse To Survey Data.
The related setup is highlighted the Observations Editor vista.
- Click
to dismiss the
Observations Editor vista.
To continue this tutorial, go to Exercise 2: Editing a Figure.