
To use grips to edit a fixed line
- In the drawing, click an alignment containing a fixed line.
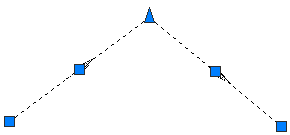
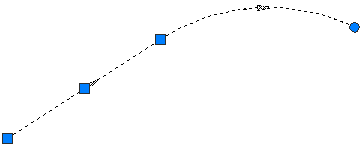
Grips for a fixed line with two pass-through points:
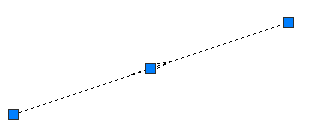
- Use the grips to edit the line:
- Use the end grips to adjust the line length and pass-through point.
- Use the center grip to move the location of the line.
To use grips to edit a fixed curve with three pass-through points
- In the drawing, click an alignment containing a fixed curve through three points.
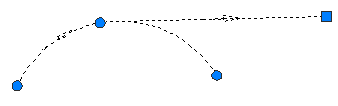
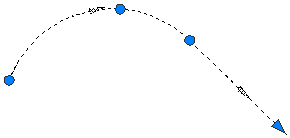
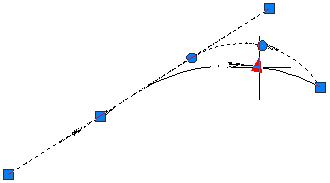
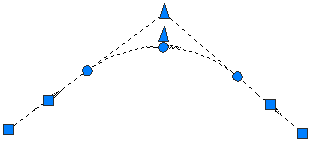
Grips for a fixed curve with three pass-through points:
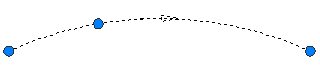
- Move any grip to change a pass-through point, which changes the radius of the curve.
To use grips to edit a fixed curve with a center point and radius
- In the drawing, click an alignment that contains a fixed curve with a center point and radius.
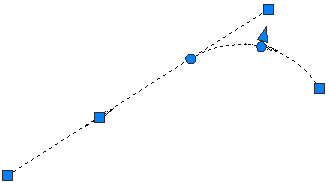
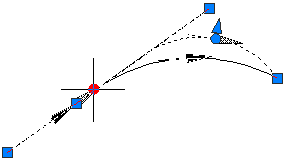
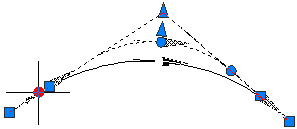
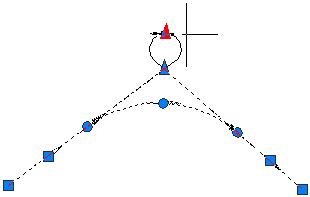
Grips on a fixed curve with a center point and radius:
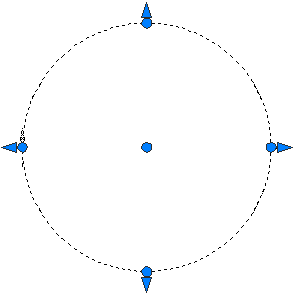
- Use the grips to edit the curve:
- Move a triangular grip to change the radius.
- Move the center grip to change the center point of the circle.
- Move a circular grip on the circle to change a pass-through point.
To use grips to edit a fixed curve with a center point and a pass-through point
- In the drawing, click an alignment that contains a fixed curve with a center point and a pass-through point.
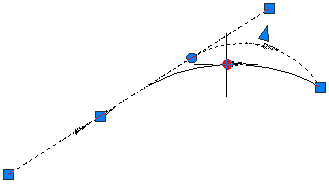
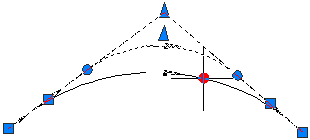
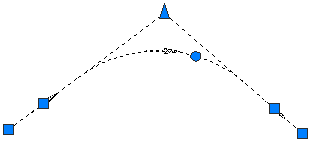
Grips for a fixed curve with a center point and a pass-through point:
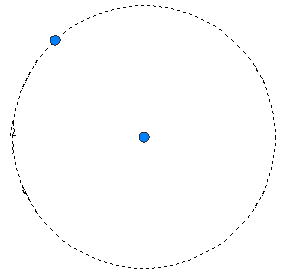
- Use the grips to edit the curve:
- Move the center grip to change the center point of the circle.
- Move the grip on the circle to change the pass-through point.
To use grips to edit fixed or floating intersecting lines
- In the drawing, click an alignment that contains either a fixed or a floating line.
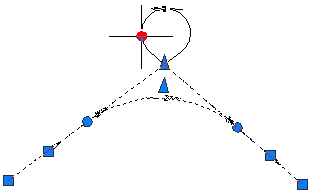
PI (point of intersection) grip where the endpoints of a fixed or floating line meet:
- Move the PI grip in any direction to edit the shared endpoints of the two lines.
To use grips to edit a floating line with a pass-through point
- In the drawing, click an alignment that contains a floating line with a pass-through point.
Grip for a floating line with a pass-through point:
- Move the square grip to edit the endpoint of the line.
To use grips to edit a floating line attached to an entity end
- In the drawing, click an alignment that contains a floating line attached to an entity.
Grips for a floating line attached to an entity:
- Move the triangular grip to change the length of the line. Note: You cannot move the triangular grip to the beginning of the line grip. Zero length lines are not permitted.
To use grips to edit a floating curve with a pass-through point and radius
- In the drawing, click an alignment that has a floating curve with a pass-through point and radius.
Grips for a floating curve with a pass-through point:
- Use the grips to edit the curve.
- Moving the first circular grip, located at the PC/PT point of the curve, relocates the point of tangency (PT). Use this grip to create a compound or reverse curve with another curve attached to the same entity.
Changing a curve using the PC/PT grip:
- Moving the second circular grip, located at the mid-point of the curve, modifies the radius while changing the pass-through point.
Changing a curve using the midpoint grip:
- Moving the square grip at the end of the curve changes the pass-through point of the curve while holding the curve radius.
Changing a curve using the end grip:

- Moving the triangular grip changes the radius while holding the pass-through point.
Changing a curve using the radius grip:
- Moving the first circular grip, located at the PC/PT point of the curve, relocates the point of tangency (PT). Use this grip to create a compound or reverse curve with another curve attached to the same entity.
To use grips to edit a floating curve attached to an entity end with a pass-through point
- In the drawing, click an alignment that contains a floating curve attached to an entity end with a pass-through point.
Grips for a floating curve attached to an entity end with a pass-through point:
- Move the circular grip to change the pass-through point at the end of the curve. Moving the pass-through point also changes the radius.
To use grips to edit a free curve by radius
- In the drawing, click an alignment that has a free curve. Move any grip to modify the curve radius.
Grips for changing the curve radius:
- Use the grips to edit the curve:
- Move the circular grips along tangent entities to adjacent PC/PT points on the opposite end of the same tangent to create reverse or compound solutions.
Endpoint grips for dragging the beginning or end of the curve along the attachment entity:
- Move the circular, mid-point grip to modify the pass-through point and radius for the curve. Move the triangular grip to modify the radius for the curve while holding the pass-through point. By moving either of these grips, you can create a curve of less than or greater than 180 degrees.
Changing the radius to less than 180 degrees:
Changing the radius to greater than 180 degrees using the circular pass-through point grip:
Changing the radius to greater than 180 degrees using the triangular radius grip:
- Move the circular grips along tangent entities to adjacent PC/PT points on the opposite end of the same tangent to create reverse or compound solutions.
To use grips to edit a free curve with a pass-through point
- In the drawing, click an alignment with a free curve and a pass-through point.
Grips for a free curve with a pass-through point:
- Move the circular grip to change the pass-through point of the curve. This pass-through point is maintained when you edit the attached entities.