
The
Shade UVs feature lets you see whether any UVs or UV shells overlap when viewed in the
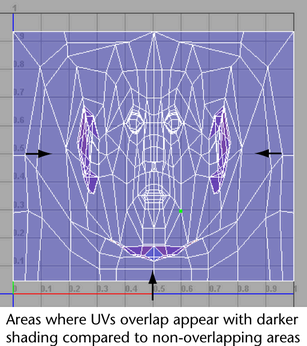
UV Editor. When activated, all selected UV shells appear shaded in a semitransparent way. However, areas that appear more opaque than normal indicate regions of overlap. Overlapping UVs are often undesirable because any associated texture maps will also overlap on the related surface meshes.
Note: By default,
Shade UVs also allows you to see the UV winding order on the selected UV shells. For more information on UV winding order see
Display UV winding order.
To display overlapping UVs in the UV Editor
- In the Viewport, select the object whose UV shells you want to display.
- In the
UV Editor, do one of the following:
- Press 5.
- In the
UV Editor menu, select
View > Shaded >
 .
.
The UV Map Shading Options window lets you modify the default settings. For more information see UV Editor View menu.
- Click the
Shade UVs icon (
 ) located on the
View options bar of the
UV Editor.
) located on the
View options bar of the
UV Editor.
The selected UV shells update to a semitransparent shaded display. Areas where the UVs or UV shells overlap are visually apparent by the increased opacity of the shading in the overlapping regions.
Tip: You can correct overlapping UVs and UV shells using the
Unfold and the
Layout features. For more information see
Layout UV shells.
You can also view the borders for a UV shell by selecting or .
For more information see UV Editor View menu.