
Complete the character map
In the following procedure, you define the structure of your character model for MotionBuilder by mapping the required nodes in the Mapping list. Character mapping describes the character model for MotionBuilder, indicating what are the legs, arms, and so on.
Although you can load a skeleton definition template from the Character Controls window to map and characterize a character, or by dragging the Character asset onto a character model, this tutorial shows you how to manually map Mia’s structure.
To complete the character map:
This procedure assumes you have just completed the previous procedure.
See Prepare the scene.
In the Asset browser pane, click the Characters folder to view its contents in the Asset browser display pane.
In the Asset browser display pane, drag the Character asset into an empty area of the scene.
A Character asset is added in the Navigator window Scene browser. The Definition settings for this Character asset are displayed in the Navigator window Definition Settings pane.
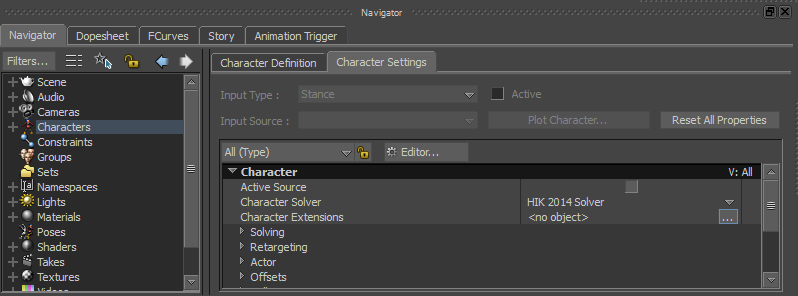
Navigator window displaying the Character asset and its Character Settings
In the Navigator window, switch to the Character Definition pane and expand the Base (required) group of nodes in the Mapping list (A).
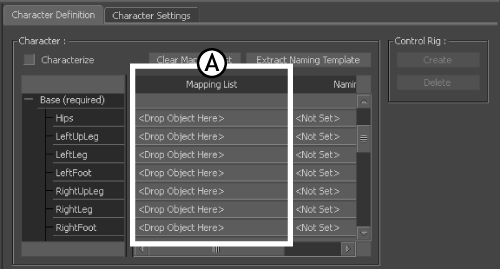
Character Definition pane: A. Base nodes
This group of nodes is required for MotionBuilder to recognize the structure of your character model. If you had automatically characterized this character, the Mapping list would be populated with the character’s bone names.
In the Viewer window, switch to the Schematic view (Ctrl-W) and press A to frame the hierarchy.

Schematic view of Mia’s structure
The Schematic view makes it easier to select bones from the model’s hierarchy because each bone is represented as a rectangular node.
In the Navigator window Scene browser, activate the Lock option (
 ) to lock the view of the Character Definition pane.
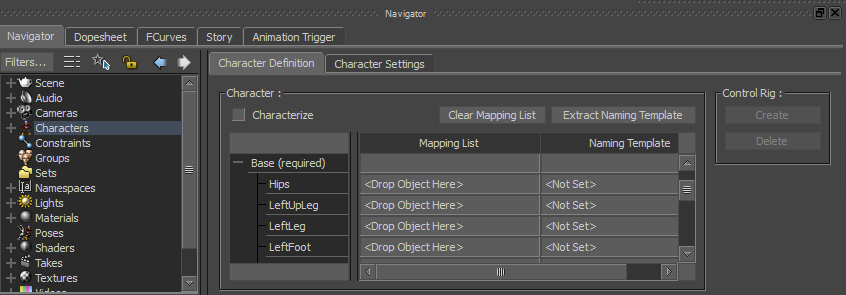
In the Schematic view, zoom in (
 or Ctrl-drag) and pan (
  or Shift-drag).
These navigation buttons are at the to centre of the Viewer window.

In the Schematic view, press the keyboard shortcut Shift-N.
The Find Model By Name dialog appears.

Enter Mia:LeftUpLeg and click OK.
In the Schematic view, locate the Mia:LeftUpLeg node, and select the node.
Tip:You can use the keyboard shortcut Ctrl-drag to zoom in and the keyboard shortcut Shift-drag to travel (or pan) in the Viewer window.

Mia:LeftUpLeg node selected
Alt-drag the Mia:LeftUpLeg node into the Base (required) LeftUpLeg Mapping List slot.
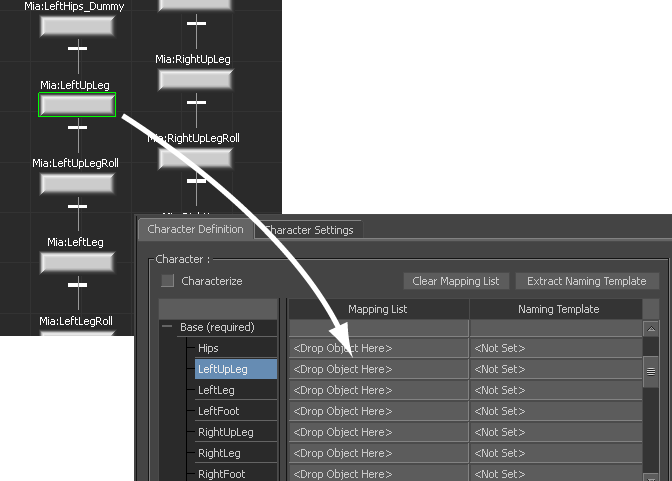
Mia’s LeftUpLeg node mapped to MotionBuilder LeftUpLeg
When you characterize this character, MotionBuilder recognizes that for this skeleton the LeftUpLeg node is called Mia:LeftUpLeg.
Use the following checklist and figure as guides to map the rest of Mia’s bones to the Base (required) nodes in the Mapping list.
Note:Although Mia has many bones, you are only required to map the Base group of 15 for MotionBuilder characterization.
Bone Slot Mapped Mia:Hips Hips Mia:LeftUpLeg LeftUpLeg x Mia:LeftLeg LeftLeg Mia:LeftFoot LeftFoot Mia:RightUpLeg RightUpLeg Mia:RightLeg RightLeg Mia:RightFoot RightFoot Mia:Spine Spine Mia:LeftArm LeftArm Mia:LeftForeArm LeftForeArm Mia:LeftHand LeftHand Mia:RightArm RightArm Mia:RightForeArm RightForeArm Mia:RightHand RightHand Mia:Head Head
After completing the character mapping process for the Base group, the Mapping list resembles the Mapping List shown in the following figure.

Mia’s base bones mapped to the Base nodes in the Mapping list
The Character mapping is now complete.
In the Character Controls Definition pane, the green symbol ( ) indicates the mapping is valid.
