
Add Links
Your can add links that point to various data sources, such as spreadsheets, webpages, scripts, graphics, audio and video files and so on. An object can have multiple links attached to it, although, only one link, called default, is shown in the Scene View. The default link is the link that you add first, but you can mark a different link as default, if necessary.
Add a Link to an Object
In the Scene View, select the desired geometry item.
Click Item Tools tab > Links panel > Add Link
 .
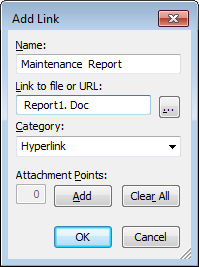
.In the Add Link dialog box, enter the name for the link in the Name box.
In the Link to File or URL box, type in the full path to the required data source or the URL address. You can also browse
 to the folder containing the desired external file.
Choose the category for your link from the Category drop-down list. by default, your link has hyperlink category.
 Tip: To create a custom category type, type its name directly into the Category box. when you save your link, the corresponding user-defined category is automatically created.
By default, your link is attached to the default center of the item’s bounding box. If you want to attach your link to a specific point on the selected item, click the Add button. A cross-hair cursor appears in the Scene View, allowing you to select a point on the item where the link will be attached to.
Note: If you made a mistake, clicking the Clear All button deletes all attachment points associated with this link and reverts to the link being attached to the center of the item's bounding box.Click OK.
Add Several Links to the Same Object
- In the Scene View, select the desired geometry item.
- Right-click and click Links > Add Link.
- Use the Add Link dialog box to add the first link. This is the default link, and it’s the only link that will be visible in the Scene View. You can choose a different default link later, if necessary.
- Right-click the object again, and repeat the previous steps to add all required links.