
Manage a RMA's lifecycle
For users with Fusion connected sites, references to the 'Items' workspace should be the 'Components' workspace.
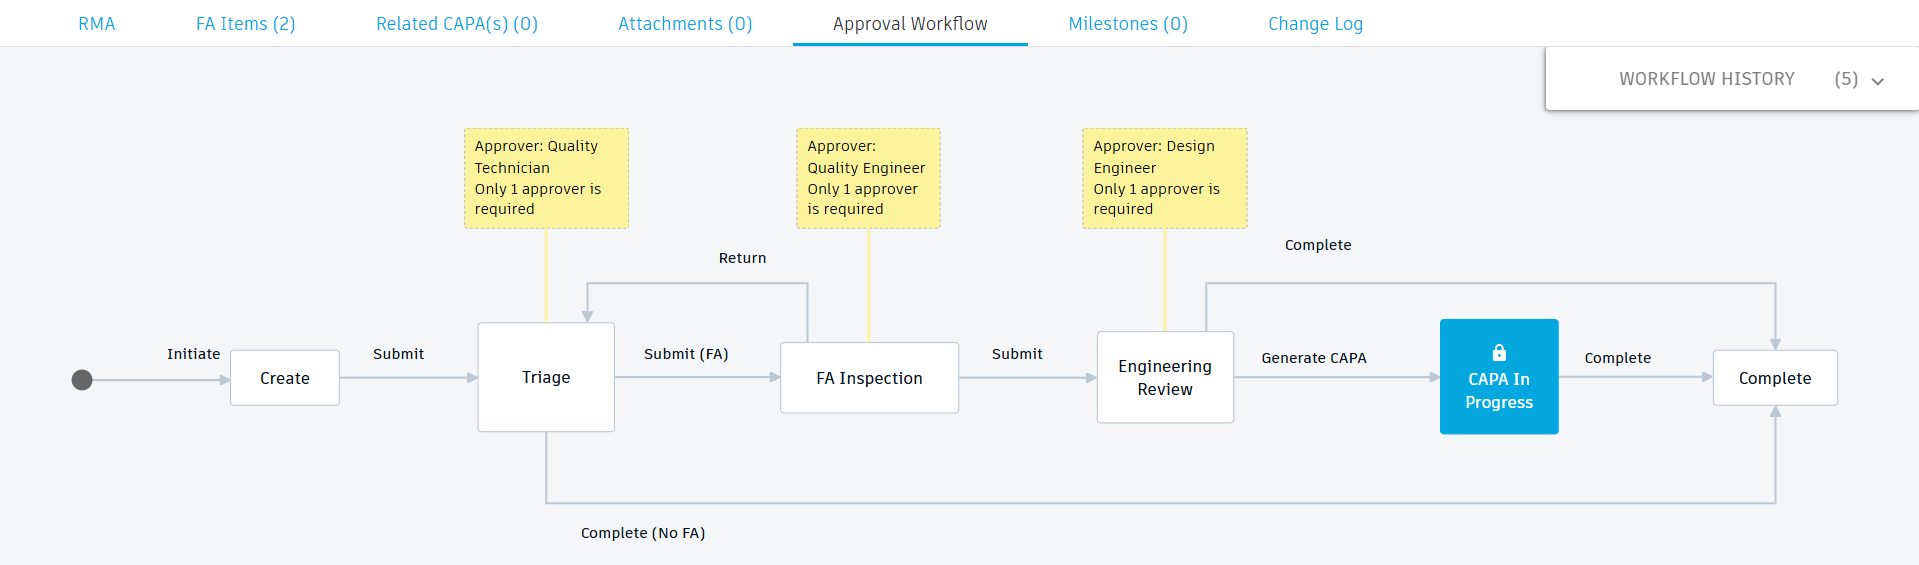
This template comes with the following default workflow. This is found in the Approval Workflow tab on the RMA. Here is where you and your team progress the workflow through its various states. There are added notes (in yellow) to indicate which person can progress each stage. These team members are added in the RMA tab in the Team section.
Start the workflow
Upon creation of the RMA, the RMA is in the Created state. This means it has been created but may only have a name.
You may add the specific items that have failed in the FA Items tab at this time.
To add an item:
- In the FA Items tab, click Add.
- In the Part Number column, click the field to view a drop-down list of all items from the Items workspace.
- Select an item or begin typing the item name or number to narrow down the list, and then select the item.
- Repeat for any additional items to include here.
- Click Save.
You may also add a related CAPA that may have generated the need for the RMA.
To add a related CAPA:
In the Related CAPA(s) tab, click Add.
There are two options:
- Search the list of existing CAPAs and select the one to add to this RMA.
- Click Create New Item to create a new CAPA in the Quick Create dialog.
In the Direction Type column, click the drop-down list to specify whether the relation between the RMA and CAPA is uni-directional (the CAPA resulted in the RMA) or bi-directional (the result of one impacts the result of the other and vice versa).
Click Save.
Now, before the RMA can be moved to the Triage state, you must specify the Quality Technician who will review the RMA and decide what to do next. You do this in the RMA tab in the Team section:
- Click Edit.
- In the Team section, beside Quality Technician, click in the Approvers column.
- Select one or more people to add them as Quality Technicians.
- Click Save.
Once the Quality Technician has been defined, in the Approval Workflow tab, click the Submit transition. The RMA is now at the Triage state.
Triage the RMA
The Quality Technician now reviews the RMA to decide whether to proceed with the RMA or close it.
Before proceeding, you must specify who the Quality Engineer is. You do this in the RMA tab in the Team section.
There are two options:
- Click the Submit (FA) transition to move the workflow to the FA Inspection state.
- Click the Complete (No FA) transition if not further work is required.
The person who progressed the workflow is recorded in the Teams section in the Approved By column.
Inspect identified items
The Quality Engineer now reviews the product and items included in the RMA to determine the overall issue. They fill in the information in the Failure Analysis section:
- Overall FA Code – Click to select from a list of six options.
- FA Notes – Enter any additional information on related to the analysis of the identified items. You may refer to additional documents added to the Attachments tab.
Before proceeding, you must specify who the Design Engineer is. You do this in the RMA tab in the Team section.
Now, the Quality Engineer may click the Submit transition to move the RMA to the Engineering Review state.
The person who progressed the workflow is recorded in the Teams section in the Approved By column.
Engineering Review
The Design Engineer must now review the identified items and failure analysis to determine whether the items have no issues, or if there are issues that they can be reworked or must be scrapped. They fill in the information in the Closeout section.
- Disposition – Click to select from No issue found, Return to inventory, Rework, or Scrap.
- Disposition Notes – Enter any additional information about the decision made.
There are two options:
- Click the Complete transition to close the RMA. This would happen if no CAPA is required if the items have no issues or must be scrapped.
- Click the Generate CAPA transition to automatically generate a CAPA in the Corrective / Preventative Actions workspace. This means that the RMA workflow only completes once the CAPA’s workflow has been completed. A link to the CAPA is added to the RMA > References section and also appears in the Related CAPA(s) tab. A link back to this RMA is added to the CAPA.
The person who progressed the workflow is recorded in the Teams section in the Approved By column.
Once everything is complete, the workflow moves to the Complete state and is finished.