
You can import a file of points into PowerInspect as a Point-Cloud item. This enables you to measure a part using a different system, such as a CMM scanner or a photogrammetry system, and then import the results from an ASCII file.
The Digitised Curve option is only available when creating inspections for CNC and Manual machines.
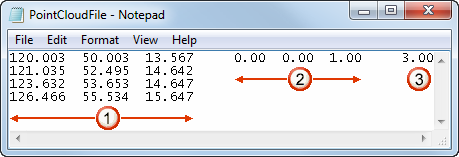
The data for each point must be on a separate line and each field must be separated by one or more spaces. In addition, the file must specify:
- the XYZ coordinates
 of each point.
 - the IJK coordinates
 of each point. To use the same vector for all the points, specify the IJK values for the first point only.
 - the probe diameter
 . If no value is specified, the diameter defaults to 0.
To create a Point Cloud item using points from a file:
- Open the group in which you want to create the Point Cloud item.
- Click Home tab > Create panel > Point-Cloud > Point-Cloud From File. The Import Points Wizard is displayed.
- Click Browse.
- Select the file containing the points you want to import, and click Open. A description of the format is displayed in the Possible Formats tab.
If the file contents are not recognized, select the All Formats tab, and select the format from the list.
- To check the point data, click Preview to display it in the Preview window. When you have finished, click OK to close the window.
- Click Next. The wizard displays the format options for the file.
- Click Next. The wizard processes the points and displays an analysis of the point cloud.
For large numbers of points, this may take some time. To halt the process, click the Stop button, then click Yes.
- Click Finish to create the Point Cloud item.
To view the details of a Point Cloud item, select its entry in the inspection sequence, and then select the Point Cloud tab. You can also use this tab to project the point cloud onto the CAD model so you can check the measurement accuracy.