
Use the Side curvature tab to specify the parameters to be used when creating the side of the heel (shown in yellow on the diagram).
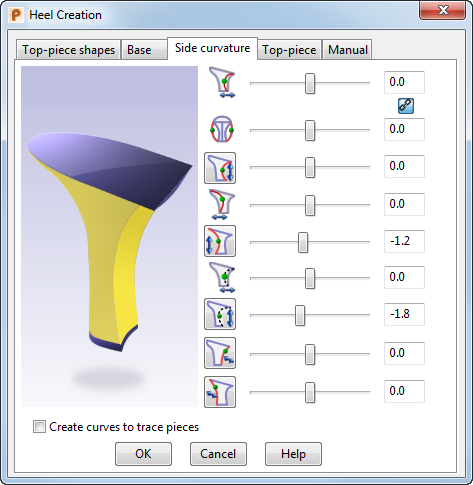
Use the sliders and buttons to adjust the heel parameters:
 Sides X — Drag the slider to set the positions of the curve points in the X direction for the side curves. The positions of the curve points affect the shape of the curves.
Note: This slider is linked with the Front Curve slider in one direction. If you drag the X Curve slider, the Front Curve slider moves. However if you drag the Front Curve slider, the X Curve slider does not move.
Sides X — Drag the slider to set the positions of the curve points in the X direction for the side curves. The positions of the curve points affect the shape of the curves.
Note: This slider is linked with the Front Curve slider in one direction. If you drag the X Curve slider, the Front Curve slider moves. However if you drag the Front Curve slider, the X Curve slider does not move.
 Link/Unlink — Toggle this button to display the
Link
icon to link the
Sides X and
Sides Y sliders, so that they move in sync. Display the
Unlink
icon to break the link.
Link/Unlink — Toggle this button to display the
Link
icon to link the
Sides X and
Sides Y sliders, so that they move in sync. Display the
Unlink
icon to break the link.
 Sides Y — Drag the slider to set the positions of the curve points in the Y direction for the side curves of heel. The points move in opposite directions along the Y axis. The positions of the curve points affect the shape of the curves.
Note: If the Link
Sides Y — Drag the slider to set the positions of the curve points in the Y direction for the side curves of heel. The points move in opposite directions along the Y axis. The positions of the curve points affect the shape of the curves.
Note: If the Link toggle is selected, this slider synchronizes with the Side X slider.
 Sides Z — Drag the slider to set the positions of the curve points in the Z direction for the side curves. The positions of the curve points affect the shape of the curves.
Note: This slider is linked with the Straight Front curve point slider in one direction. If you move the Straight Side slider, the Straight Front slider moves. However if you move the Straight Front slider, the Straight Side slider does not move.
Sides Z — Drag the slider to set the positions of the curve points in the Z direction for the side curves. The positions of the curve points affect the shape of the curves.
Note: This slider is linked with the Straight Front curve point slider in one direction. If you move the Straight Side slider, the Straight Front slider moves. However if you move the Straight Front slider, the Straight Side slider does not move.Select the button to straighten the side curves from the curve point downwards. The button changes to
 when selected.
 Back X — Drag the slider to set the position of the curve point in the X direction for the back curve. The position of the curve point affects the shape of the curve.
 Back Z — Drag the slider to set the position of the curve point in the Z direction for the back curve. The position of the curve point affects the shape of the curve.
Select the button to straighten the back of the heel from the curve point downwards. The button changes to
 when selected.
 Front X — Drag the slider to set the position of the curve point in the X direction for the front curve. The position of the curve point affects the shape of the curve.
 Front Z — Drag the slider to set the position of the curve point in the Z direction for the front curve. The position of the curve point affects the shape of the curve.
Select the button to straighten the front of the heel from the curve point downwards. The button changes to
 when selected.
 Front Blend — Drag the slider to change the tangency of the top point of the side and front curves to achieve a smooth blend with the reference surface.
Select this button to change the top point on the front curve, so that the front curve blends smoothly with the reference surface. The button changes to
 when selected.
 Back Blend — Drag the slider to change the tangency at the top point on the back curve to achieve a smooth blend with the reference surface.
Select this button to change the top point of the back curve, so that the back curve blends smoothly with the reference surface. The button changes to
 when selected.
- Create curves to trace pieces — Select this option to create curves along the edges of the heel. Use these curves to create pieces on the heel; such as a heel cover or a Louis heel effect at the heel front.