
CFD Script Editors
There are two ways to create and run scripts with the Autodesk® CFD API:
- The CFD Script Editor within the Autodesk® CFD user interface
- The External CFD Script Editor
Internal Script Editor
The internal script editor is well suited for working with completed simulations. Example applications include the following:
- Extraction of custom result quantities
- Automation of repetitive functions
- Extraction of results data in ways not available in the user interface
To open the Script Editor, click Setup (tab) > Design Study Tools (panel expanding menu) > Script Editor. In many cases, a script is run within the same session as a completed scenario. This allows results manipulation directly within the design study environment.
Script Editor User Interface
File
- Click New to create a new script.
- Click Open to open an existing script.
- Click Save to save the current script to a folder.
Edit
- To revert to an earlier state, click Undo. To return to the last state prior to clicking Undo, click Redo.
- To remove highlighted text, click Cut. To insert cut text elsewhere, position the mouse at the desired location, and click Paste.
- To skip to a specific line, click Go To. Enter the desired line number when prompted.
Tools > Triggers
You can use triggers to automatically launch a script when a specific event occurs.
Examples of using trigger events:
- Use a trigger to detect when the simulation finishes so that a script can automatically extract results or save a specific data item. This automates data extraction, and eliminates manual intervention.
- Use a trigger to detect when the geometry model is loaded to execute a script that automates the setup and execution of the simulation. This is useful if you are automatically varying geometric parameters from a CAD tool.
Pre-defined trigger events:
- Solver Finished: When the simulation (numerical solve) has completed.
- New Design: When a design is created.
- Update Design: When a design has been modified with an updated version of the geometrymodel.
There are two levels of triggers:
- Default triggers are invoked for all models. They are saved in
\AppData\Local\Autodesk\CFD YEAR\Triggers - Design Study triggers are invoked only for the model in which there were created. Design Study triggers are saved with the design study. Note that you must have a design study open to create or edit a Design study trigger.
To create a trigger:
- Click Tools > Triggers...
- Right click on the desired trigger event (from either the Default or Design Study groups), and select Add Trigger.
- A minimum script is automatically created. Modify this script to include your specific actions and commands.
To change the name of a trigger or script, double click over the name and enter the new name.
Tool bar Commands
- Select the Python scripting language.
- Click the Run button to execute the script.
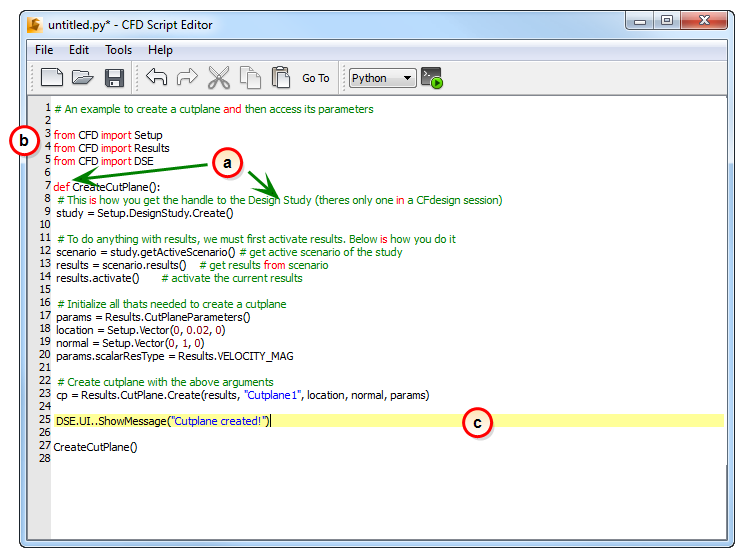
Text Region
The text region is contains several features that make text development easier:
a. Color-coding for several elements including variable declarations, comments, strings, and vectors
b. Line numbers
c. Current line highlighting
External Script Editor
Use the external script editor to execute a Script from outside Autodesk® CFD.
To open the external editor, navigate to your CFD installation folder, and doubleclick on CFDScriptEditor.exe.
The primary use of the external editor is to run existing scripts.
- To open a script, click Browse.
- To view or modify a script, click Edit. The script opens in a separate text editor.
- To run the script, click Run.
- To select a different text editor, click Options..., and input the name of the editor executable.
Related Topics