Move (in space, or relative to the geometry), scale, or rotate multiple CVs at once, with the amount of transformation relative to the CVs distance from the primary CV you click.
Use the Proportional Mod tool from the Control Panel
- Double-click Control Panel > Transform CV
 .
. - In the control window, choose Prop mod from the Transform menu.
- Choose a mode from the Mode menu.
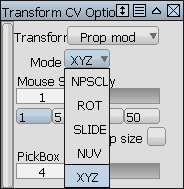
See Mode for a description of the different modes.
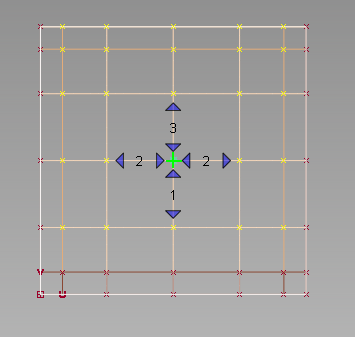
- Select the primary CV. All other CVs will move with respect to this CV. Note: If the CVs are not visible, click on the object and they will be displayed automatically.
A green jack locator apears on the CV, and eight blue arrows appear around it.
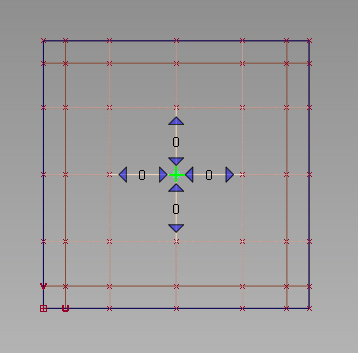
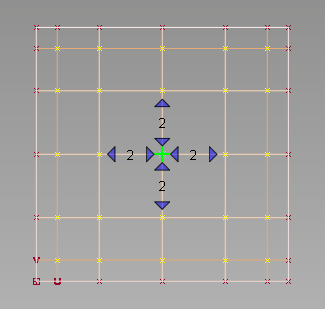
- Select the range of CVs that you want to transform, by doing one of the following:
- Click on the blue arrows to select/deselect rows of CVs.
- Hold down the
 key, and click on a CV (or box-select) to select/deselect additional rows. (See Specify the selection range below for more details.)
A numeric label shows how many rows of CVs have been selected in each direction. Selecting and deselecting CVs always maintains a "rectangular" selection.
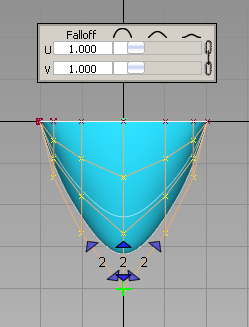
- In the Falloff window, adjust the falloff values in the U and V direction. By default the sliders are synchronized. To decouple them, click the chain link icon. (See Adjust the falloff values below for more details.)

- Drag to transform the CVs. The mouse buttons operate in the same way as for the Move transformation.
Set Transform to Pivot if you need to move the pivot before rotating or scaling CVs. The options from Transform > Local > Set Pivot are used to determine which pivot(s) to move (Rotation, Scaling, or both).
- Modify the falloff values, mode, range of CVs, or even the primary CV itself. The other parameters are maintained. You can even change the Transform option and come back to Prop Mod without losing your settings. Note: All with all other Transform CV applications, Mouse Sensitivity and Step Size can be used with this Prop Mod tool.
Specify the selection range
You must first select the primary CV by clicking on it. The primary CV defines the point from which falloff is calculated and applied to the range of CVs. It is indicated by a green jack locator.

If only one CV is selected when the Prop Mod tool is invoked, it becomes the primary CV.
If the CVs are not visible on the object, clicking it first will turn on the hull and CVs.
Small blue arrows appear around the primary CV, allowing you to select/deselect additional rows of CVs to define the range that will be affected by Prop Mod.
- Click an outward pointing arrow to add CVs to the range in the given direction.
- Click an inward pointing arrow to remove CVs from the range in the given direction.
If you keep the mouse button depressed, rows of CVs are continuously added/removed to/from the selection. if you click and release, rows are added/removed one at a time.
A numeric label shows how many rows of CVs have been selected for each direction.
Selecting and de-selecting CVs always maintains a “rectangular” selection.
Instead of using the blue arrows, you can also select the range of CVs by holding down the ![]() key, and:
key, and:
- Box selecting the entire range.
- Selecting the CVs at the extent of the range. The intermediate CVs are added to the range.
- Selecting already selected CVs to de-select them along with all CVs on the same hull lines and those further away.
Adjust the falloff values
As with the Transform > Modify > Proportional tool, we use a range-based modification. That is, the greater the number of CVs between the primary CV and the boundary of the defined region, the less effect the transformation has on each CV.
The falloff window appears as soon as the Prop Mod tool is selected.

By default the U and V falloff sliders move in sync. To decouple them, click the chain link icon on the right hand side of the window. A value of 0.0 means that all CVs move by the same amount. A value of 1.0 (default) corresponds to a linear falloff. The higher the falloff value, the less effect the movement of the primary CV has on the surrounding CVs.
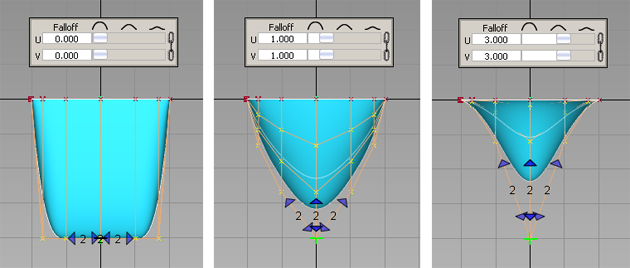
Changing the falloff values automatically causes the last Prop Mod transformation to update to the new falloff values.
The slider settings are maintained between applications of the tool.
Apply Prop Mod across multiple surfaces
Under certain conditions, it is possible to select CVs on surfaces adjacent to the surface containing the primary CV and apply the modification across several surfaces:
- The surfaces must share an edge along its full length.
- Adjacent CVs must match (within G0 continuity tolerance).
Examples
In Figure A below, you can only select CVs across adjacent surfaces in a single direction.
In Figure B, the surfaces form a rectangular grid, allowing you to expand the selection to adjacent surfaces in both directions.
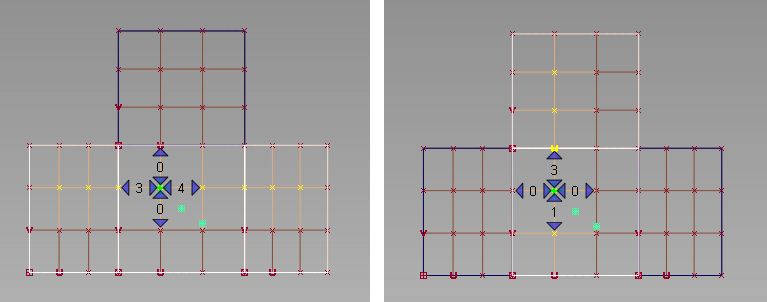
Figure A: Four adjacent surfaces.
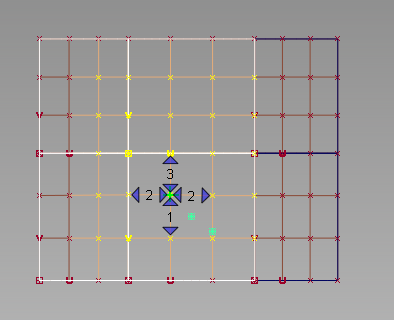
Figure B: Six adjacent surfaces forming a rectangular grid.
Alternate method: Use the Proportional Mod tool from the Palette (deprecated)
Show CVs on the picked objects
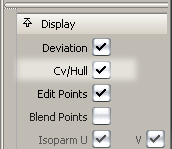
Click the Cv/Hull checkbox in the Display section of the Modeling control panel
or do the following:
- Choose ObjectDisplay > Control

 .
. - Set Scope to Active and turn on the CVs checkbox.
- Click Go.
Transform CVs proportionally in relation to a primary CV
- Choose Transform > Modify > Proportional Mod
 .
. - Click the CV to use as the primary CV.
- Use the option box to set the following:
- The Operation to perform on the CVs.
- The number of CVs before (Preceding U and V) and after (Preceding U and V) the primary CV that will follow along.
- The Move Mode: choose XYZ to move the CVs in world space, or NUV to move the CVs relative to the surface (in the normal, U, and V).
- Use the mouse or keyboard to move, scale, rotate, or smooth the primary CV.
The affected CVs (the number of CVs before and after the primary CV as specified in the option box) follow along, with the amount of transformation relative to their distance from the primary CV.